![]()
Canvasser is a building tool that allows you to create simple animations and interactives that can be displayed on the web (in both desktop or mobile view). An interactive is essentially content that changes depending on the input of a user, meaning it can be used to make online games, quizzes, adding popup annotations to a diagram or map, creating simple animations, and more.
In this training, you’ll learn about the process of creating a Canvasser interactive from start to finish by looking at examples created by past STAs. Then you’ll create your own interactive game, which you can model on an existing interactive or design from scratch. Your game should be educational and relate to the theme you chose for your CLIO module, where it will eventually be uploaded. Once your game is added to your module, other STAs will be able to play it.
Past Canvasser Projects
In past years, design STAs have used Canvasser to recreate interactive content that uses Flash Player, which is no longer supported by many browsers. STAs have made hundreds of Canvasser interactives for different educational services and online courses, including Texas Beyond History, Virtual Laboratories for Biological Anthropology, taught by Professor John Kappelman, and a digital history of the United States, created by Professor Steven Mintz.
The following interactives were all created by STAs in Canvasser. Take a few minutes to look through them before you start working on your game design. You can preview each live interactive and see how it was built by loading it in Canvasser. Follow these steps:
-
- Log in to the Canvasser editor with your UT EID and password
- Click on File > Load File
- Search for the project folder and file name of the interactive


Basic Features of an Interactive
Interactives are built using a series of images—typically PNGs created in Photoshop—that have transparent backgrounds and are layered on top of each other. Once they are uploaded to Canvasser, these images become objects, which can then be animated or made interactive.
Here is a breakdown of some basic interactive elements that are possible in Canvasser:
Buttons
Any object—including text—can made clickable and turned into a button. Usually, clicking on a button will trigger a new popup to appear and at the same time make all other popups disappear (so that only one popup is visible at any given time).
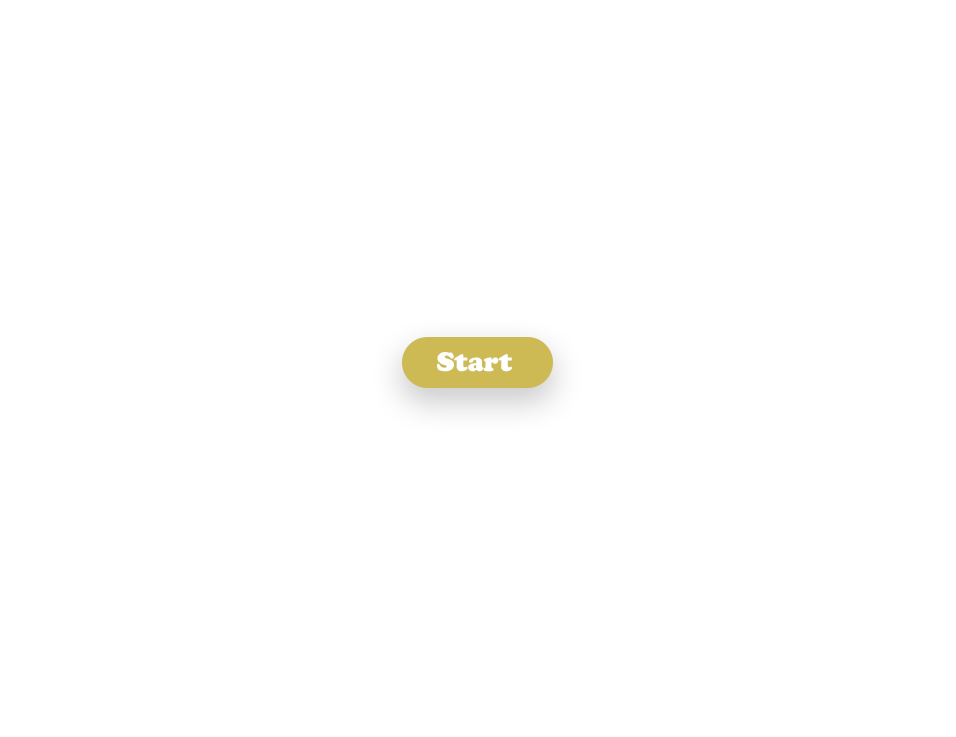
Buttons can also be used in combination with a begin screen or filter at the start of an interactive as a gateway into the game.
- Tip: Transparent areas can’t be clicked in Canvasser, so buttons will be much easier to click if they’re fully opaque.
Toggle Elements
Toggle elements are very similar to buttons, but different in some key ways. Like buttons, toggle elements trigger a popup to appear. But unlike buttons, they can be clicked repeatedly to make a popup appear and disappear, and multiple toggle elements can be on (i.e. visible) at the same time.
Toggle elements will have 3 parts: a popup, an off button, and an on button.
Click-and-Drag Objects
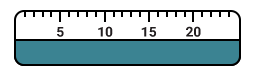
These are objects that can be dragged with your cursor. They can be incorporated into games by having a user drag a tool (like a ruler) across the screen or into games where a player has to correctly match two elements.
- Tip: Drag objects require some special settings to run more smoothly. Before you export drag objects, make sure they’re cropped to fit the image content so they can slide more easily across the screen.
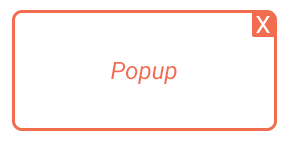
Popups
Popups are objects that appear after clicking on a button. They usually include text, and almost always include a close button. If you do decide to include a close button, make sure to export it separately from the popup itself so that it can be made into a button later on.

Conditional Popups
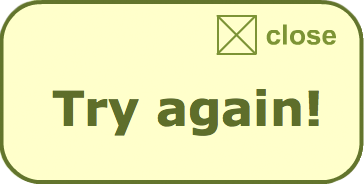
Conditional popups are not triggered by a button; instead, they only appear if certain criteria are met (e.g. the position of an object is guessed correctly or the correct answer is entered into a text box).
Conditional popups can be used with click-and-drag objects to create matching games, where placing an object in the correct location triggers a “correct” popup, and placing an object incorrectly triggers an “incorrect” or “try again” popup. They can also be used with text entry to check if the answer a user entered is correct.
Text Entry Boxes
Text entry boxes can be used to prompt someone to enter their own response to a question. For text entry to work, you’ll need to create an empty box and upload it to Canvasser so the user will know where to begin typing their response.
Next to each text entry box you’ll probably want to include a submit button which will trigger a popup with the correct answer. Depending on how many answers are possible for a given question, you may want to use different kinds of answer popups.
Tip: If a question has multiple possible answers, you can create one answer popup. It’ll function like a regular popup and appear no matter what a user enters as their response. Or, if a question has only one possible answer, you can use conditional popups that will appear depending on whether the input is correct or incorrect.

Step One: Propose a Game Idea

Now that you’ve reviewed some Canvasser interactives, you can start planning the type game you want to create. Your game will eventually be uploaded to your CLIO module as part of an activity, so make sure it fits within the theme of your page and is educational.
Here are some ideas to consider:
- Option #1: Create a game where you have to match pairs of elements (2 objects per match)
- See an example.
- Things to think about: what kinds of objects do you want the user to match together–flashcards? dots on a map? Each matching pair will consist of a drag object and a drag location (the correct location where the drag object should be placed). The drag location can either be a visible object or a hidden object.

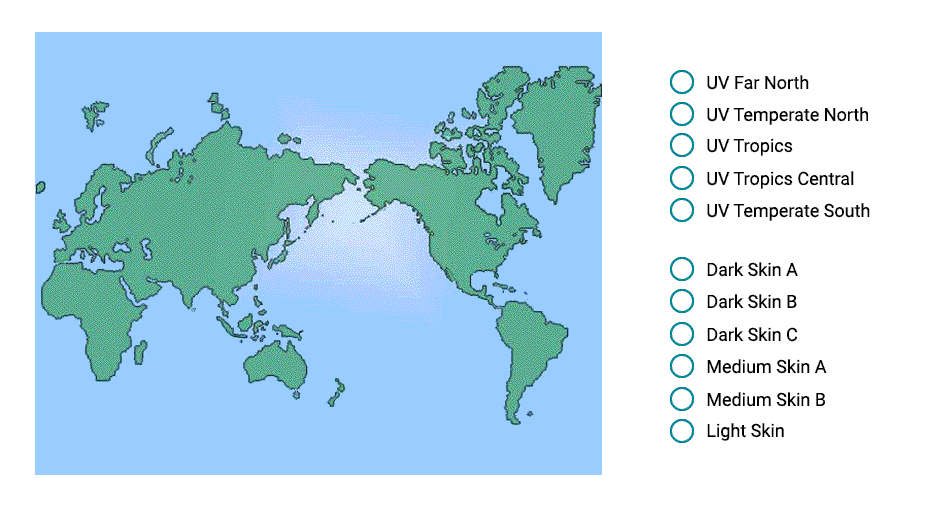
- Option #2: Find a map or chart and create text popups that appear on top.
- See an example.
- Things to think about: do you want the popups to appear one at a time (by using buttons) or do you want multiple popups to be visible simultaneously (by using toggle elements)?
- Option #3: Create a multiple choice quiz using check boxes that can toggle on and off.
- Option #4: Create a fill in the blank quiz using text entry boxes and a submit button.
- See an example.
- Things to think about: How many possible answers does each of your questions have? Do you want the answer to appear as a regular popup or a conditional popup?
- Option #5: Or pick an completely new concept by mixing and matching the elements above.
While the aesthetic and type of game you create is up to you, it must include the following elements:
- a begin button and begin screen (which will both become hidden once the game starts)
- a stationary background
- at least one button (besides the begin button)
- at least one popup
- at least one click-and-drag object
- one additional interactive feature from the list above (either a text entry box, toggle element, or conditional popup)
Post your idea to Basecamp and tag your STA mentor! They will let you know if it seems feasible, give you feedback on your design, and answer any questions you might have about implementing it. When you get approval on your game concept, move on to the next step.
Step Two: Build the Assets
Now you can start building the assets for your game. Open a new document in Photoshop and choose a width of 956 pixels (the height is up to you).
Set Up Your Layers Panel
Create the following 4 groups in your layers panel:
- Begin filter (*this will include your begin screen and begin button)
- Popups
- Clickable Elements (*includes buttons, toggle elements, and drag objects)
- Stationary
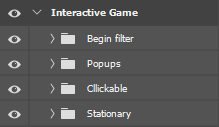
This organization will make it easier to export assets for your interactive and, if necessary, go back and make edits to the PSD later.
Start Making the Assets
To see some examples of recent interactive assets made by other STAs, click here and select any of the lab folders.
You can start creating the elements of your game in whatever order you want to. Here are some tips to keep in mind:
- Every clickable element and popup will need to be saved on its own layer, so keep them unmerged*
- The begin screen can be a filter on top of your game
Ex: It can be a solid black layer set to 50% opacity, which will make your game look grayed out until you start playing it.
- Anything that remains static for the whole game can be grouped under “Stationary”
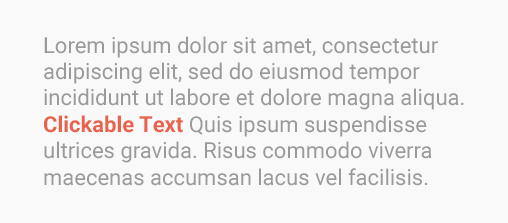
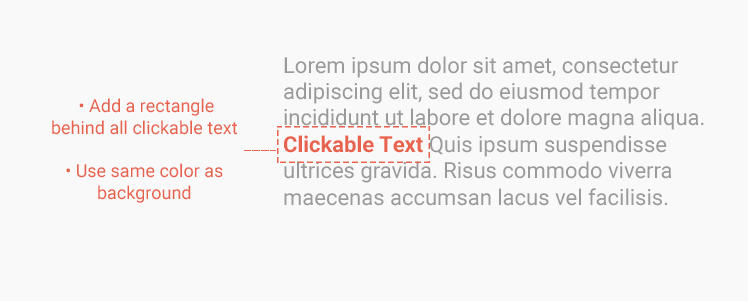
- If your game involves clickable text: Transparent areas are not clickable in Canvasser, which means that text saved on a transparent background will be virtually impossible to click. The best way to get around this problem is to add a rectangle directly behind your clickable text (word, phrase, etc.) that is the same color as the background so that spaces in between each letter are able to be clicked.
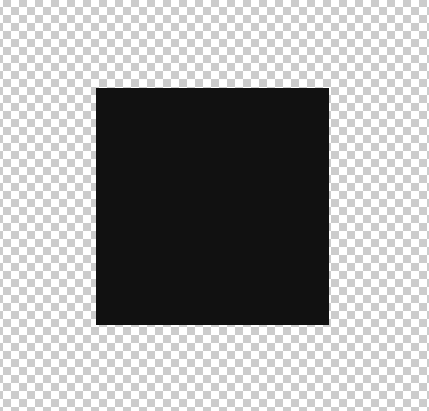
- If your game involves hidden drag locations: To create a hidden drag location, all you have to do move the location under the stationary layer. It’ll be invisible but “on” or active for the whole game. You can use any kind of shape–rectangles, freeform shapes–as a hidden location (fill color doesn’t matter).
Ex.
- If you’re creating toggle elements: Make sure you save the popups and the on and off buttons as separate images.
Ex:

Finally, save your PSD using the following format:
[Last Name First Name] Canvasser Game
Before you move on to the next step, upload your PSD to your UT Box folder and share the link with your STA mentor on Basecamp so they can review it.
Step Three: Export the Assets as PNGs
When your PSD is approved, you’ll need to export each element of your game individually as a PNG (this is the ideal format because PNGs support transparent backgrounds).
Most of your assets (e.g. buttons, popups) should be exported with the same dimensions as your game, which means the images will be surrounded by excess transparent space.
You don’t have to save your assets this way, but the point of doing this is to guarantee that they are perfectly centered in the game without having to manually enter the location of every object you upload. It should save you time overall.

The exception to this rule is if your game involves matching pairs of elements. Any objects that are supposed to be matched together (e.g. including both drag objects and drag locations) must be cropped to fit the size of the image content, otherwise Canvasser won’t be able to read the location of each object.
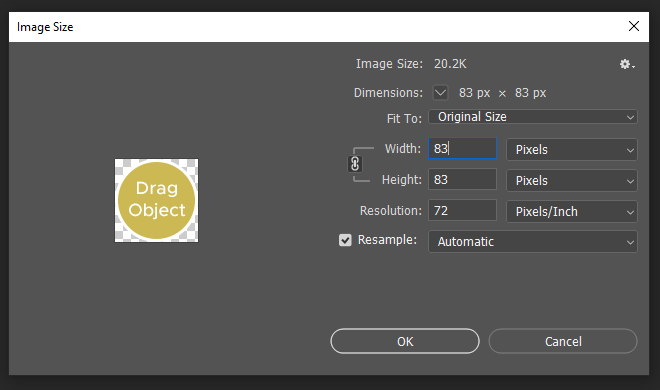

Tip: An easy way to export objects so they’re cropped to fit the pixel content and not the canvas is to right click on a layer or group (selecting just those pixels) and clicking “Quick Export as PNG.”

When you’re ready to start exporting your assets, name them using roughly the following format. Keeping your file names consistent by using some type of prefix for all your assets will make your files easier to find later when you upload them to Canvasser, since they’ll all be grouped together.
[last-name-first-name]-[type-of-element]
- Save the stationary background as a single PNG. Turn off the visibility of all layers except for the stationary group. Go to File > Export > Quick Export as PNG. Save it using the name [last-name-first-name]-stationary
- Repeat step 1 with the begin button and begin screen. Save them as separate images and use the names [last-name-first-name]-begin-button and [your-name]-begin screen
- Repeat step 1 with each clickable element. Name them [last-name-first-name]-click-1, [last-name-first-name]-click-2, etc.
- Repeat step 1 with each popup. Name them [last-name-first-name]-popup-1, [last-name-first-name]-popup-2, etc. Make sure it’s easy to remember which popup corresponds to which button.
When you’re done, upload your PNGs to the same UT Box folder.
Step Four: Assemble the Game in Canvasser
At the bottom of this page there’s an FAQ section that you can reference if you get stuck at any point in Canvasser. Click this button to jump there:
Upload Your Files
You should’ve been given permission to log in to Canvasser as an editor. Go to Canvasser and log in with your UT EID and password. After you log in you’ll see a blank workspace.
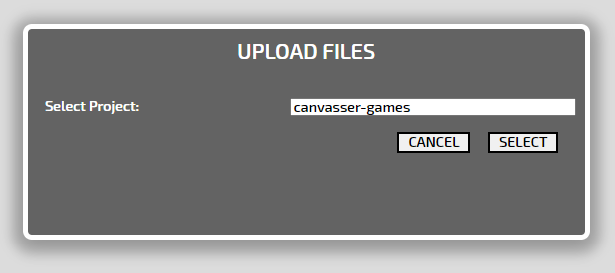
The first thing you should do is import your PNGs to Canvasser, which you should be able to upload all at one time. Click on File > Upload Files, and when prompted, select the folder “canvasser-games” (You may have to manually type it in if you don’t see it appear).
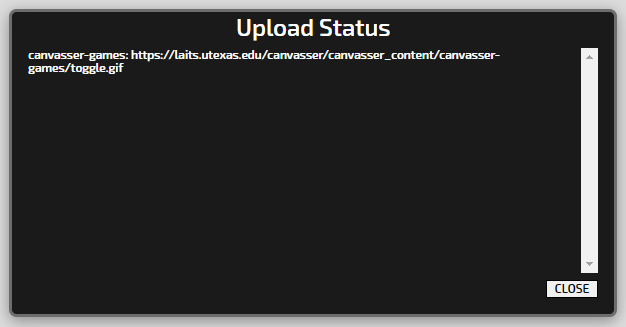
You’ll know your files have successfully uploaded when you see the file paths appear under “Upload Status.” This lets you know that your files are now stored in Canvasser.
Save Your New Project
Click on File > Save File in the top left of your screen. Under project, choose “canvasser-games” again. Then pick a name for your file and press save. It’s a good idea to save your project periodically in case Canvasser crashes or your screen times out (which usually after 30 minutes or so of inactivity).
Set Up Your Workspace
Now you can start setting up your workspace. Here are the main windows that you will need to have open. If you don’t see one of them, click on Windows in the top menu of Canvasser.
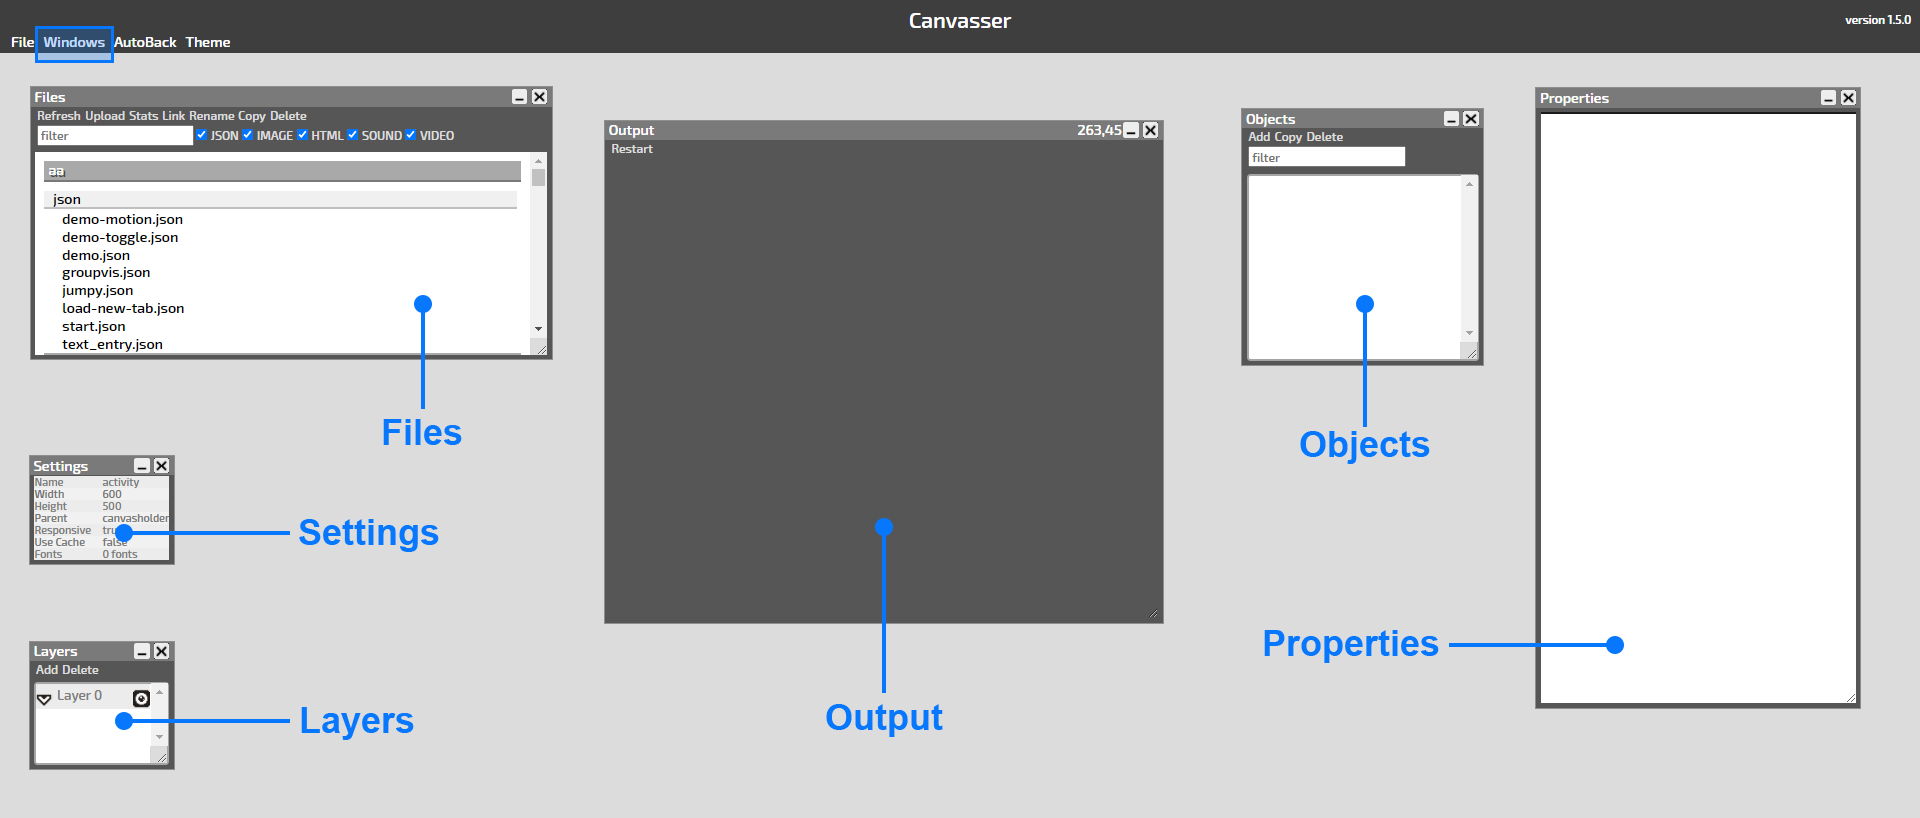
Output
The ouput window is a live preview of your interactive. It updates automatically.
- Tip: You can use the settings window to resize the output window to fit the dimensions of your game.
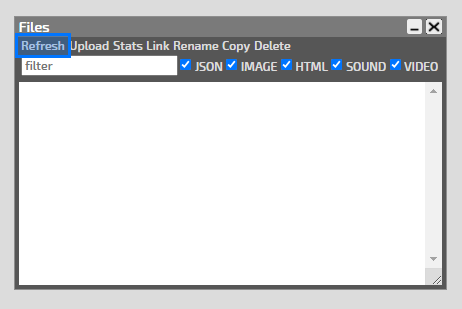
Files
Even though you’ve already uploaded your PNGs, they’re only stored in Canvasser. In order to start using them, you’ll need to link them to your interactive.
- First, open the files window and search for your project name (canvasser-games) by typing it into the search bar manually or selecting it.
- Scroll until you find the images you uploaded
- Left click and drag your cursor down to highlight them. They will turn neon green.
- Finally, press the link button at the top of the window.

Images
If you want, you can double check that your images have been linked successfully by opening the images window. Every file you link will show up here.
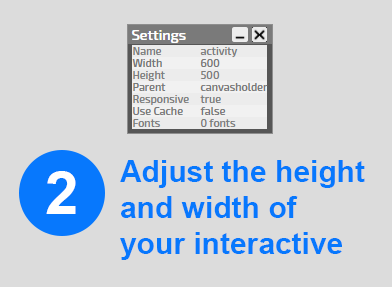
Settings
Next adjust the height and width of your interactive by selecting them in the settings window. Enter a new value for each in the properties panel (the height is in pixels and will be the same as the height of your Photoshop document). You should see your output window change to match the new values.
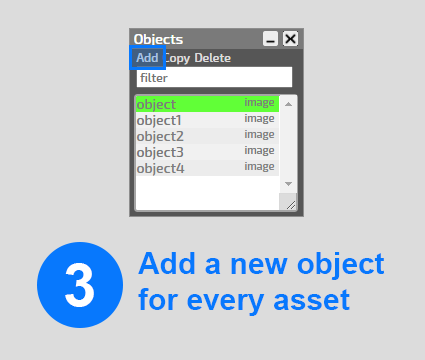
Objects
After linking your PNGs, you will need to add a new object for every asset you’ve uploaded. The new objects will be listed as object1, object2, etc. until you name them.
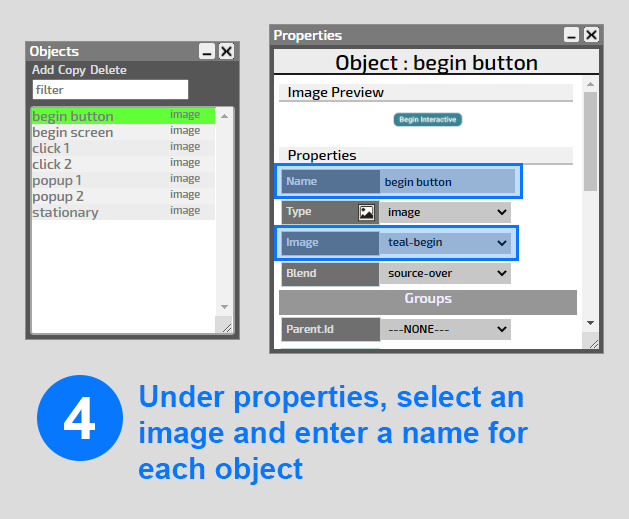
Properties
Next, select one of your objects to start modifying it. The properties panel is where you can choose which images you want to be displayed, name them, set their positions, and eventually make them interactive. Right now we’re just going to set up their basic properties, then in the next section we’ll get into more advanced interactive settings.
Naming an Object
- At the top of the panel you can enter a name for each object. Try to pick names that will help you differentiate your objects so you can find them again easily
- For type, make sure “image” is selected
- For image, use the dropdown to select one of the images you linked. Once you select an image you’ll see a tiny preview of it appear under Image Preview.
Change the Visibility of an Object
- To change the visibility of an object, check or uncheck the box that says Show. This willonly affect which objects are visible at the beginning of the game.
- As a general rule, all popups should be invisible at the start of the game (they’ll become visible later on), and all other objects should be left visible.
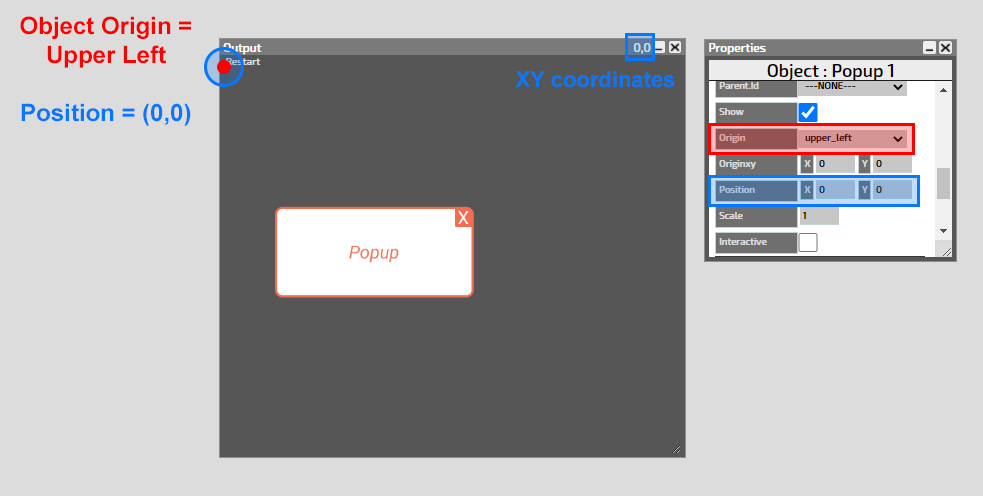
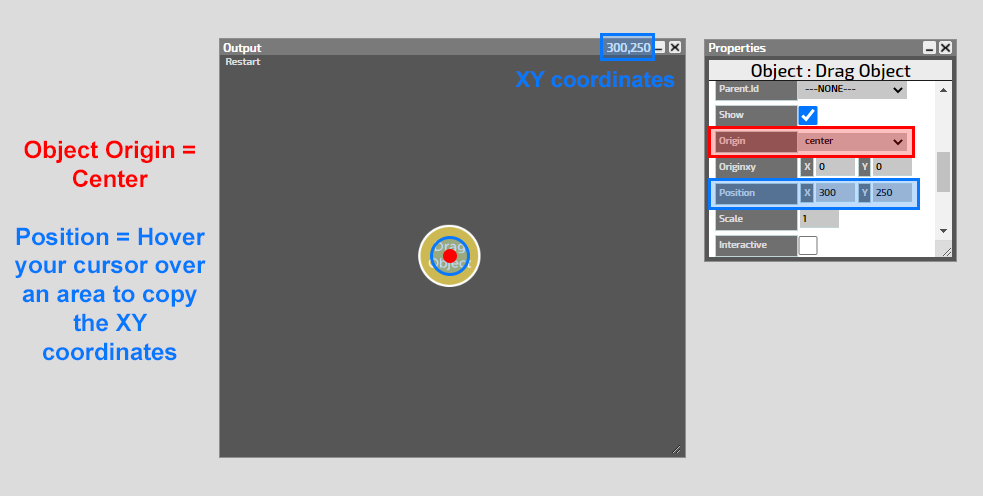
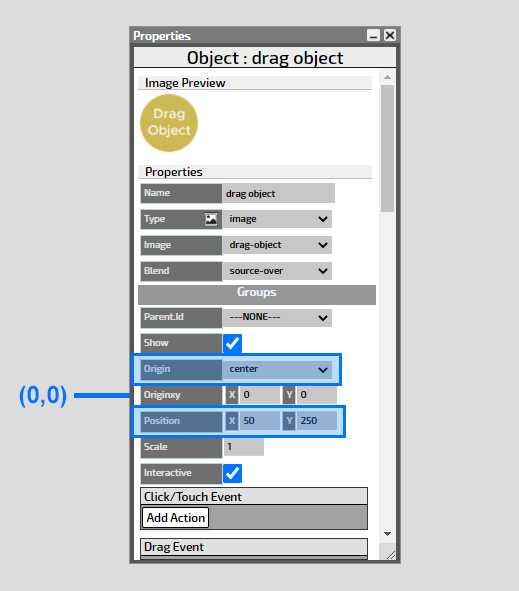
Setting an Object’s Position
- Next you can set the positions of all the objects. Since most of your objects will have the same dimensions as your game, the position is super easy to set. All you have to do is enter (0,0) as the position coordinates.

- When you set the position to (0,0), you’re lining up the upper-left corner of the object (aka the origin of the object) with the upper-left corner of the output window. If you hover your cursor over this corner, you’ll notice that the XY coordinates appear as (0,0).
- In some cases, your objects won’t have the same dimensions as your game. If have any drag objects or drag locations (objects marking the position where the drag objects should be dropped), you’ll need to set their positions manually.
- First you’ll need to change the object origin to center for all drag objects. Then hover your cursor over the area where you want the object to be positioned, copy the XY coordinates that appear, and enter them as the new position.
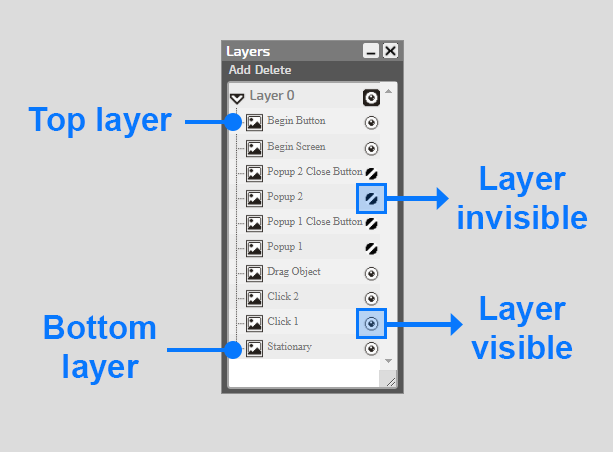
Layers
Open the layers window to check the arrangement of the objects. Generally, you’ll want your popups to be on top of your clickable elements, your begin button and screen at the very top, and your stationary elements on the bottom layer (see screenshot below).
- Tip: If you have any drag locations that are meant to be hidden, these will be directly under the stationary layer. They must be marked visible, even though they’re hidden.
- Another Tip: You can click on the visibility icon next to each layer to toggle between visible and invisible.
Groups
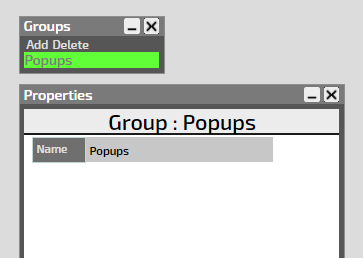
Groups are useful because they allow you to apply a command to multiple objects at the same time (
If your game has many popups, it will be helpful to add them all to a single group. This is a critical step because it will let you turn of the visibility of all popups so that only one popup shows up at any given time. Open the groups window, add a new group, and name it “Popups” or “All Popups.”
- Tip: Feel free to add more groups, especially if your game has a lot of popups! They can help you keep your settings more simplified. Most commands (like the vis command) can be applied to groups.
(Optional Step) Variables
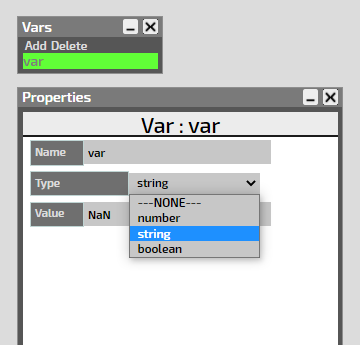
If your game includes text entry boxes, you will need to add at least one variable (you can add more if you want). You can apply a single variable to multiple text boxes, and for most interactives one variable will probably be all you need.
- Open the variables window by clicking on Windows > Var. Then add a new variable. Under type, select either number or string, depending on if you want people to be able to enter a single number or a string of numbers/letters, respectively.
- The value of the variable(s) should always be zero or left empty (it may autofill as “NaN,” or not a number/undefined). This the value that will automatically show up in the text box before a user starts typing, so you want it to be blank initially, regardless of the number of variables you have.
Tip: If you want to add more variables, just repeat these steps using different names so you can remember which text box they correspond to (Question 1, Question 2, etc., or Variable 1, Variable 2, etc.)
Advanced Properties
Now that your document is set up and your images are linked, you can start modifying the advanced properties of each object. This is the fun part because it is what will make your interactive functional. Let’s start with the begin button since it’s the top layer of your interactive.
Begin Button
When you click a begin button, you want two things to happen simultaneously: the begin screen (or filter) and the begin button itself should both disappear. You can do this by adding vis events, which you’ll probably use a lot in Canvasser.
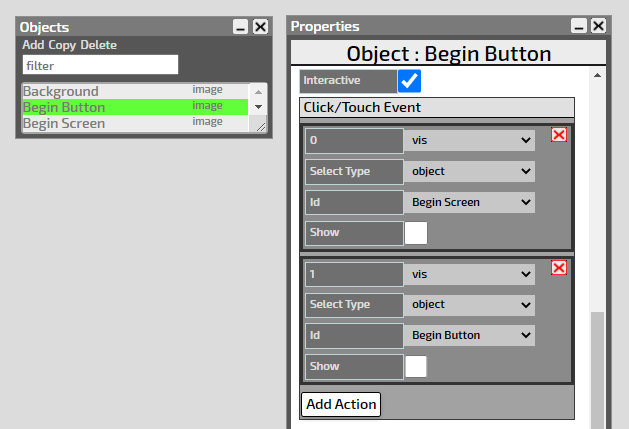
- Select the begin button.
- In the properties panel, scroll down and check the box to make the object interactive.
- Add a new action under Click/Touch Events. Whatever actions you add under this category will happen simultaneously when you click on the begin button. For the first action, choose these settings:
- Command (the first dropdown): “vis” (means visibility)
- Type: “object”
- ID: select the begin screen
- Show: Uncheck box
- Then add a second action by repeating step 3, but this time select your begin button as the object.
All Other Buttons
Most of your other buttons will work essentially the same way, but this time they’ll trigger a popup to appear.
You’ll need two vis events (one applied to a group and the other to an object). The first one will make all your popups disappear (if you skip this step you’ll end up with overlapping popups… :/) and the second one will make the corresponding popup appear.
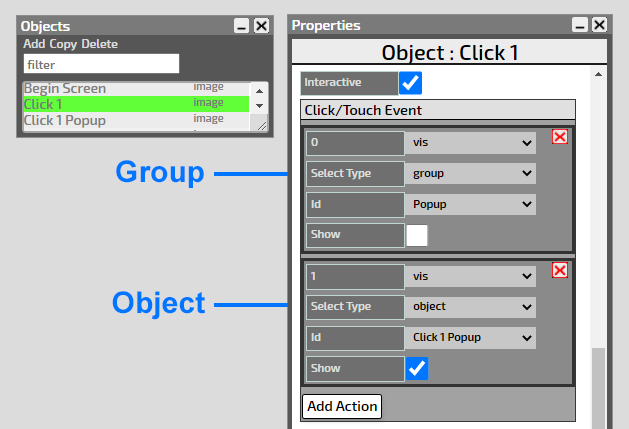
- Select a button and check the box to make it interactive.
- If you haven’t already created a group called “Popups,” open the groups window to make one. Then add an action under Click/Touch Events. Choose these settings, and make sure to select group instead of object:
- Command: “vis”
- Type: “group”
- ID: choose the group called “popups”
- Show: Uncheck box
- Add a second action under Click/Touch Events. Choose these settings:
- Command: “vis”
- Type: “object”
- ID: choose the popup that you want to appear
- Show: Leave box checked
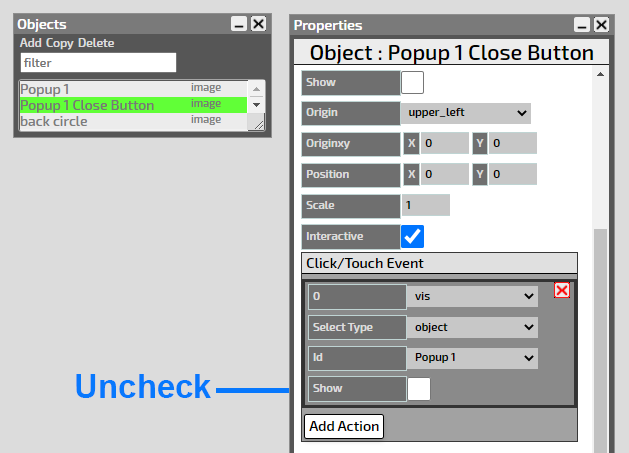
Popups
Popups do not need to be made interactive, but you still need to make a few changes to their properties so they show up at the right time.
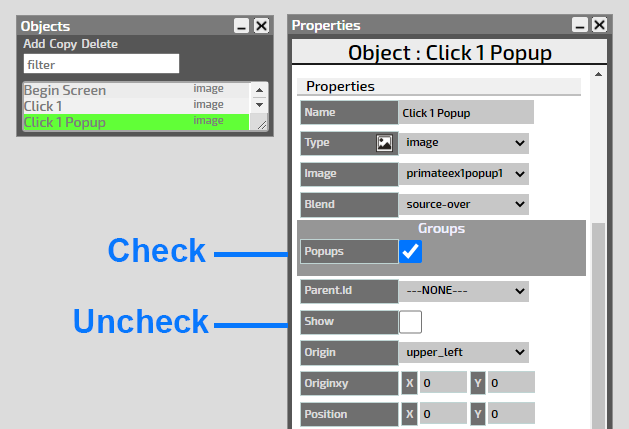
- Click on a popup
- Under properties, uncheck the box that says Show. This will make sure that the popup is hidden at the outset of the game, and only becomes visible when it is triggered.
- And finally, if you created a group for popups, make sure each popup object is added to that group by checking the corresponding box (if you haven’t done that already).
Tip: There are different ways to get a popup to close. For most popups, you’ll add a vis event to a close button (or alternatively, to the popup itself). Here are the settings you would use:
Toggle Elements
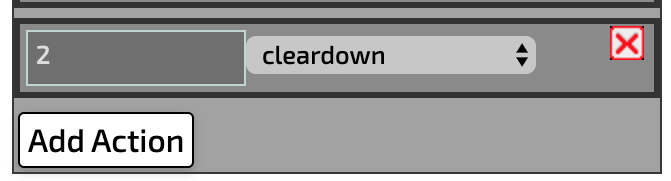
Toggle popups will work the same as regular popups, but because toggle buttons are overlapping, they need some special settings in order to work.
Tip: Any time you have overlapping buttons (even if they’re not toggle buttons) you’ll want to add the cleardown command. This prevents overlapping buttons from clicking simultaneously.
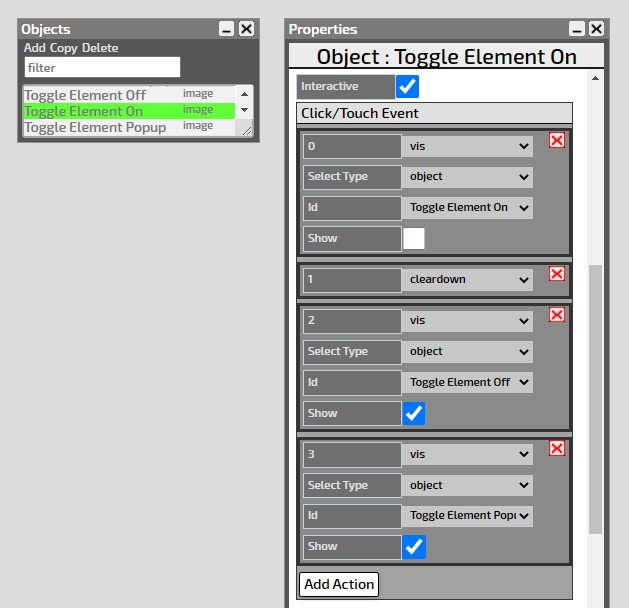
- In the objects window, click on the button that is visible when the toggle is off (i.e. the empty circle). Name this button “Toggle Element On” because clicking it will turn the toggle on.
- Add an action under Click/Touch Events. Choose these settings:
- Command: “vis”
- Type: “object”
- ID: “Toggle Element On”
- Show: Uncheck box
- Add another action under Click/Touch Events. Choose the command “cleardown.” This enables you to click one button at a time, otherwise both buttons would click simultaneously and cancel each other out.
- Add a third action under Click/Touch Events. Choose these settings:
- Command: “vis”
- Type: “object”
- ID: “Toggle Element Off”
- Show: Check box
- Add a fourth action under Click/Touch Events. Choose these settings:
- Command: “vis”
- Type: “object”
- ID: “Toggle Element popup”
- Show: Check box
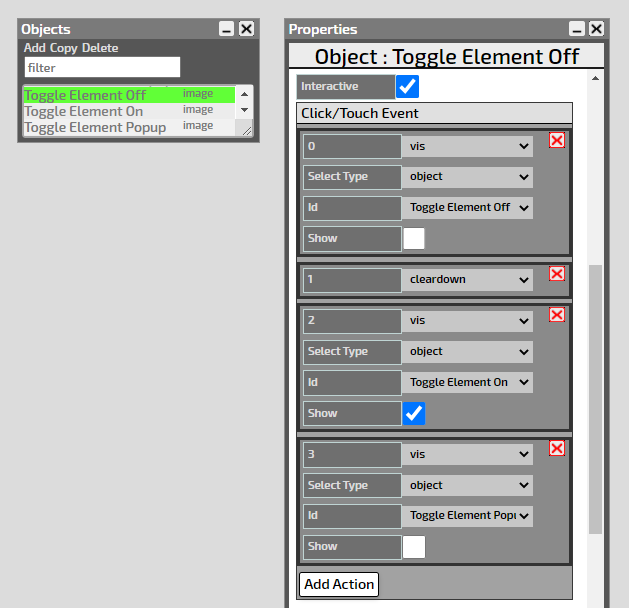
- Finally, click on the button that is visible when the toggle is on (i.e. the button called “Toggle Element Off”). This is the button you will click to turn the toggle off.
- Select the opposite settings you just used for “Toggle Element On” (make sure you keep the cleardown command though).
Click-and-Drag Objects
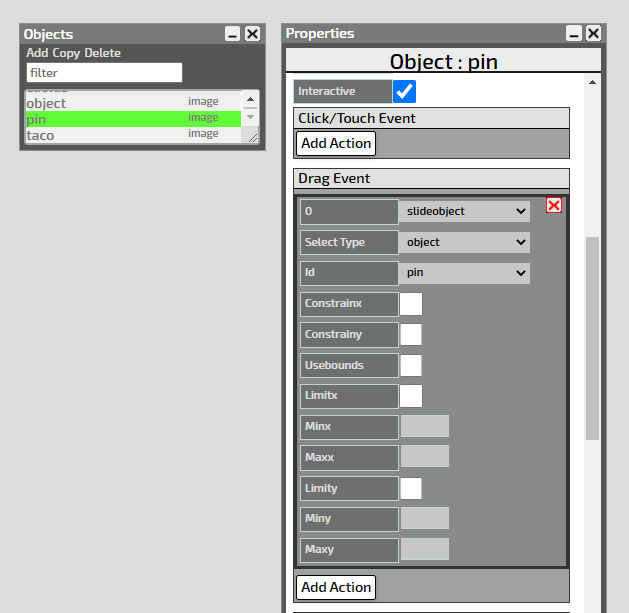
- Click on an object and check the interactive box under properties.
- Add an action under Drag Event. Choose these settings:
- Command: “slideobject”
- Type: “object”
- ID: Select the object you want to turn into a click-and-drag object (in this case a pin)
Conditional Popups – Matching Games
To create conditional popups that only show up at certain times, you’ll need to add a conditional command. There are two types of conditional commands:
- Position (this is the kind you’d use in matching games)
- Variable (this is the kind you’d use with text entry)
For a matching game, you’d add the conditional command to the drag object as a drop event. Here are the settings you’d use:
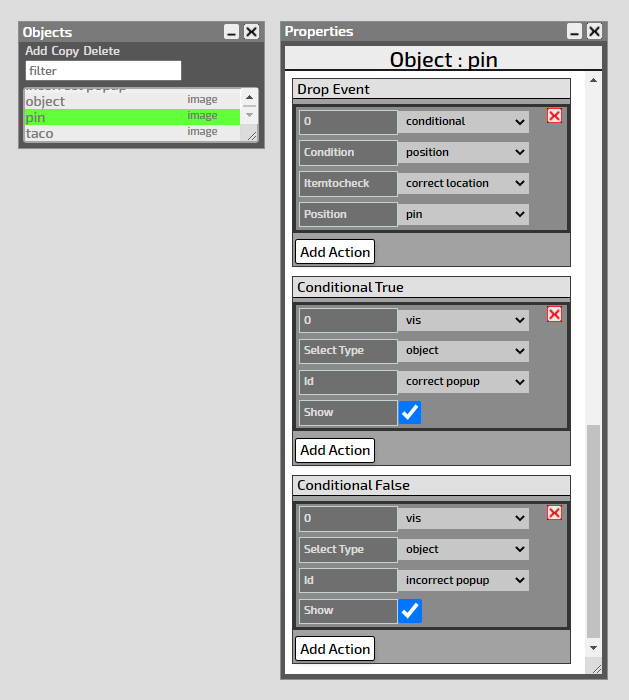
- With the drag object selected, add an action under Drop Event. Choose these settings:
- Command: “conditional”
- Condition: “position”
- Item to Check: Select the object that represents the correct location
- Position: Select the drag object
- Next, add an action under Conditional True. Whatever command you specify here will happen only if the drop event conditions are also true.
- Command: “vis”
- Type: “object”
- ID: choose the popup you want to appear when the drop event is true
- Show: Leave box checked
- Finally, add an action under Conditional False. Whatever command you specify here will happen only if the drop event conditions are not met (i.e. false)
- Command: “vis”
- Type: “object”
- ID: choose the popup you want to appear when the drop event is false
- Show: Leave box checked
Text Entry Boxes
To make a functional text entry box, you’ll need to add some settings to link the variable(s) you’ve created to the text entry box. (If you haven’t added a variable yet, you’ll need to do that step first.)
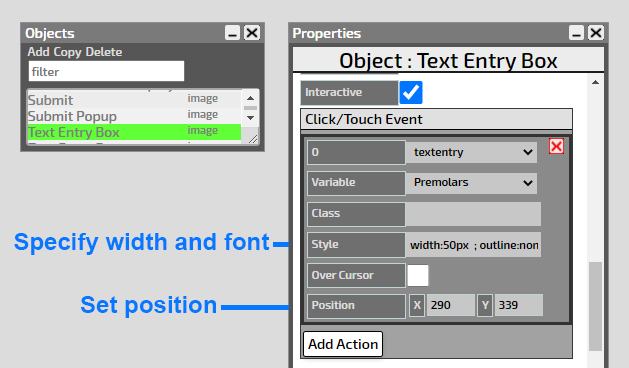
- Select your text box in the objects window. In the properties panel, check the box to make it interactive.
- Add an action under Click/Touch Event. Choose these settings:
- Command: “textentry”
- Variable: select the variable you created (you probably won’t need to have more than one variable per interactive)
- Class: Leave blank
- Style: Here you can specify characteristics of the text box like width, outline/no outline, and font. Copy the following style and adjust the width as needed:
width:50px; outline:none; border:none; font-family:verdana
- Over Cursor: Don’t check
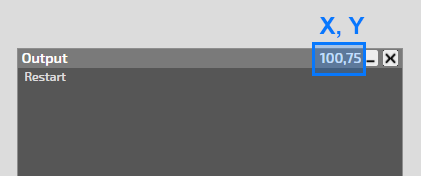
- Position: Here you’ll need to enter the X and Y coordinates of the text entry box. To do this, hover your mouse over the top left corner of the text box. Note the coordinates that appear in the top right of the output window, and copy the numbers you see:
Conditional Popups – Text Entry
For games that have text entry boxes, you can add a conditional command that will check whether the value entered by user is correct or incorrect.
In the example below, the conditional command is applied to the submit button, which gives the user a chance to finalize their answer before checking if they got it right or wrong.
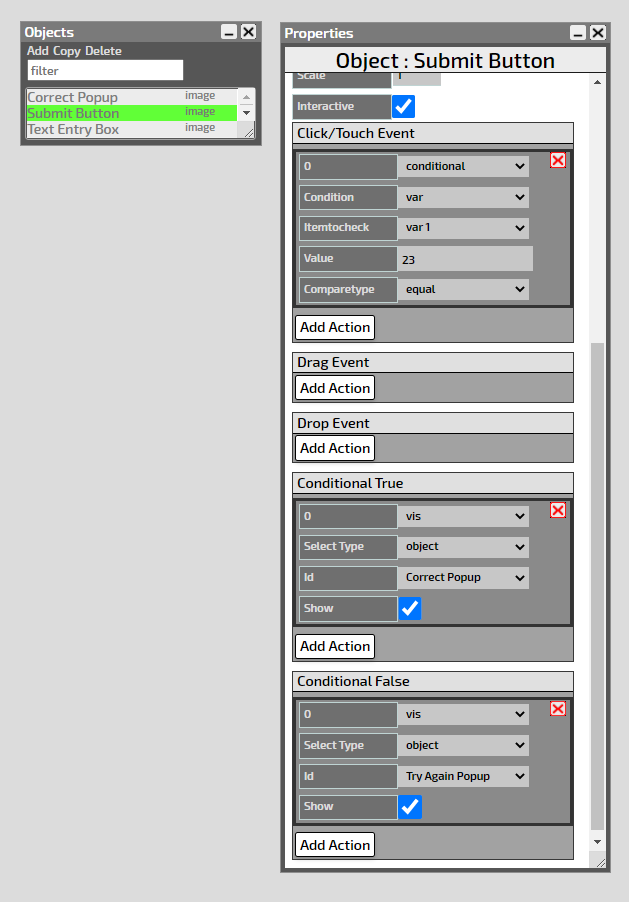
- Select the submit button and make it clickable by adding an action under Click/Touch Event. Choose these settings:
- Command: “conditional”
- Condition: “var”
- Item to Check: Select the variable that matches the text box/submit (if all your variables are the same, then pick an arbitrary one)
- Value: This is the correct answer to the question (in this example 23 is the correct answer)
- Compare to type: Choose “equal” which means that the input must be equal to that value (e.g. 23) in order to be marked correct (in some cases, you might be want to choose “greater” or “less”)
- Next, add an action under Conditional True. Whatever command you specify here will happen only when the value entered is correct.
- Command: “vis”
- Type: “object”
- ID: choose the “correct” popup
- Show: Leave box checked
- Finally, add an action under Conditional False. Whatever command you specify here will happen only when the value entered is incorrect.
- Command: “vis”
- Type: “object”
- ID: choose the “incorrect” popup
- Show: Leave box checked
Animations (Optional)
For this assignment animations are not required, but if you want to experiment with some animations you can! First, open up the animation window by going to Windows > Anim and add a new animation.
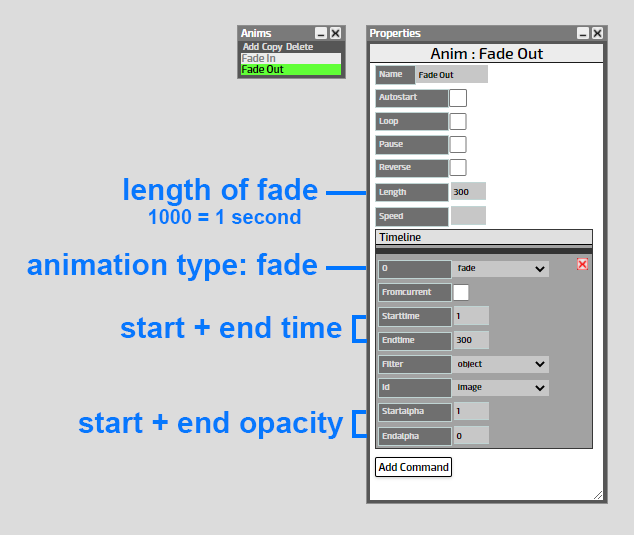
Fade In/Out
To fade an object (e.g. a popup) in or out, here are the settings you would use:
- Set the length of the entire animation. 1000 equals one second, so most animations will probably be <3000.
- Choose your type of animation, in this case fade.
- The start time can be zero if you want the fade to start immediately, or it can a larger number if you want a delay before the fade starts.
- The end time will typically be the same as the length of the entire animation.
- Under ID, choose the object you want to fade in or out.
- Start + end alphas: this refers to the opacity of the object. For a fade out, use a start alpha of 1 (fully opaque) and an end alpha of 0 (no opacity). For a fade in, reverse those values.
Step Five: Have Another STA Test Run Your Game
If you’ve made it this far, congrats! You’re almost through with your first Canvasser interactive. The next step (when you’re happy with how your game is looking) is to have another STA do a test run and give feedback on it.
First, save your Canvasser file again, and you should see that your file is saved in two formats: html and json.
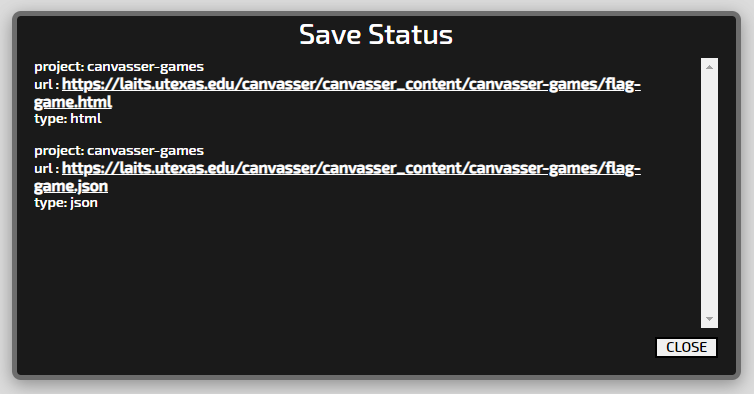
Copy the html link and post it to Basecamp. Tag your STA mentor, and either they or another STA will give you feedback and/or suggestions on how to make it better. Once your game gets approved, move on to the next (and final) step!
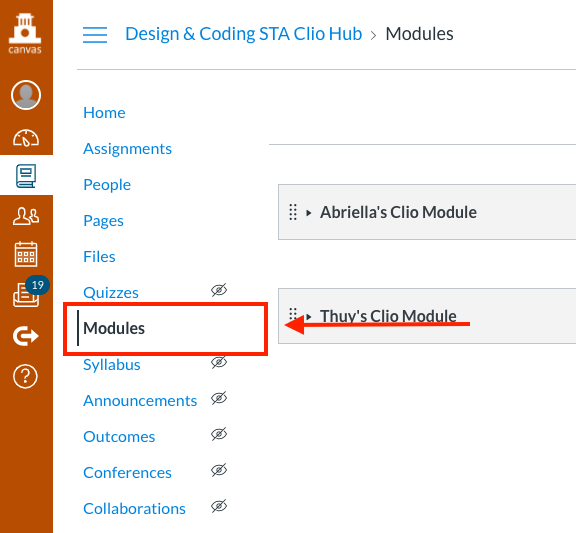
Step Six: Upload Your Game to Your Clio Site
The last step is to upload your game to your Clio module and invite other STAs to join your course. Log in to Canvas and navigate to the modules tab in the left sidebar:
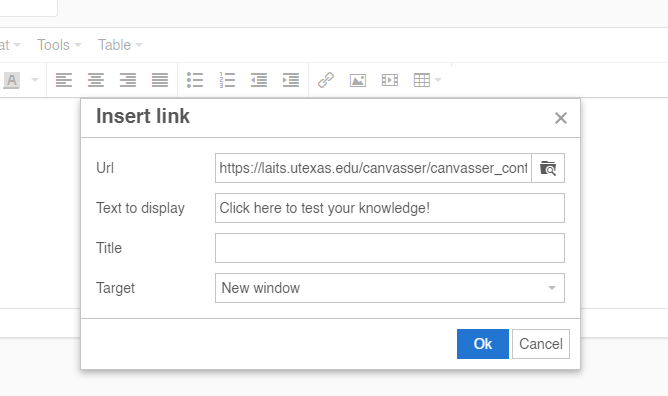
Then select the activity you want to add your game to. Add a new link and paste the html URL to your game. Change the display text to something that fits with the content of your page (e.g. “Play Game” or “Test Your Knowledge”).
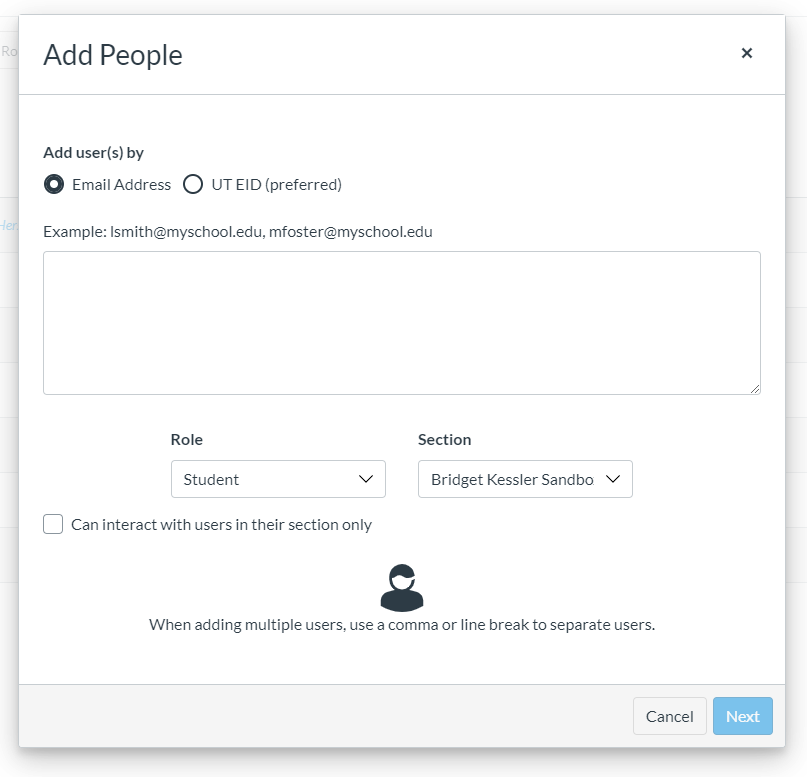
Finally, invite STAs to your Canvas sandbox so they can play your game. Navigate to the people tab in the left sidebar and click on the +People button at the top right of the page. Enter the emails or UT EIDs of your fellow STAs and give them the student role:
Let your STA mentor know on Basecamp when you’ve done this final step, and now you’re done!

—-
Canvasser | Frequently Asked Questions
Q: Conditional true and false not working?
A: If this is happening, a couple things could be interfering with how Canvasser is able to read the position of either the drag object or the drag location (or both).
Double check the image dimensions of both your drag objects and drag locations. They should be cropped to fit the image content so that Canvasser can read their location in the game.
If the conditional popups are still not working, double check the object properties. Make sure that when you’re setting the position of both your drag objects and drag locations, you’re changing the position of the object and not the XY origin, which should always stay (0,0).
Also double check that the origin of all your drag objects is set to “center” (instead of “upper left,” which is the default).
Q: Files not showing up in the files window?
A: Sometimes the files window can be glitchy when you first log in to Canvasser. If the window appears empty when you open it, try hitting the refresh button (top left). It may take a minute or two for the files to show up. If you’re still having trouble, tag your STA mentor on Basecamp.
Q: Buttons not clicking properly or acting glitchy?
A: When buttons are directly on top of each other (e.g. toggle buttons), you need to add a cleardown command underneath Click/Touch Events. This prevents the button from “clicking through” to the button underneath it (i.e. trying to click multiple buttons simultaneously).
Q: X or Y values of drag object constrained when they’re not supposed to be?
A: If you’re trying to drag an object but it’s limited in one direction (either vertically or horizontally), it could be because the object’s position is missing a value (either the X or Y value).
Click on the object that’s not working and double check the position coordinates. There should always be an X and a Y value entered–they should never be left empty. If one or both of them is supposed to be zero, the number 0 needs to be entered.
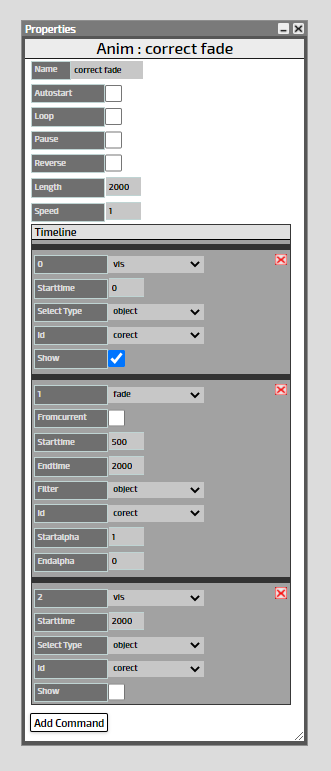
Q: Animations playing too quickly?
A: One reason this could be happening is if you have a vis command before animation that isn’t part of the animation itself. Whenever possible it’s good to combine vis commands with your animations if they’re being applied to the same object.
Example: If you have a popup that’s supposed to appear and then fade away, try combining all the commands for that popup under a single animation. Here’s what the settings would look like:
- Popup appears at 0 seconds
- Popup fades out between 500 and 2000 (duration: 1.5 seconds)
- Popup disappears at 2 seconds