In this training you will be introduced to HTML, CSS, and JavaScript, the languages that can be used as tools to help you develop simple websites.
This training is quite involved and can be frustrated or confusing, so be sure to reach out to a team lead whenever you encounter any issues or have questions. Good luck :).
Introduction
HTML
HTML stands for Hypertext Markup Language, and it is the standard markup language for documents to be displayed in a web browser.
CSS
CSS stands for Cascade Style Sheets, and it is a style sheet language used for describing the presentations of HTML. In other words, CSS is used to style the written HTML.
JavaScript
JavaScript of JS is a client-side programming language that assists HTML and CSS in adding logic to the site.
In this training you will not be actively writing JS, as the focus of the training is HTML and CSS, however you can reuse JS code elsewhere to implement some of your HTML and CSS functionalities.
Setup
Before you begin the training, you will need to set up your workspace. A team lead will most likely walk you through this initial setup, however if you’ve had experiences with ssh you are welcome to set up on your own :).
First, download an IDE if you don’t already have one. IDE is an Integrated Development Environment that aides the process of writing code (i.e. color code, auto-completion, etc.). If you’ve seen developers write code that has a lot of colored-text, that’s most likely displayed in an IDE.
Please note that there are other IDEs out there that will do the job as well, however because we will be viewing the website through LAITS’ server, we will need to ssh into the LAITS server and write our code there.
From here, there are two ways you can work on this training. You can either ssh into the server and work directly from there, or create local files on your computer and transfer them to the server later. Please check in with a team lead to choose the method accordingly.
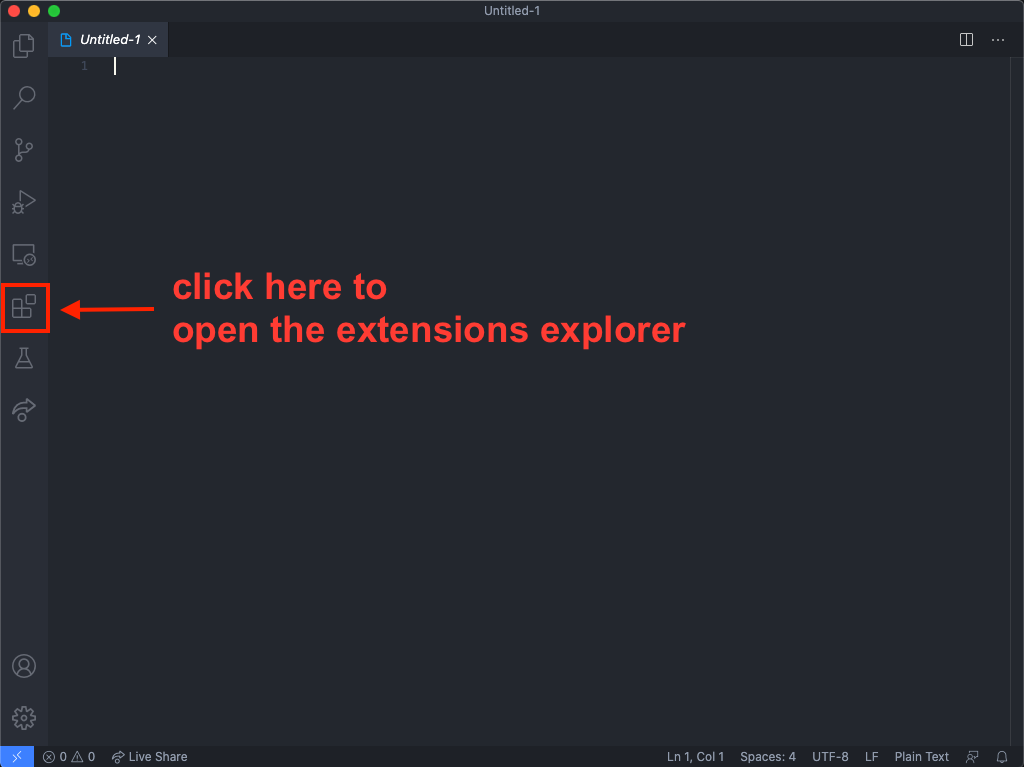
Click on this icon to the left to open the extensions explorer.
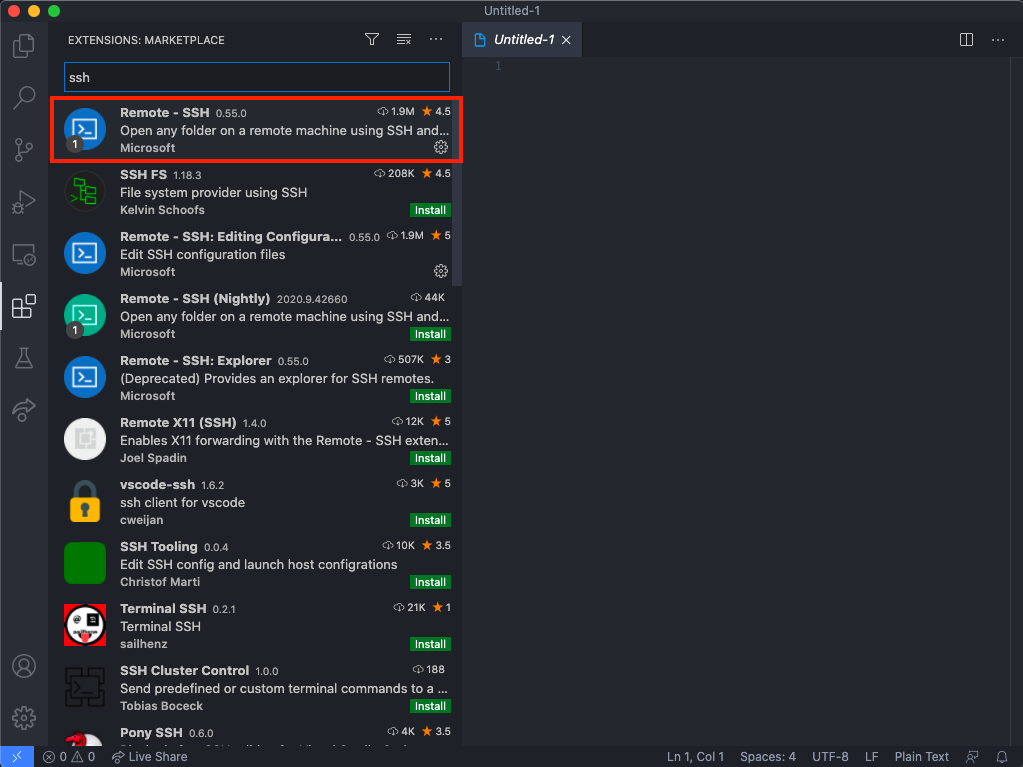
In the search bar, type “ssh” and click on the Remote – SSH extension.
Install that extension.
Configure Remote SSH
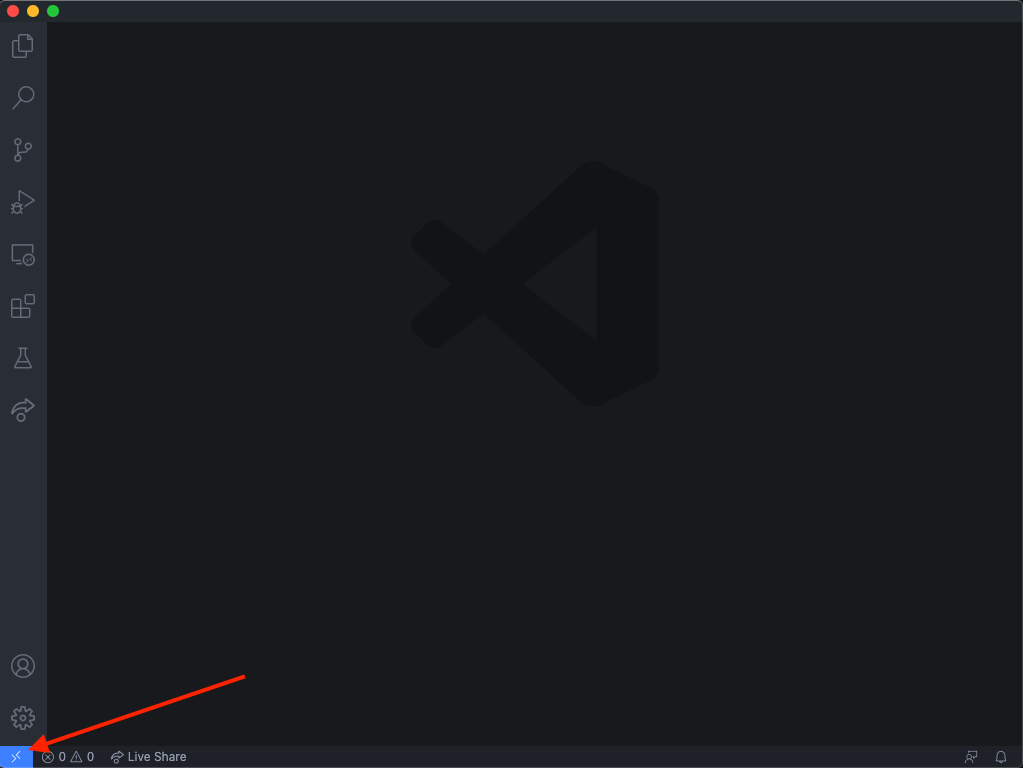
Click on the SSH icon (looks like ><) on the bottom left corner of the VSCode window. If you don’t see this icon, close VSCode and relaunch it.
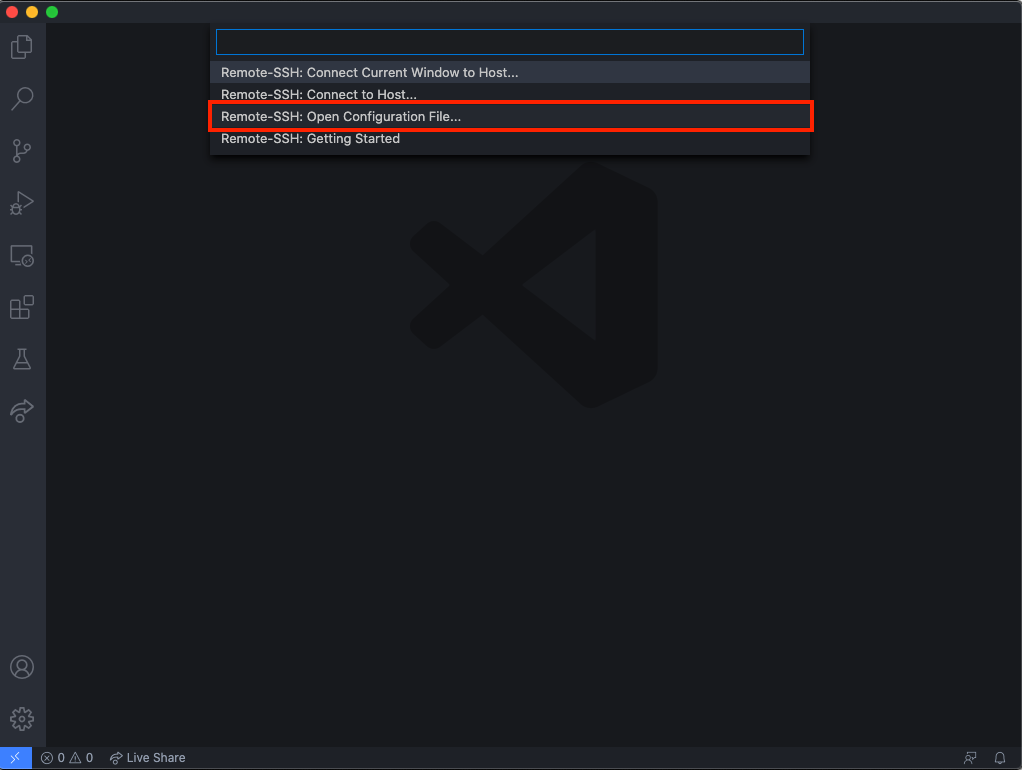
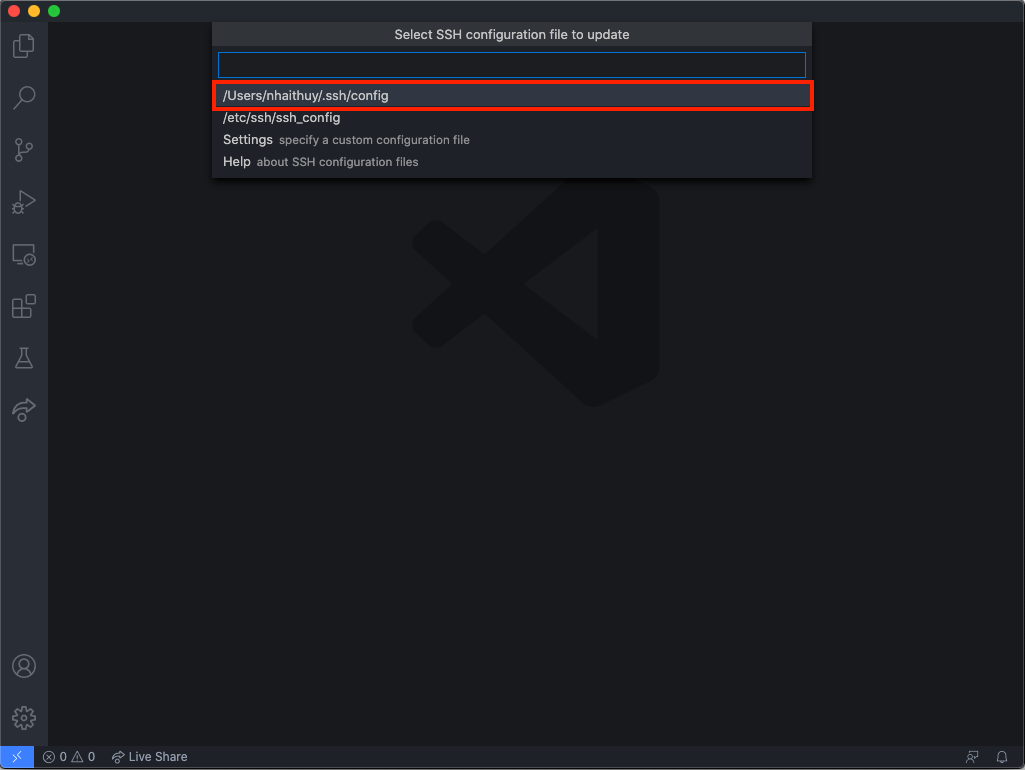
A dropdown will appear at the top of the VSCode window. Choose “Open Configuration File.”
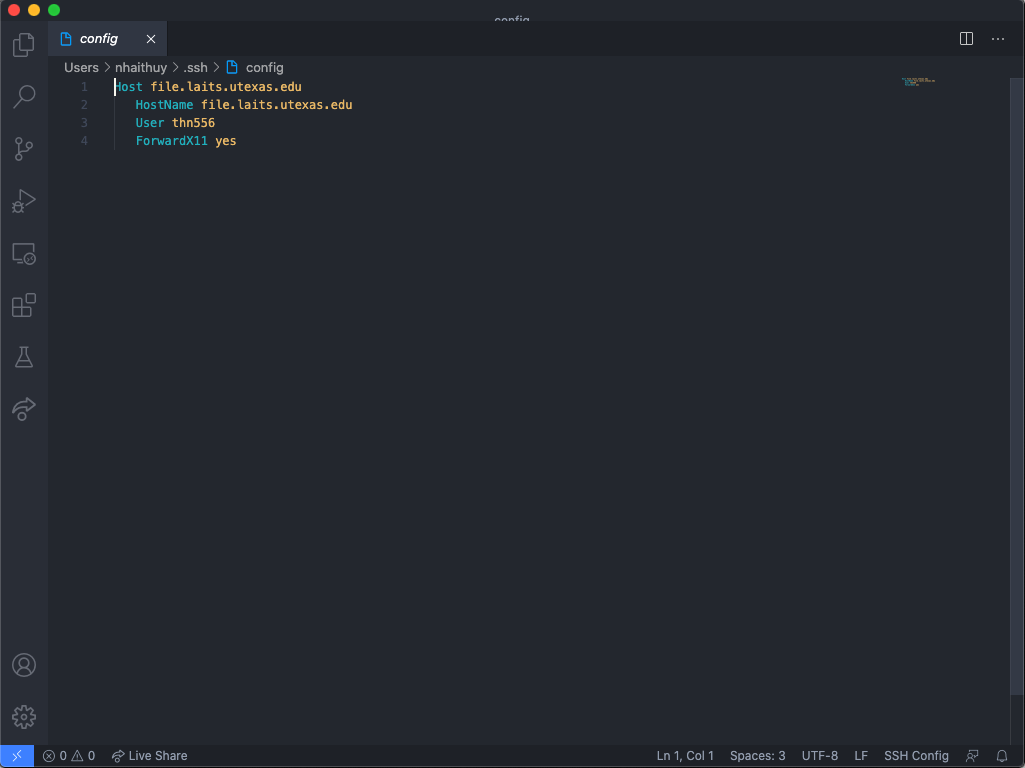
Edit the configuration file. The path will look a little different on your computer, but it should look something similar to [some-path]/.ssh/config. Click on that file. For reference, mine looks like this.
After clicking on it, paste in this configuration format and replace the text after User with your EID.
Host file.laits.utexas.edu
   HostName file.laits.utexas.edu
   User [replace this text and brackets with your eid]
   ForwardX11 yes
Your config file should look something like this.
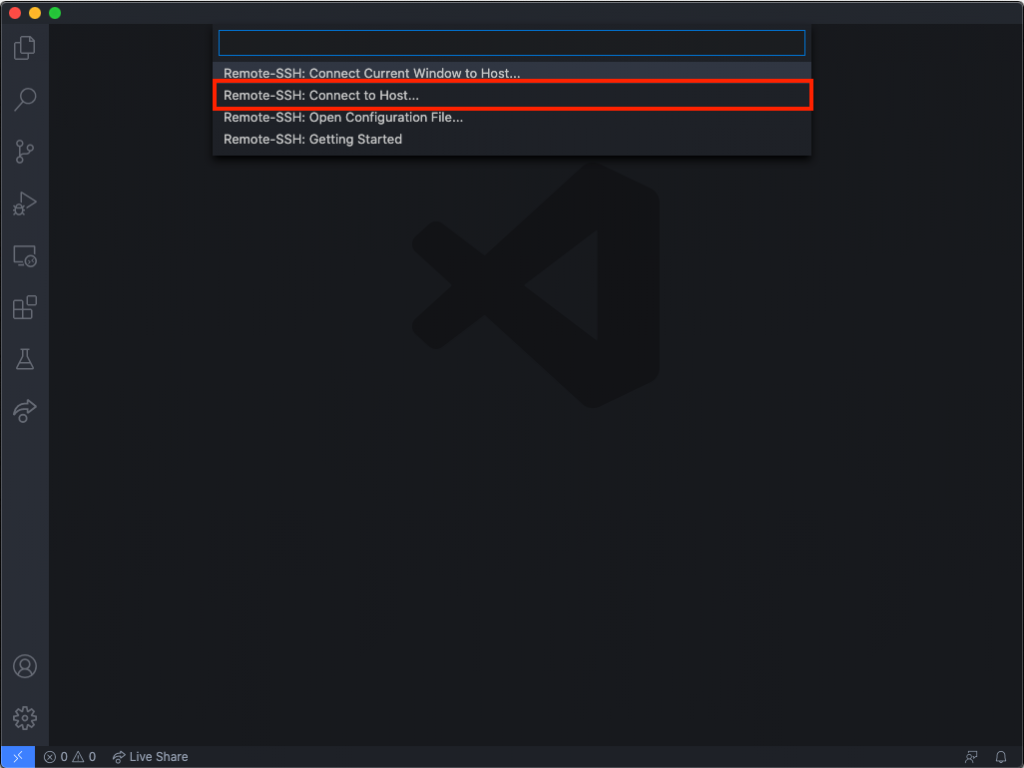
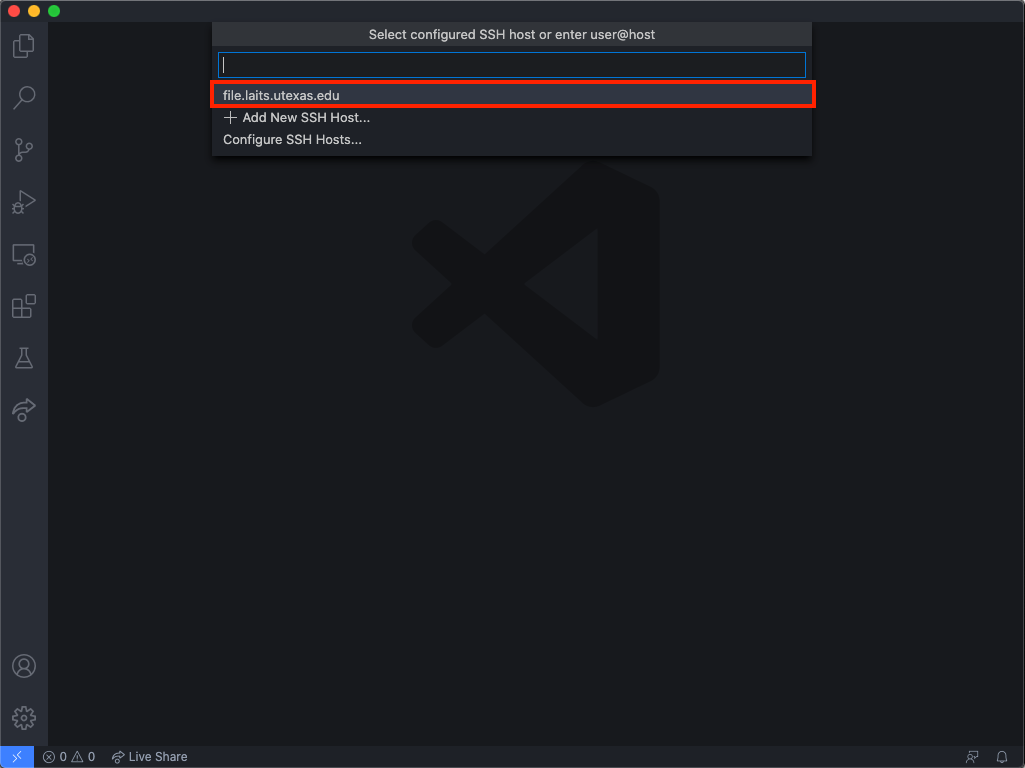
Save and close the file. Click on the Remote SSH icon in the bottom left of the screen again. Click “Remote SSH: Connect to Host,” then choose “files.laits.utexas.edu.” You will be prompted to enter your password. Please enter the password to your UTEID. You will do this every time you begin the training.
Set up the public_html folder.
In VSCode, click Ctrl / Cmd + O. Navigate to your folder. Type in the path to your folder. It should be /mnt/home/[your-EID]
Click “OK.”
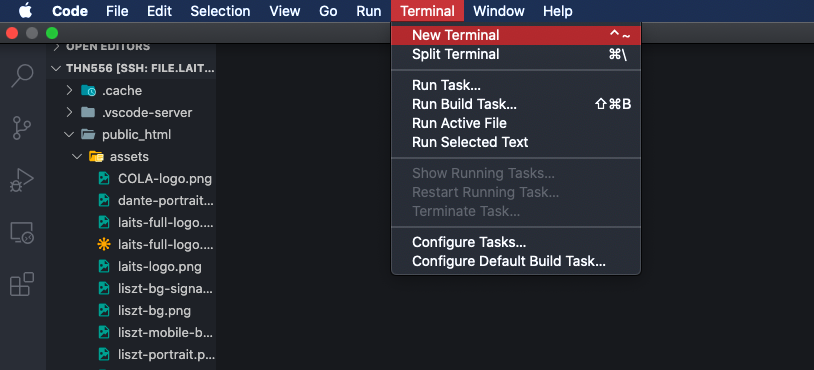
On the top toolbar of VSCode, click Terminal > New Terminal.
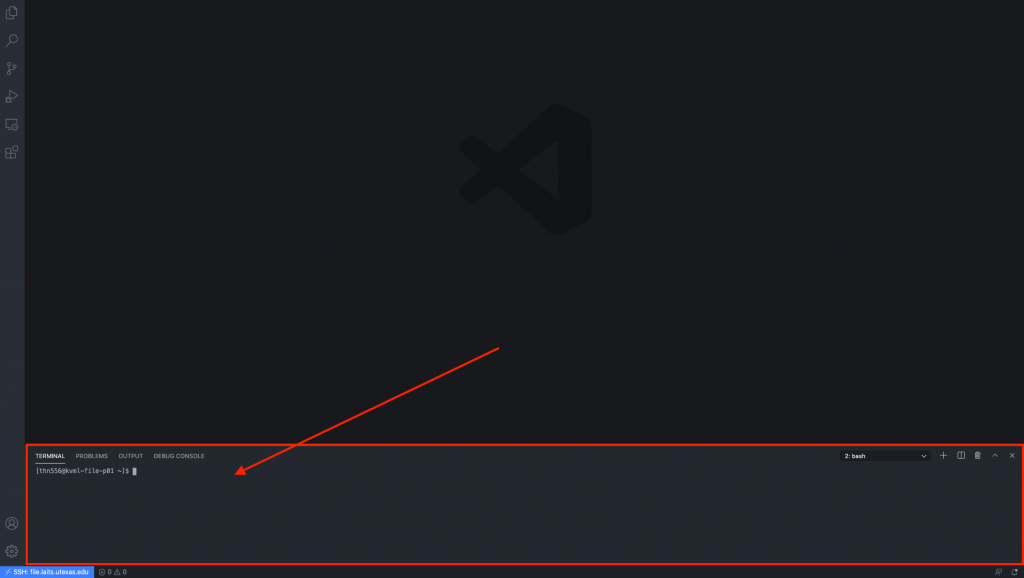
A terminal window will pop up at the bottom like this.
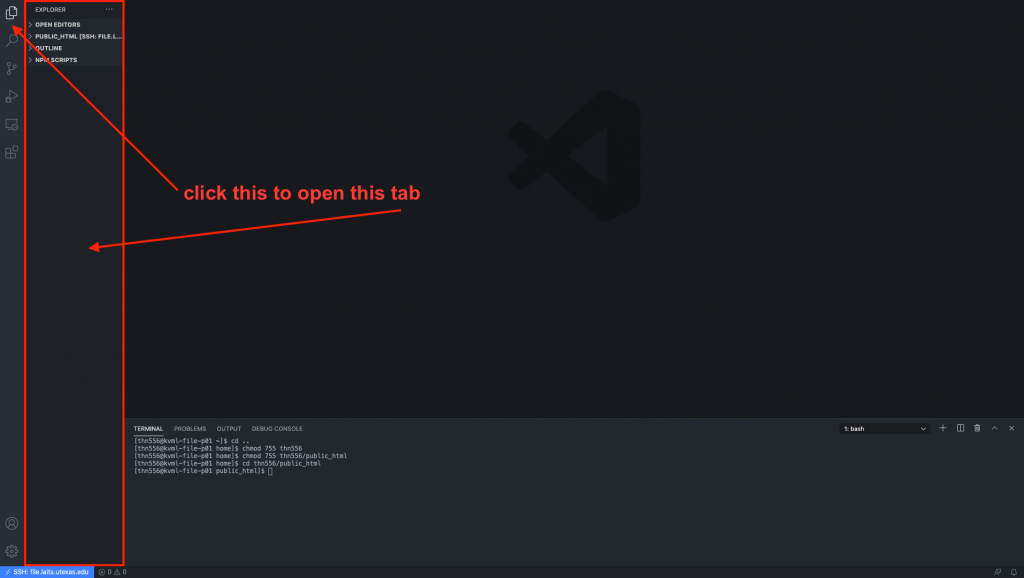
Click on the terminal window. Now type in these exact same command. Hit Return / Enter after each command. Please be extra cautious when doing this so that you do not affect other folders / files. mkdir public_html cd .. chmod 755 [your-EID] chmod 755[your-EID]/public_html cd [your-eid]/public_html The last 4 commands look like this. Make sure you do the first command (mkdir public_html) as well.
Now click on the File icon to the top left to toggle the File tab.
Ctrl / Cmd + N > Ctrl / Cmd + S and save the new file as index.html. Make sure your file path looks like this. Click “OK.”
Now you’re all set to start writing your HTML, CSS, and JavaScript.
Method 2: Edit Local Files
Create a new folder named “public_html” on your computer. This will be where you put all of your files for this training. Make sure you remember where you put it.
Open VSCode. Cmd / Ctrl + O and open the folder you just organized. This is just like opening up a file on your computer.
Ctrl / Cmd + N > Ctrl / Cmd + S to create a new file and Save. Save it as “index.html”
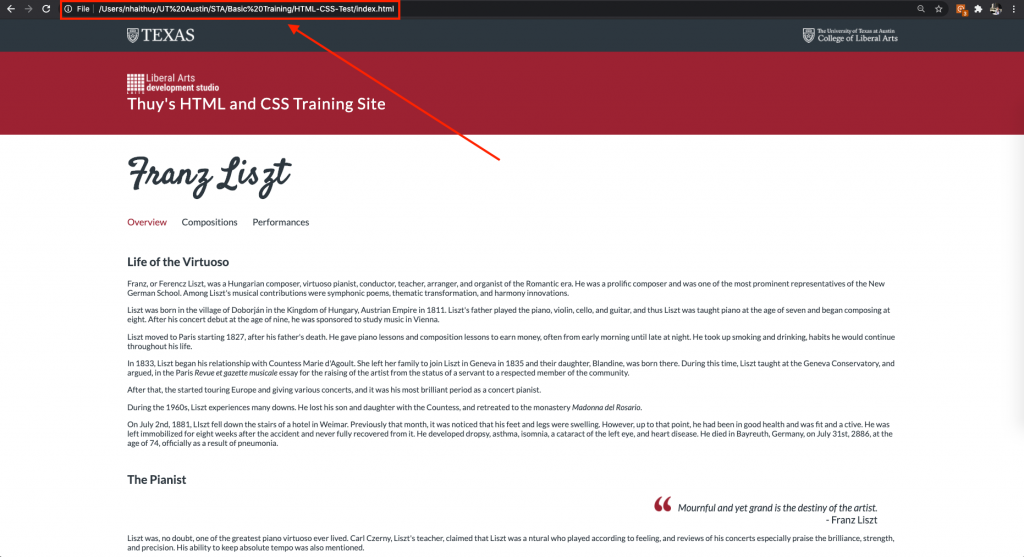
Now you can see your changes on the local url on the browser. So for example, I saved my index.html under the directory /Users/nhaithuy/UT Austin/STA/Basic Training/HTML-CSS-Test/index.html, so my browser url looks like this.
Every time you write new code, just refresh the page and it should work. If you don’t see the changes, try hard refreshing (Cmd / Ctrl + Shift + R) to prevent browser caching.
Writing HTML
HTML is a markup language, meaning that it uses tags to define the elements displayed, and the tags themselves are not displayed. For example, an HTML p tag displays a paragraph.
Most HTML tags come in pairs. To begin a tag, type <[tag-name]>. To end a tag, type </[tag-name]>.
For example, for the p tag: <p>This is a paragraph</p>
Don’t worry if this seems confusing, you’ll get a hang of it as you work on this training.
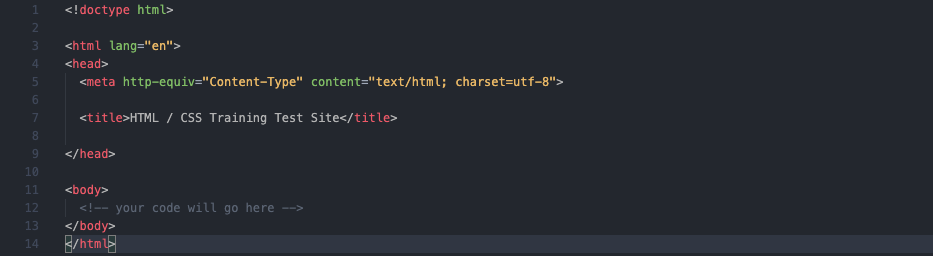
To start, place this code below to your HTML file.
<!doctype html>

<html lang="en">
<head>
  <meta http-equiv="Content-Type" content="text/html; charset=utf-8">

  <title>HTML / CSS Training Test Site</title>

</head>

<body>
  <!-- your code will go here -->
</body>
</html>
It should look like this.
In your browser, go to https://laits.utexas.edu/~[your-eid]/index.html (or, if you work on your local computer, Ctrl / Cmd + O, navigate to your public_html folder, and open up index.html) and make sure that there is a blank page (no errors). If there are any errors. please reach out to the training lead for help.
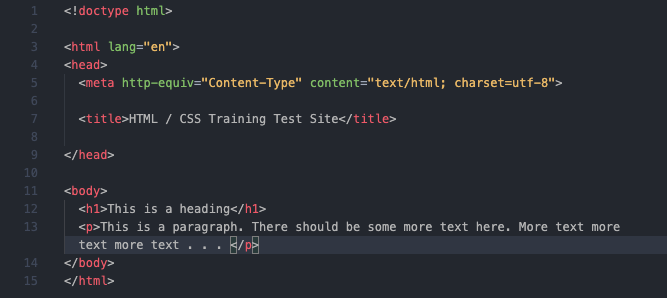
You will write your code between the <body> </body> tags. First, try: <h1>This is a heading</h1> <p>This is a paragraph. There should be some more text here. More text more text more text . . . </p>
Refresh your browser. You should see this.
Here’s a list of HTML tags for your reference https://www.w3schools.com/tags/default.asp. Take a glance at it but don’t worry about knowing all of it. If you need to look up something you’d like to achieve on your site at anytime, you’re welcome to go back to the reference or simply Google what you want. Most likely, the ones you’d use the most are these listed below. Please read through their description on the HTML reference page:
<p></p>
<h1></h1>, or any of the numbered heading (<h2>, <h3>, <h4>, etc.). The smaller the number, the smaller the header.
<img>. Notice that this one doesn’t have a closing tag
<a></a>
<div></div>
<b></b> and <i></i>
Simple Headings and Paragraphs
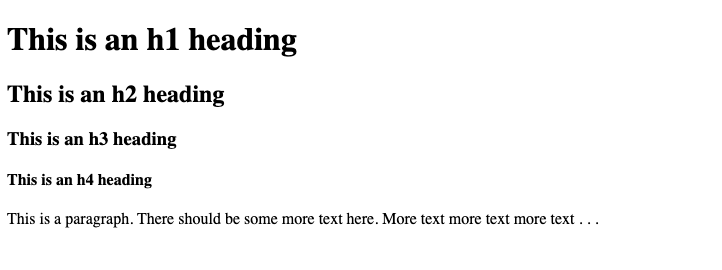
Start creating a few headings and paragraphs under each heading. Please have a minimum of 3 headings and 3 paragraphs. It should follow the format: heading – paragraph – heading – paragraph – and so on. For example:
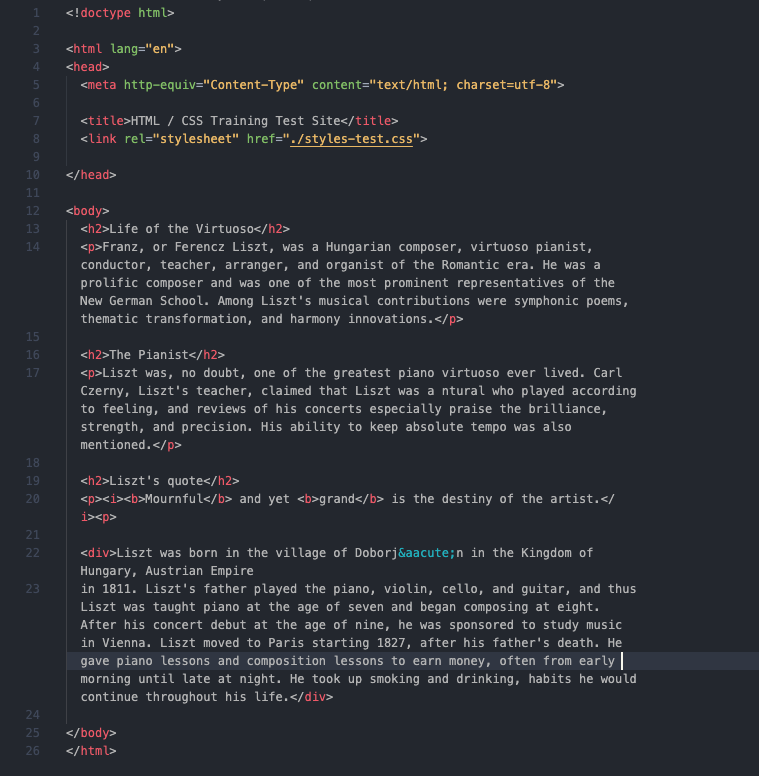
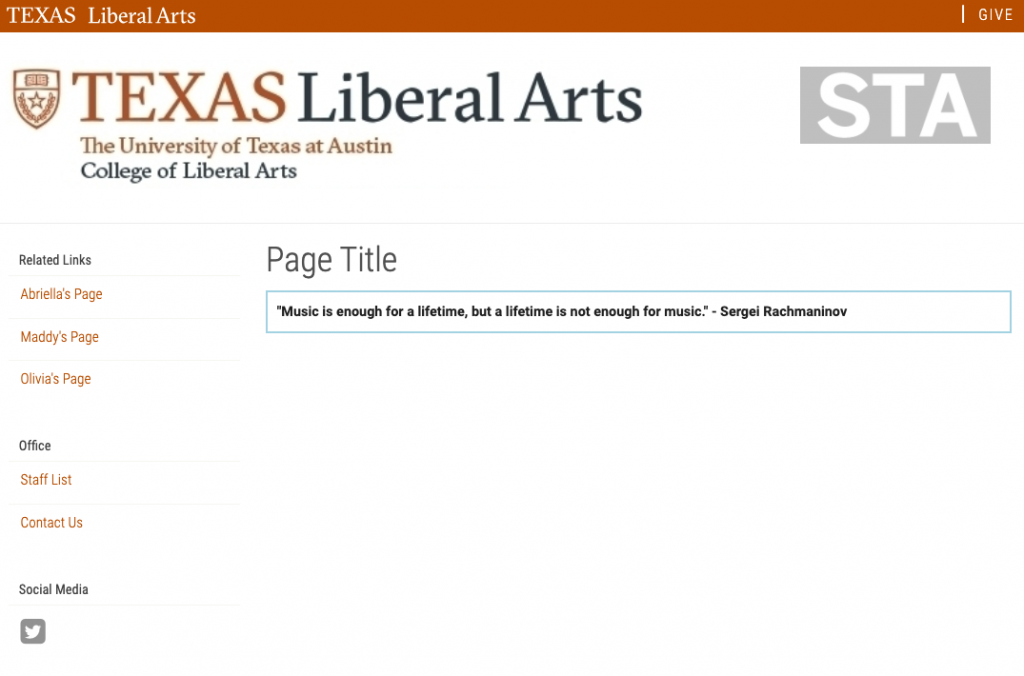
a<h1>Life of the Virtuoso</h1>
<p>Franz, or Ferencz Liszt, was a Hungarian composer,
virtuoso pianist, conductor, teacher, arranger, and
organist of the Romantic era. He was a prolific composer and
was one of the most prominent representatives of the New
German School. Among Liszt's musical contributions were
symphonic poems, thematic transformation, and harmony
innovations.</p>
<h1>The Pianist</h1>
<p>Liszt was, no doubt, one of the greatest piano virtuoso
ever lived. Carl Czerny, Liszt's teacher, claimed that Liszt
was a natural who played according to feeling, and reviews
of his concerts especially praise the brilliance, strength,
and precision. His ability to keep absolute tempo was also
mentioned.</p>
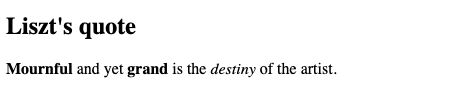
<h2>Liszt's quote</h2>
<p>Mournful and yet grand is the destiny of the artist.</p>
Renders:
Have at least 3 bolded text and 3 italicized text. To do this, simply wrap the text you want bold or italicized in either <b></b> or <i></i> tags, respectively. For example: <p><b>Mournful</b> and yet <b>grand</b> is the <i>destiny<i> of the artist.</p> becomes:
You can also nest HTML tags. For example, if you want text to be both bolded and italicized: <p><i><b>Mournful</b> and yet <b>grand</b> is the destiny of the artist.</i></p> becomes:
The Div Tag
The <div></div> is a very common and powerful element in HTML. It is essentially a boxed container for your content. It allows you to group elements and apply desired stylings for them.
In this section, let’s practice creating a paragraph with a div. You’ll see that it looks just like the <p></p> tag, but we’ll be applying styles to it later in the CSS section.
Add a paragraph with the text of your choice anywhere on the page. For example:
<div>Liszt was born in the village of Doborján in the
Kingdom of Hungary, Austrian Empire in 1811. Liszt's father
played the piano, violin, cello, and guitar, and thus Liszt
was taught piano at the age of seven and began composing at
eight. After his concert debut at the age of nine, he was
sponsored to study music in Vienna. Liszt moved to Paris
starting 1827, after his father's death. He gave piano
lessons and composition lessons to earn money, often from
early morning until late at night. He took up smoking and
drinking, habits he would continue throughout his life.
</div>
It renders out to:
Section Checklist: Did you . . .
Add at least 3 Headings and Paragraphs?
Add at least 3 Bolded text?
Add at least 3 Italicized text?
Add at least 1 paragraph using a Div element?
Write CSS
Create and Link the Stylesheet file
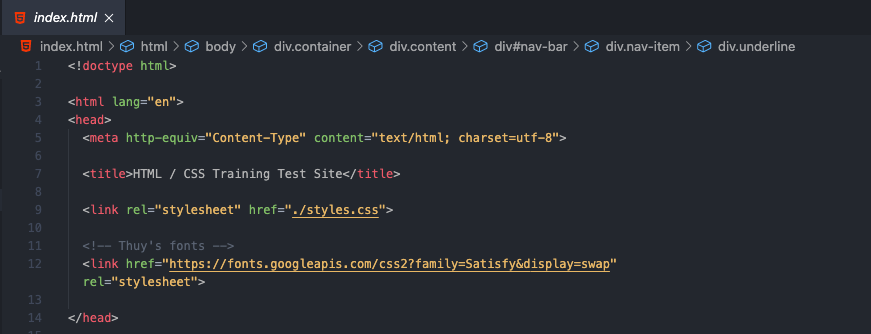
Ctrl / Cmd + N to create a new file. Ctrl / Cmd + S and save it as “styles.css” within the public_html folder.
In your index.html, between the <head></head> tags, place this code <link rel="stylesheet" href="./styles.css"> This reads “link the stylesheet in the same folder (./ means same folder) which has the name of styles.css.”
Now let’s test that your CSS file was linked correctly. In that file “styles.css,” paste in this code (this will only be for testing, we’ll remove it later) p { color: red; }
Save the file, and Refresh your browser. To prevent the browser from caching the old file, perform a hard refresh with Ctrl / Cmd + Shift + R.
Check that all of your <p></p> elements are red. If it doesn’t change:
Check that your linking path is correct
Check that “styles.css” is in the same folder as your “index.html”
Now you can delete that code (if you wish) and apply your own stylings.
CSS Selectors
In the above section, we “selected” all the <p></p> elements on the page and gave it stylings. In this section, we’ll learn about different ways to “select” an HTML element and give it proper stylings.
CSS Element Selector
The way we were doing it before, typing: p { color: red; } is called Element selector, in which we select all <p></p> elements and apply stylings. Let’s practice using the CSS Selector.
Try changing color of all of your headers. For example: h2 { color: #a62639; } changes the color of all the h2 headers into that HEX code, a crimson color.
Now try changing the font size of all your <p></p> elements. In “styles.css,” try: p { font-size: 18px; }
Notice how the text in the <div></div> elements are not affected. Guess what happen if you use the CSS element selector to select the <div></div> tags?
CSS ID Selector
What if you want to apply stylings to a specific div element and not any div visible on the page?
CSS ID Selector allows you to give your generic element a specific ID, so that every time you refer to that ID it is scoped to that element only. The HTML syntax for giving an element an ID is: <element id="[element-id]">Some stuff</element> So, for example, if you want to give a div an ID of “my-div,” you’d write: <div id="my-div">My text here</div> This applies to any element, and not just div. You can easily give an id to a header as well. <h2 id="my-header">Title</h2>
Now, in your CSS file, select that ID following this syntax: #[element-id] { /* some stylings here */ }
So for example, to apply stylings to the div and header above: #my-div { background-color: lightblue; } #my-header { font-style: italic; }
This HTML and CSS here:
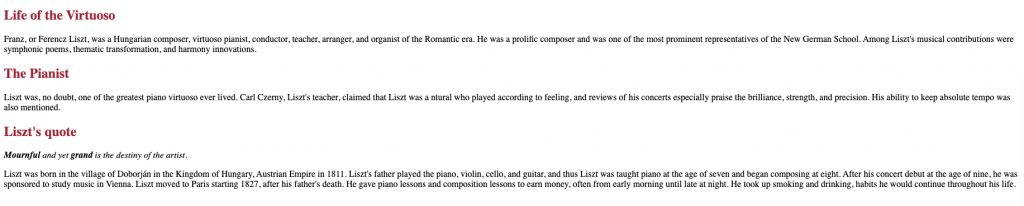
<h2 id="quote-header">Liszt's quote</h2>
<p><i><b>Mournful</b> and yet
<b>grand</b> is the destiny of the
artist.</i><p>
<div id="childhood">Liszt was born
in the village of Doborján in
the Kingdom of Hungary, Austrian
Empire in 1811. Liszt's father played
the piano, violin, cello, and guitar,
and thus Liszt was taught piano at
the age of seven and began composing
at eight. After his concert debut at
the age of nine, he was sponsored to
study music in Vienna. Liszt moved to
Paris starting 1827, after his
father's death. He gave piano lessons
and composition lessons to earn
money, often from early morning until
late at night. He took up smoking and
drinking, habits he would continue
throughout his life.</div>
Similarly, what if you want to give the same stylings to a specific group of elements? The CSS class selector allows you to do that. The HTML syntax for giving an element a class is: <element class="[element-class]">Some stuff</element> For example, to give a class name to a div: <div class="my-div">Some text</div> <div class="my-div">Another text</div> Or to an anchor tag: <a class="my-anchor" href="my-url">Hyperlinked Text</a>
In your CSS file, select the class you want following this syntax: .[element-class] { /* some stylings here */ } For example: .my-div { border: 2px solid red; padding: 10px; margin: 10px; }
This HTML and CSS:
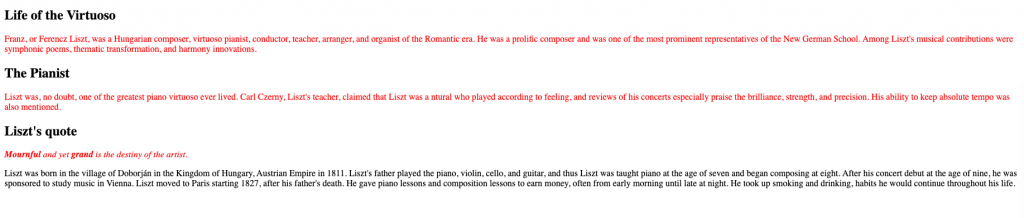
<h2>Life of the Virtuoso</h2>
  <p class="bordered-
paragraph">Franz, or Ferencz Liszt,
was a Hungarian composer, virtuoso
pianist,  conductor, teacher,
arranger, and organist of the
Romantic era. He was a prolific
composer and was one of the most
prominent representatives of the New
German School. Among Liszt's musical
contributions were symphonic poems,
thematic transformation, and harmony
innovations.</p>

  <h2>The Pianist</h2>
  <p class="bordered-paragraph">Liszt
was, no doubt, one of the greatest
piano virtuoso ever lived. Carl
Czerny, Liszt's teacher, claimed that
Liszt was a ntural who played
according to feeling, and reviews of
his concerts especially praise the
brilliance, strength, and precision.
His ability to keep absolute tempo
was also mentioned.</p>
Now practice using all 3 types of CSS Selectors on your site.
Section Checklist: Did you . . .
Use the CSS Element Selector?
Use the CSS ID Selector?
Use the CSS Class Selector?
Housekeeping Practices and Miscellaneous Information
When writing HTML / CSS or any code, it is good practice to comment your code as you go. This will not only help with your logic and organization, but also for the person reading / modifying it.
The syntax for writing comments in HTML is: <!-- your comment here --> For example: <!-- start of my hyperlinks --> <a href="url-1" target="blank">Link 1</a> <a href="url-2" target="blank">Link 2</a> <a href="url-3" target="blank">Link 3</a> <!-- end of my hyperlinks -->
The syntax for writing comments in CSS is: /* your comment here */ For example: /* styles for my footer */ .branding { width: 200px; margin: 30px; /* gives it some white space */ } /* end styles for my footer */
The syntax for writing comments in JS is: // your comment here For example: // start code for the accordion function myAccordion() { document.getElementById("accordion"); // do more stuff };
In VSCode, the shorthand for comment is Ctrl / Cmd + /
In addition, the Browser Inspect tool will be very helpful in helping you design your site. When you run into any trouble (i.e. something not showing up correctly), this should be the first place to refer to. Please read through Part 1 of this training here http://sites.la.utexas.edu/kb/2020/07/29/how-to-create-a-clio-course-module-part-2/ to familiarize yourself with this tool.
If you choose to work on your local computer, place all of these downloaded item into your public_html folder.
If you choose to work on the server with ssh, you will be using scp command to secure copy all of these into your server space. Please reach out to a team lead to complete this step.
Here are the commands to copy a local file or folder to a remote:
[in your local directory with the files / folder]
scp -r ./assets [your-eid]@file.laits.utexas.edu:/mnt/home/
[your-eid]/public_html
[enter password]
scp ./template.html [your-eid]@file.laits.utexas.edu:/mnt/
home/[your-eid]/public_html
[emter password]
scp ./template.css [your-eid]@file.laits.utexas.edu:/mnt/
home/[your-eid]/public_html
[emter password]
Check that the HTML page rendered at https://laits.utexas.edu/~[your-eid]/template/html (or /[your-local-url]/template.html looks like this:
Designing Your Site
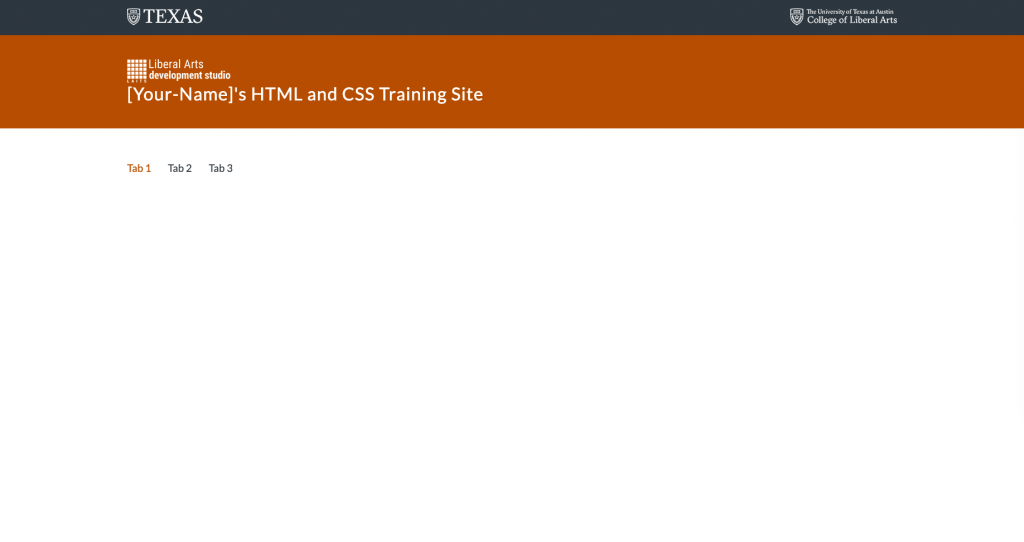
Tab 1: Simple Text and Headers
You can go ahead and get started on designing your site! Using what you’ve learned so far, design the first tab with simple text and headers. Include:
At least 2 headers
At least 2 paragraphs
(You can also use the practice you’ve done earlier and paste it in!) Be sure to also utilize CSS to style your headers and paragraphs accordingly. Here’s my site to get you started: https://laits.utexas.edu/~thn556/index.html.
Switching Tabs
Let’s create new pages for your Tab 2 and Tab 3. Navigate to the nav bar section of your template.html and make this change:
<!-- nav bar -->
    <div id="nav-bar">
        <div class="nav-item active">
            <!-- # means link to itself -->
            <a href="#">Tab 1</a>
        </div>
        <div class="nav-item">
            <!-- we want to link it to tab2.html -->
            <!-- ./ means in the same folder -->
            <!-- which is public_html is this case -->
            <a href="./tab2.html">Tab 2</a>
        </div>
        <div class="nav-item">
            <a href="./tab3.html">Tab 3</a>
        </div>
    </div>
<!-- end nav bar -->
Create 2 new files named “tab2.html” and “tab3.html” in public_html. Then copy the same HTML skeleton from template.html. Refresh the page. Now you’ll have your tabs linking to different pages. You might see that the page looks the same because you copy the skeleton over, but check the URL:
When you click on Tab 2 from Tab 1 the URL should be https://laits.utexas.edu/~[your-eid]/tab2.html
When you click on Tab 3 from Tab 1 the URL should be https://laits.utexas.edu/~[your-eid]/tab2.html
You do need to go inside tab2.html and tab3.html to change the href attribute to direct to the right page.
When on Tab 1
Clicking on Tab 1 will direct to itself, hence href="#"
Clicking on Tab 2 will direct to tab2.html, href="tab2.html"
Clicking on Tab 3 will direct to tab3.html, href="tab3.html"
When on Tab 2
Clicking on Tab 1 will direct to template.html, href="template.html"
Clicking on Tab 2 will direct to itself, hence href="#"
Clicking on Tab 3 will direct to tab3.html, href="tab3.html"
When on Tab 3
Clicking on Tab 1 will direct to template.html, href="template.html"
Clicking on Tab 2 will direct to tab2.html hence href="tab2.html"
Clicking on Tab 3 will direct to itself, hence href="#"
Tab 2: Intermediate Content
In this tab you will explore more intermediate HTML and CSS content. Please pick 3 challenges from the list of options below and incorporate it into your site. For each challenge, the resources for solving it will be included.
If you’re up for some animations (since these are quite elaborate, each of them can be counted as a separate challenge, so you can do all three of them and be done):
If you find something you’re interested in implementing, please feel free to propose it as your challenge as well!
Tab 3: Advanced Content
Congratulations on making it here! You’ve done a great job! Now, for the last section of this training, you will be exploring more challenging content in HTML, CSS, and a little bit of JavaScript. Like Tab 2, you will be presented with a few challenges that you are free to choose from, however some of the challenges will have instructions posted here!
First, let’s set up your JavaScript file. Please note that you will not be required to write your own JS, as the focus of the training is on HTML and CSS, but you might need this file to reuse JS code from the resources to implement your desired look and functionality.
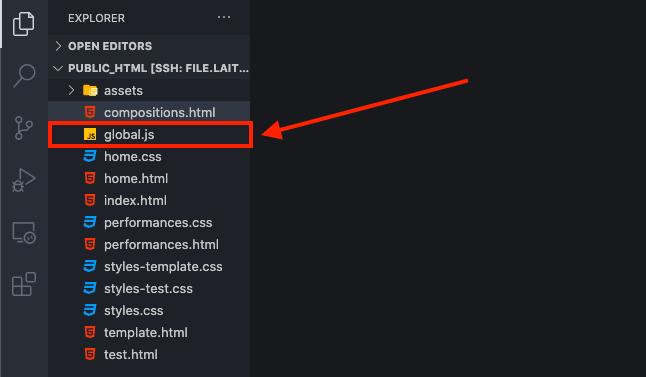
In public_html, create a file called global.js
Link it to all of your HTML files you’ve created so far. Right before you close the </body> tag, add <script src="./global.js"></script>. Make sure you copy this <script></script> tag for every HTML files you’ve made so far.
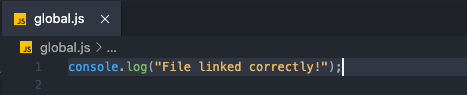
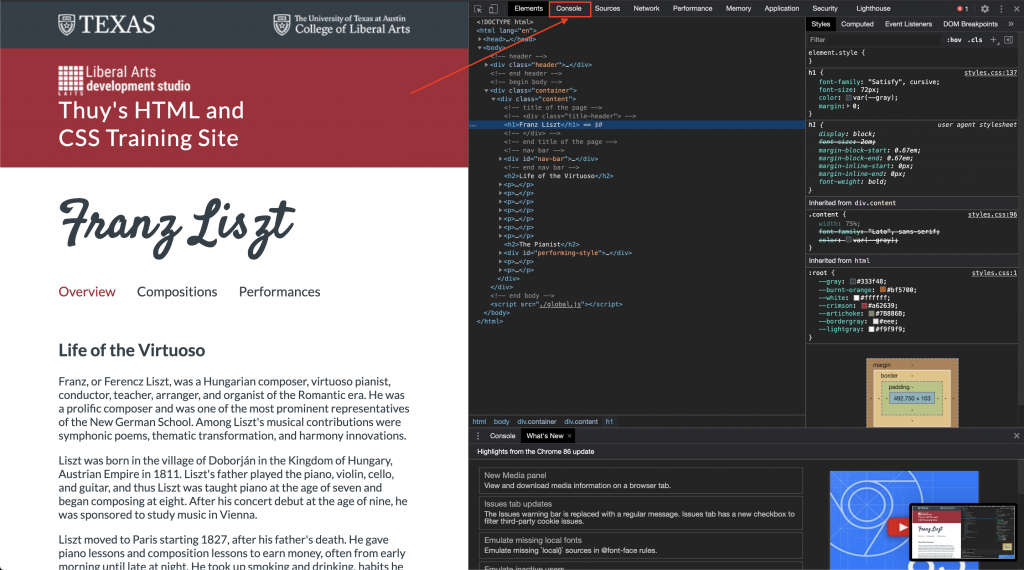
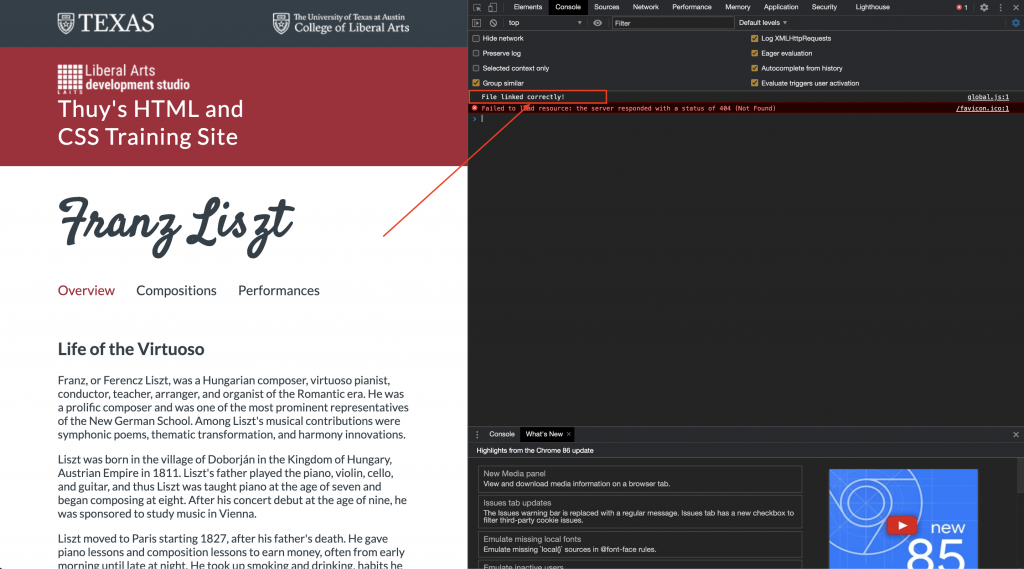
Check that the file is linked correctly. In global.js, type console.log("File linked correctly!");
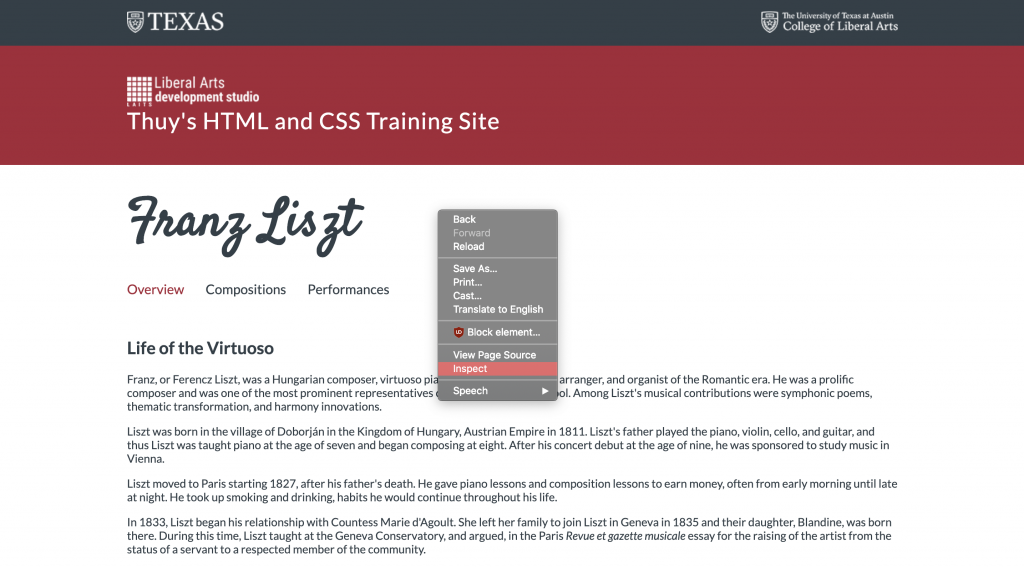
Now go to the browser and go to any of the HTML page you’ve made so far. Right click > Inspect.
Click on the “Console” tab.
If you see “File linked correctly,” you’ve successfully linked the JavaScript file. Otherwise, please reach out to a team lead.
Here are the challenges. Please pick 3 from the ones below, or propose your own. If you do decide to propose your own, please check with a team lead for approval:
Please note that for the link above, you will add the JavaScript directly into your global.js file. You are also encouraged to complete just the plain accordion first (no animation), and once that’s working you might want to try out animation (slide down).
Note: if you the challenge requires you to have JS, you will paste the JS code provided in the resource page in your global.js.
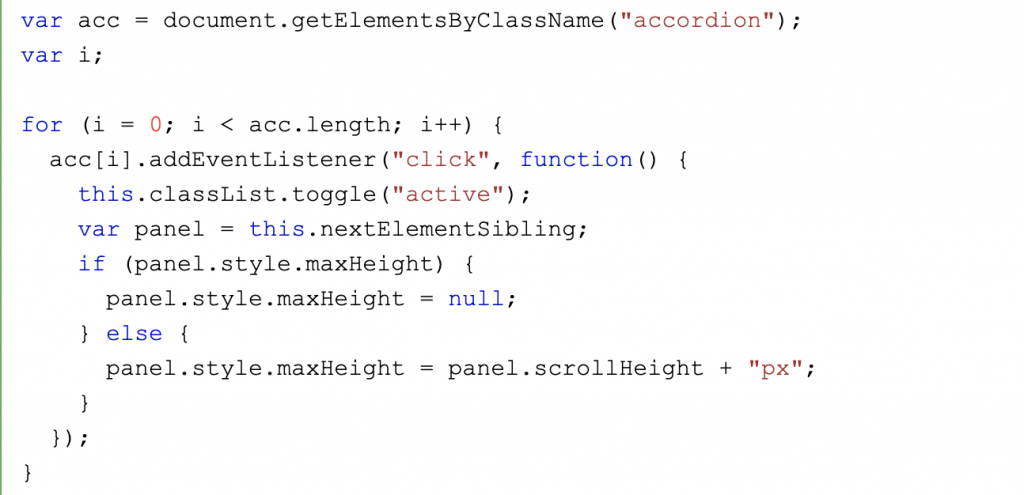
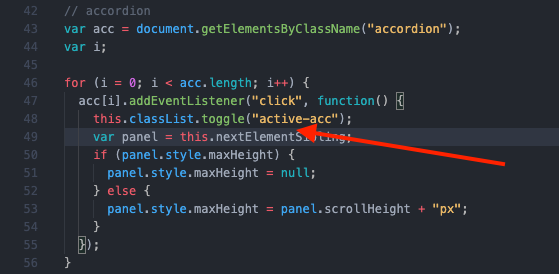
For example, let’s say that I wanted to copy the JS from the resource page to my file. It’d look like so:
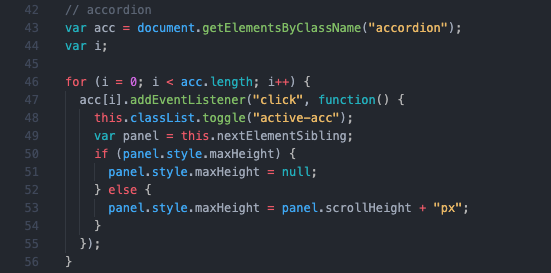
On the resource page, it looks like this:
Notice that the class name have been slightly adjusted after the code is copied over:
That’s because I’ve defined my class name a little differently in the CSS (also because the class “active” clashes with our stylings for the active tab).
No worries if you find JS confusing, you are more than welcome to do the challenges that involve only HTML and CSS.
Where to apply what I’ve learned?
You might have seen HTML, CSS, and JS in the tools we used, such as Cascade, CLIO, etc. Below are the ways you can sneak in your newly acquired HTML and CSS knowledge into these tools.
Cascade
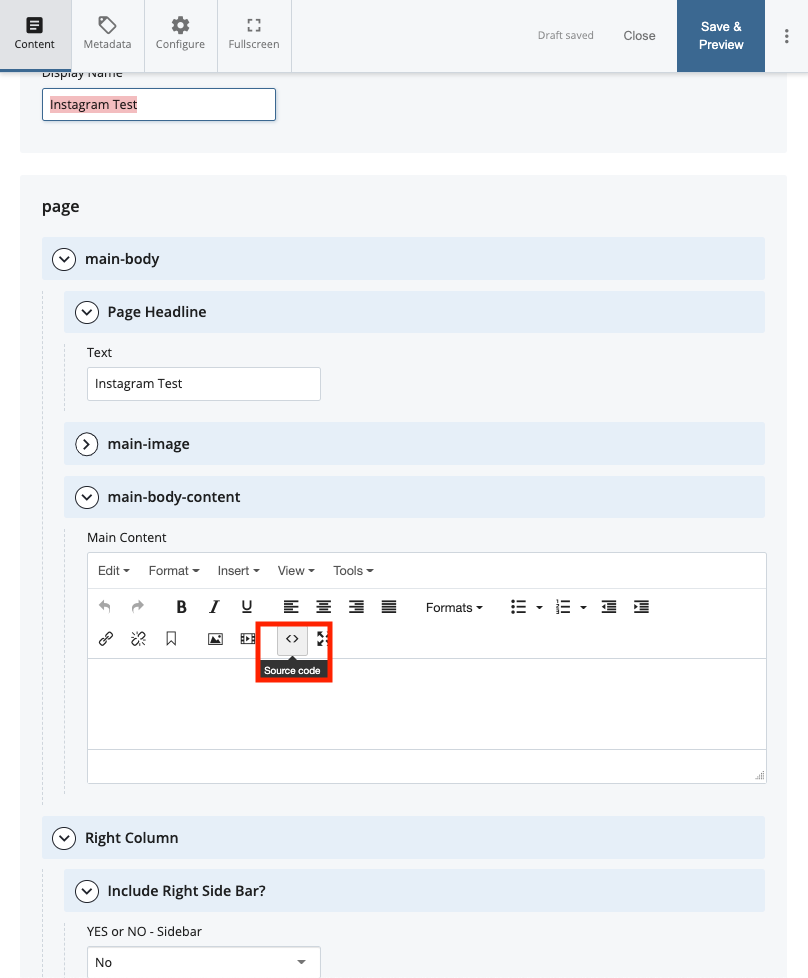
To edit the HTML, in the Cascade editor, click “Source Code.”
Unlike your CSS file where you write your CSS separately, in Cascade you will need to write inline CSS. In other words, your CSS will be within your HTML, wrapped between <style></style> tag. This tag will be placed at the beginning of the HTML. For example:
This gives the result:
CLIO
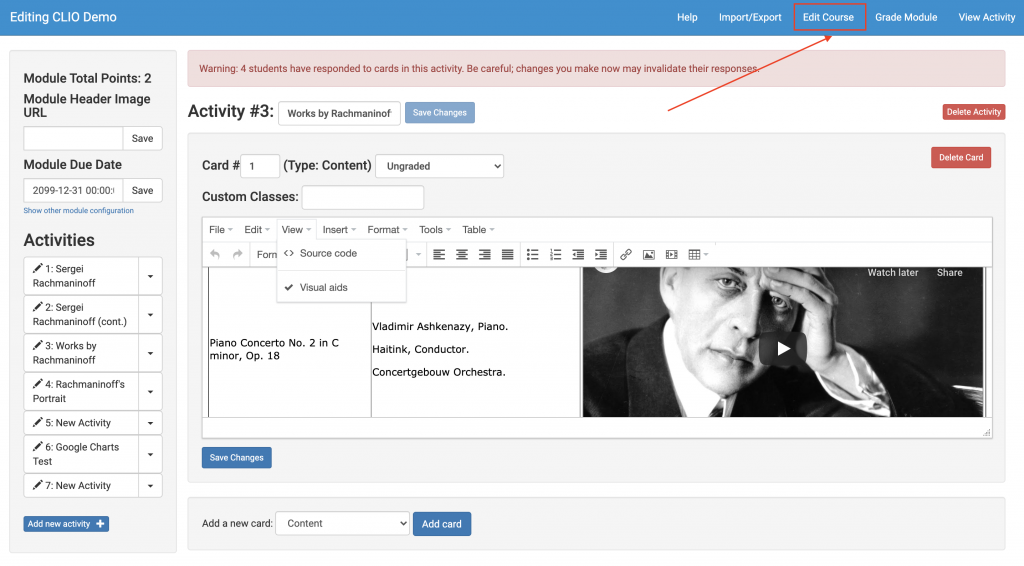
In CLIO, you can edit the HTML of a card by clicking View > Source Code.
And to edit the CSS, click “Edit Course.”
Conclusion
Congratulations on completing this training. It’s a rather long and involved training, and it can be very confusing and frustrated, so thank you so much for all of the hard work you’ve done. I hope you’ve had fun, and that you will be able to apply what you’ve learned when you have the chance to encounter it :).