
Important Information: Follow these instructions when you need to set up a new site for a client. None of these steps require deleting anything, so keep that in mind while going through the instructions. Make sure you have ADMIN ACCESS before creating a new unit in Cascade. If you are not, you won’t be able to accomplish this task. Please contact Suloni or Tim for this.
Step 1: Creating the Web Presence in Cascade
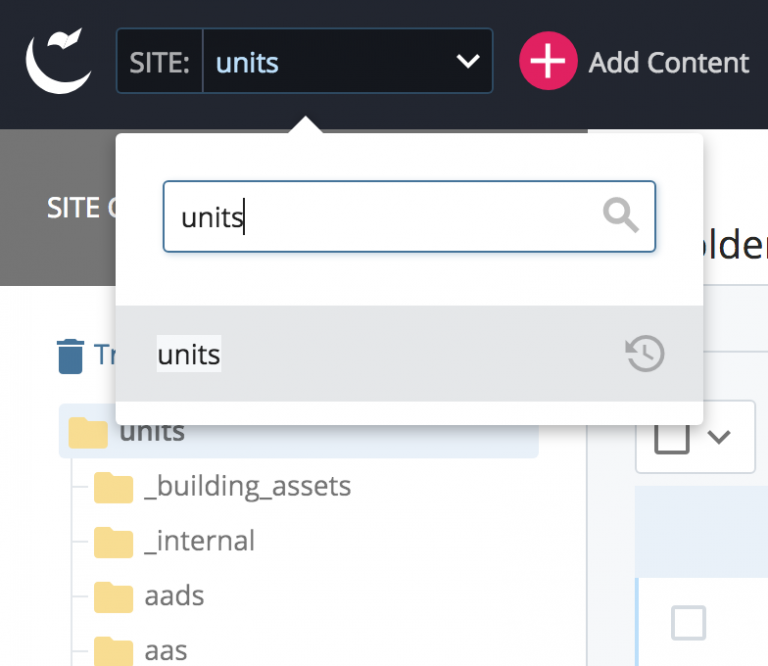
- Once you log into Cascade, go to the top left bar and click units in the drop-down menu. The new page will show all the web presences we have created for different departments.

2. From here, you will click “Add Content” and “Web Presence” to add a new site to the units folder.
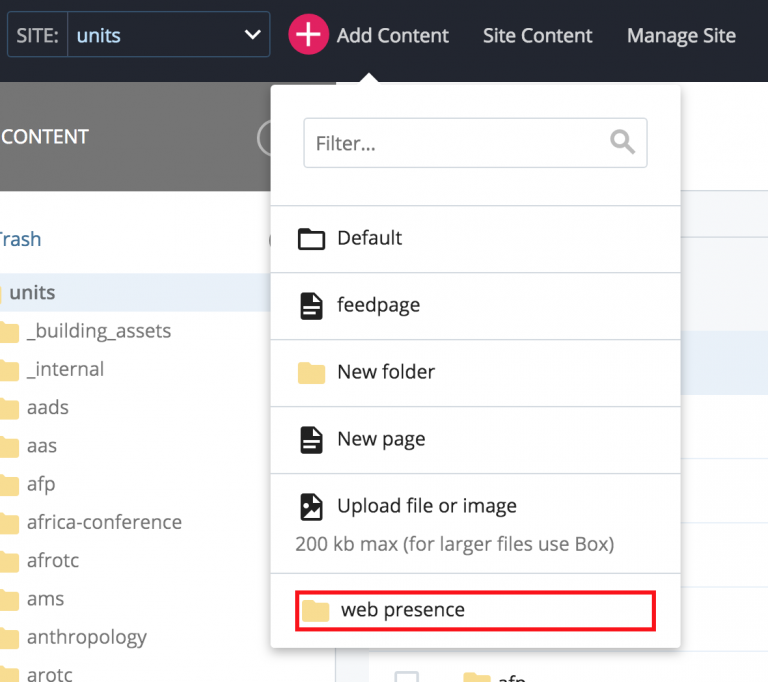
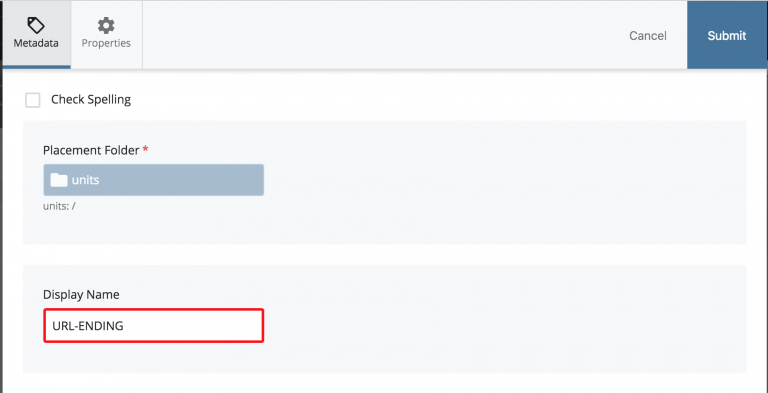
3. You will need to pick a display name for the new site. This creates the URL ending for the website. Use the client’s given website name for this step. Click “Submit” when done.
Step 2: Create New Access/ Permissions Group
Note: Groups define the parameters for how much content editing users added to the Cascade site can do. For example, when a user is assigned to the “depts-psychology” group, the user is automatically granted access to all the content in the “psychology” folder/web presence.
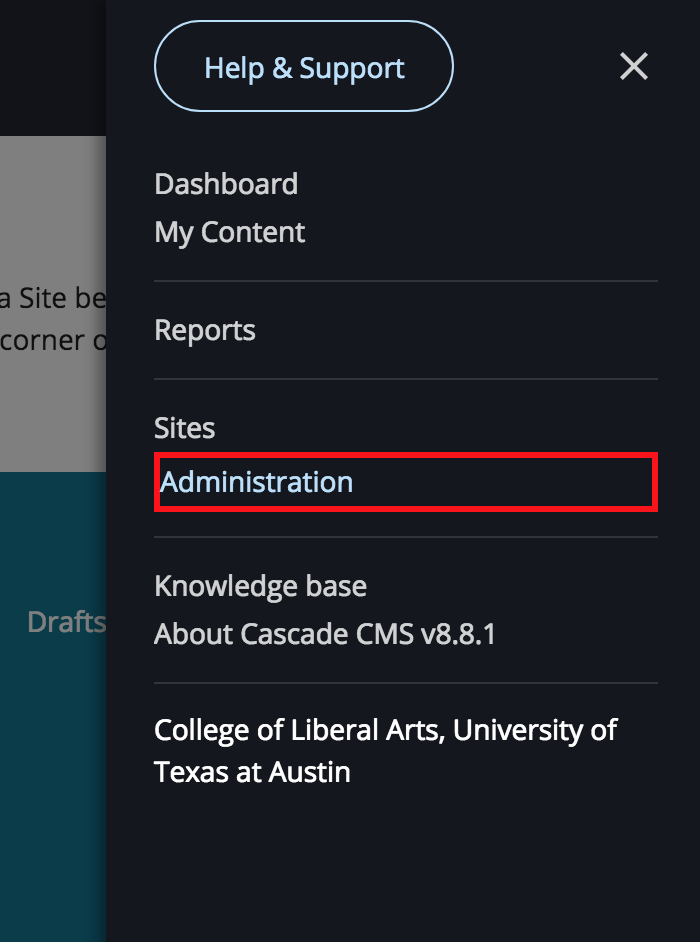
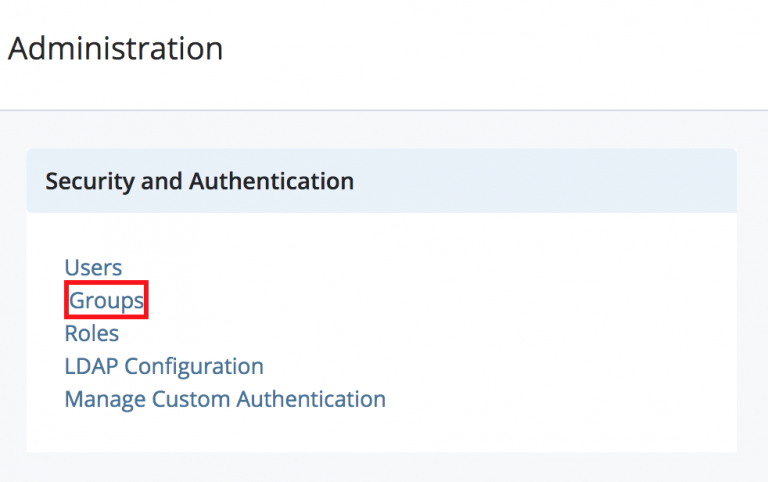
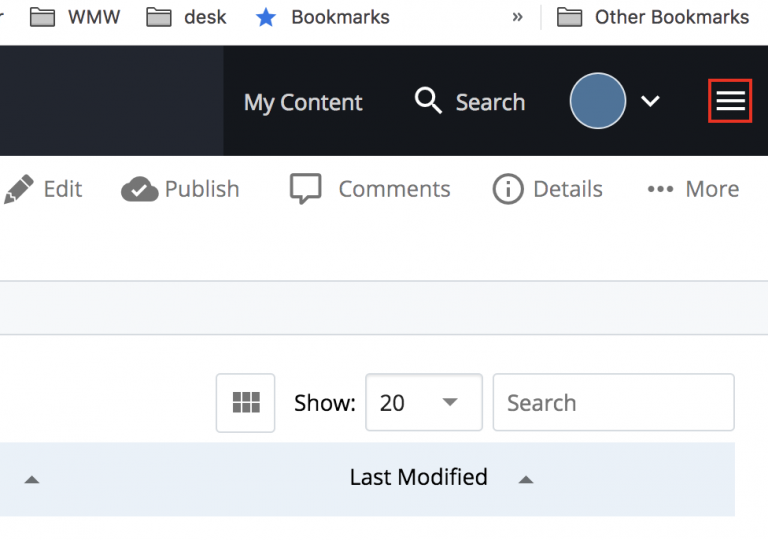
- Click the hamburger icon in the top right and when the menu pops up click on administration.

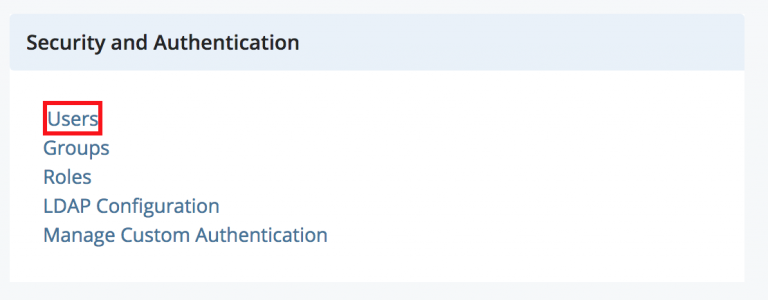
2. Under “Security and Authentication” click on “Groups”.
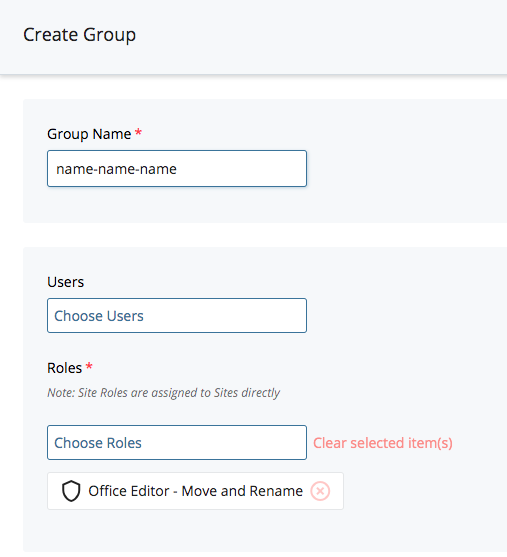
3. In the top right corner of the page click “Add Group” and name the group. It can be named starting with a “orgs-, progs-, or centers-“.
4. If the users already has a Cascade account add them to the group using their first and last name or eid. If they do not have an account, you will add them later and can skip this field for now.
5. Under “Roles” click “Office Editor – Move and Rename” then click “Submit”.
Step 3: Create the Office Admin Account
Note: These steps only apply to the main client who will add and remove users over time and over see many edits.
If your client does not have a Cascade Account:
- Click the hamburger icon in the top right and when the menu pops up click on administration.


2. Under “Security and Authentication” click on “Users”.

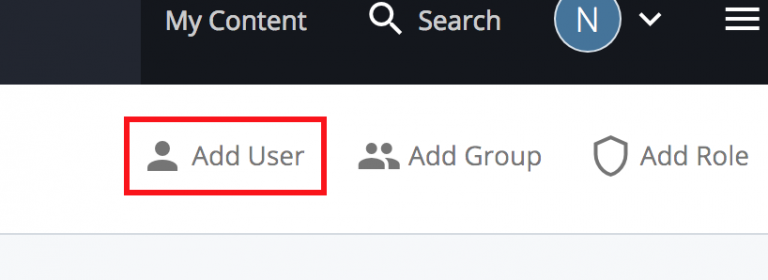
3. Click on “Add User” in the top right.

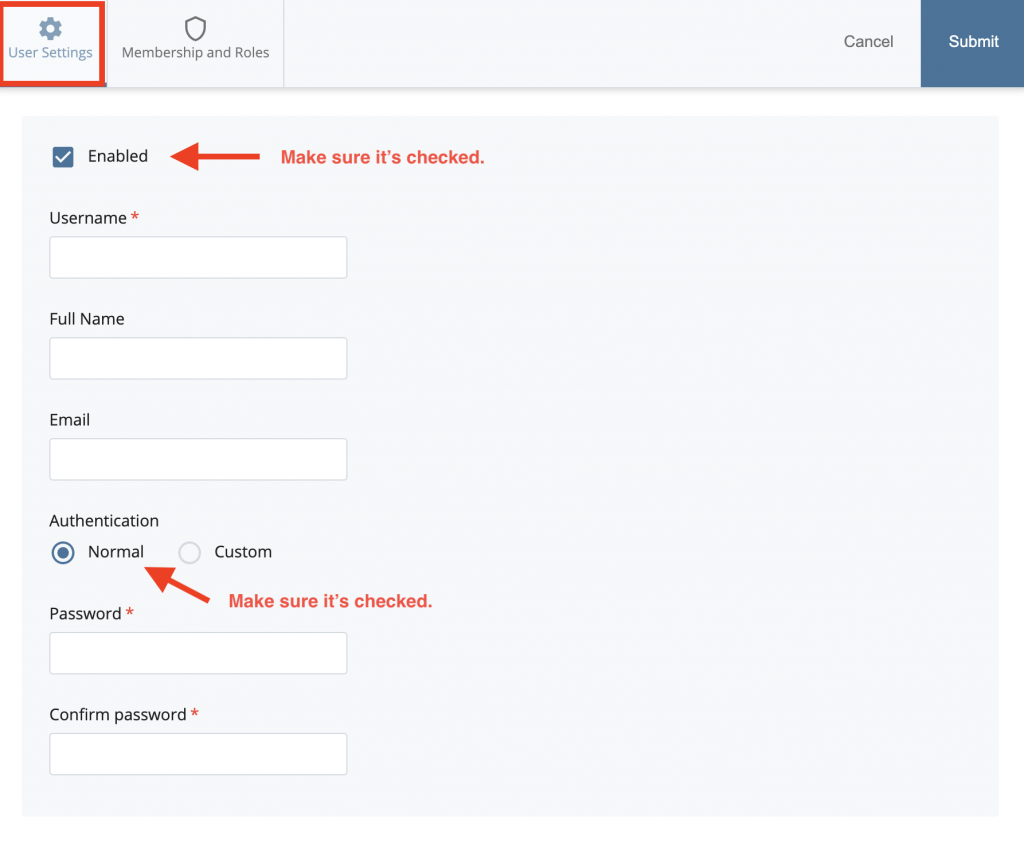
4. Fill Out under “User Settings”:
- Username – should be lowercase eid
- Full Name – (First Last)
- Email – UT email
- Authentication – Set to “Normal”
- Create a password that inspires them to change it – I use this site
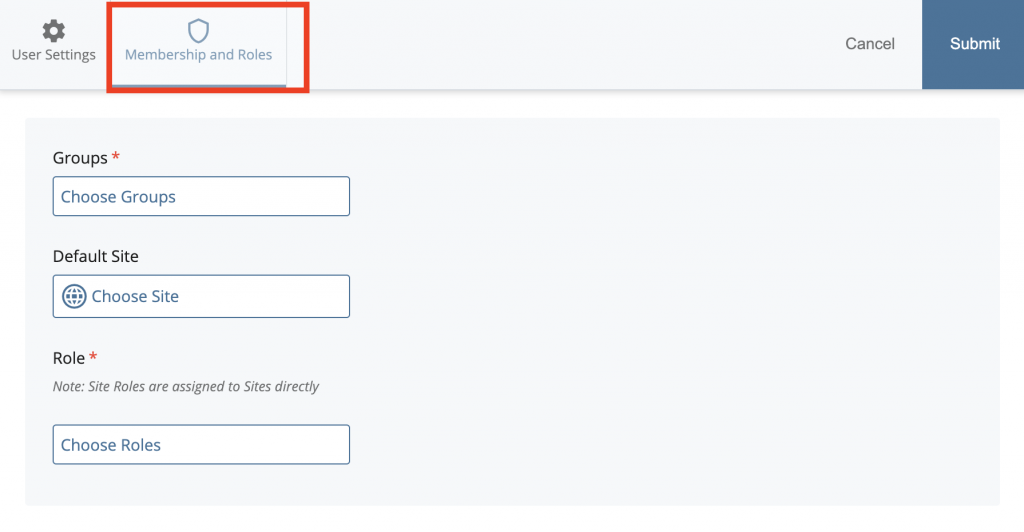
5. Click “Membership and Roles”:
- Groups – Select the group you created.
- Default Site – Skip
- Set Role as “Office Admin – Permissions”
- “Submit”

If your client does have a Cascade Account:
- Click the hamburger icon in the top right and when menu pops up click on administration.


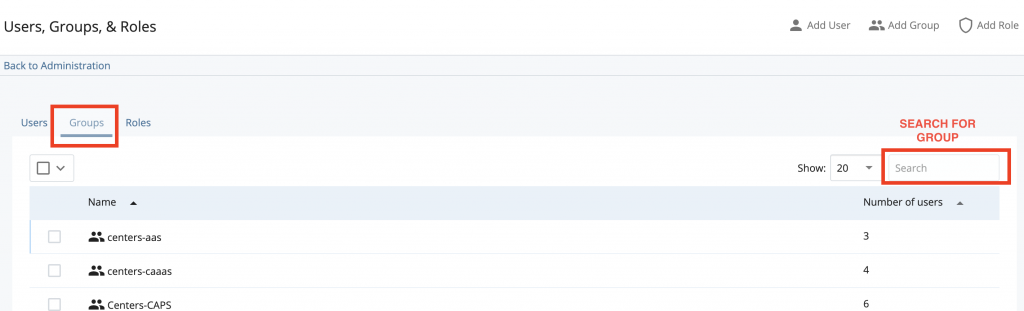
2. Under “Security and Authentication” click on “Groups”.

3. Search for your group you created and click on it.
4. Click “Edit” and click “Choose User” to search and add the client. Then click “Choose Roles”.
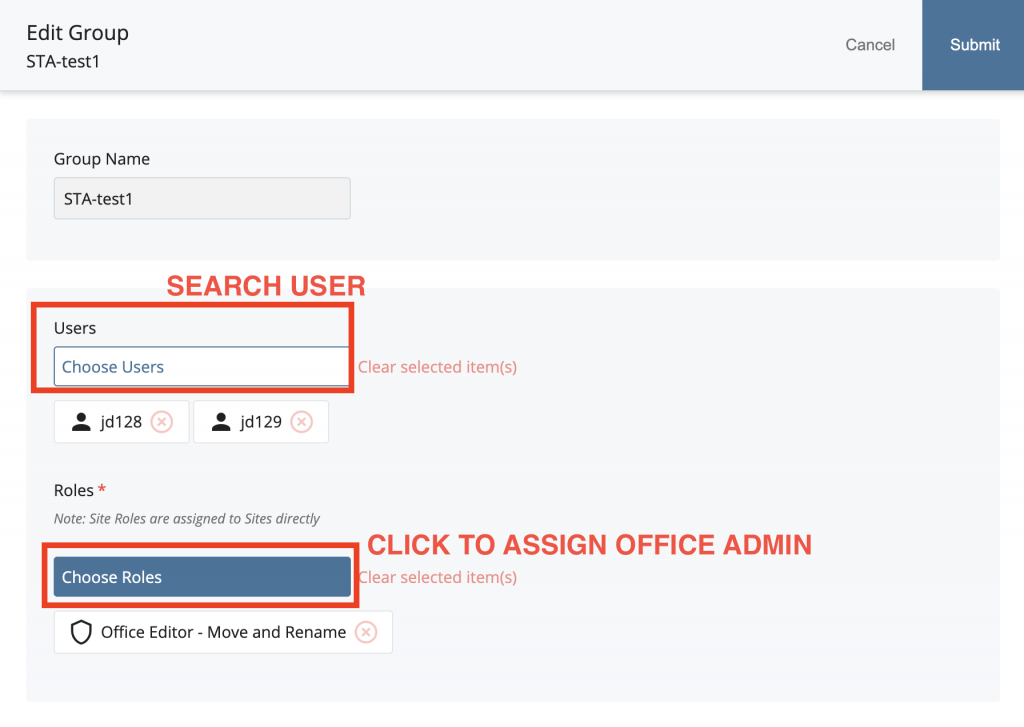
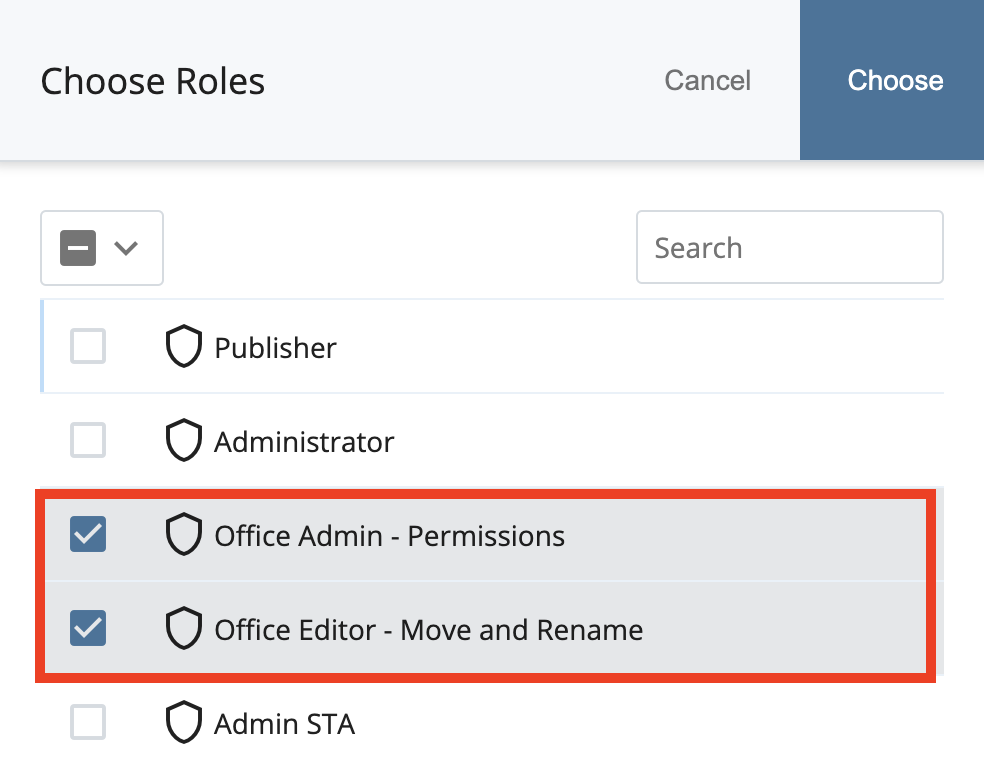
5. Assign as “Office Admin – Permissions” and “Office Editor – Move and Rename” then click “Choose”.
Step 4: Create and Add the New Users
Note: These steps apply to the extra users the client wants to have working on the site.
- Click the hamburger icon in the top right and when menu pops up click on administration.

2. Under “Security and Authentication” click on “Users”.
3. In the top right corner click “Add User”
4. Fill Out under “User Settings”:
- Username – should be lowercase eid
- Full Name – (First Last)
- Email – UT email
- Authentication – Set to “Normal”
- Create a password that inspires them to change it – I use this site
5. Click “Membership and Roles”:
- Groups – Select the group you created.
- Default Site – Skip
- Set Role as “Office Editor – Move and Rename”
- “Submit”

Step 5: Add the Group to the Publishing Mechanism
- In the top left of the page click the “Units” folder in the drop-down menu.

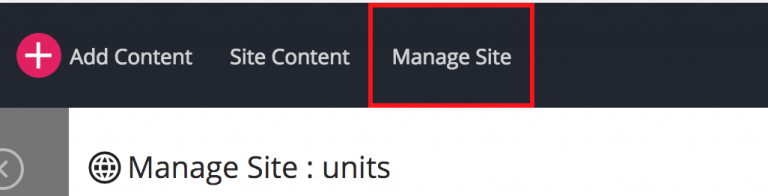
2. Click on “Manage Site” to the right of search box. Then select “Site Settings” in the top right.

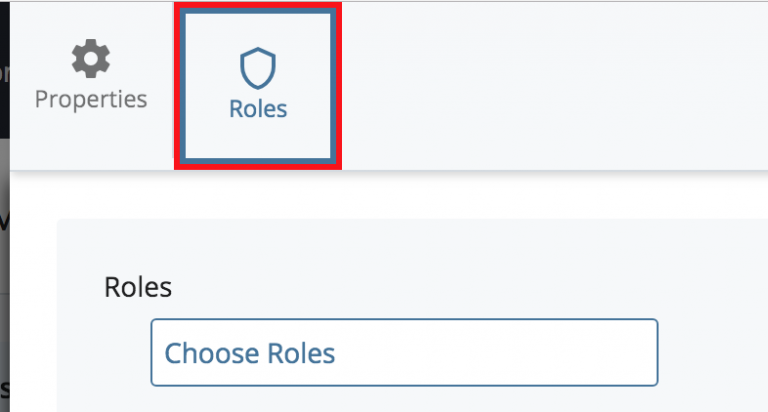
3. Click on “Roles” and add the group you created by clicking on “Choose Users and Groups”.
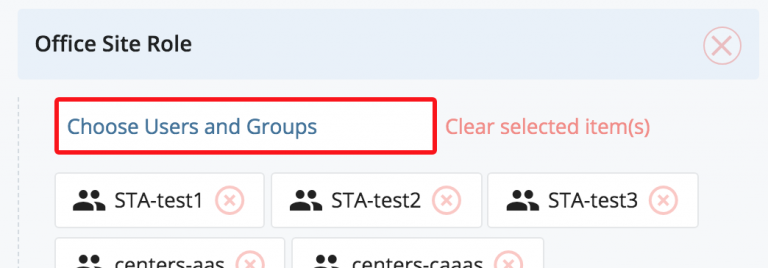
4. Select the “Groups” tab. Search for your group name and click on it so that it is check marked. Then click “Choose” and “Submit”.
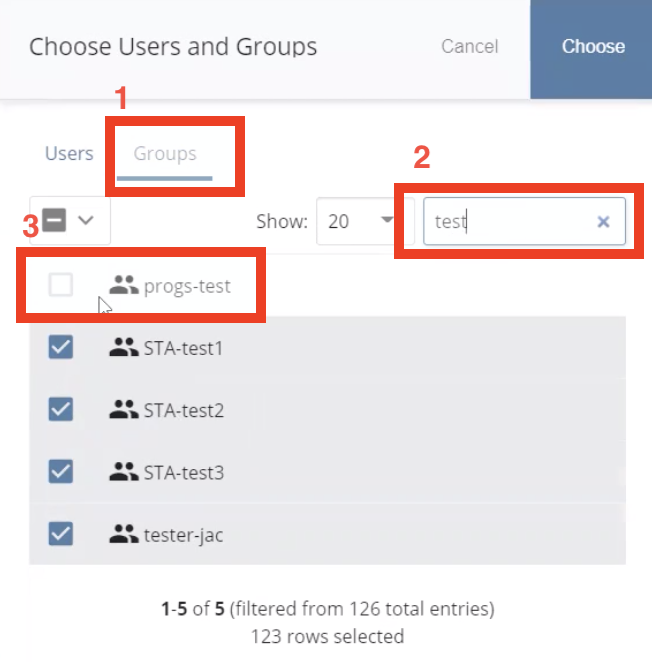
Note: You will see all the websites listed underneath, and when you search for your group you will notice that they are all check marked. This is normal and it should look like this. Do not uncheck or delete anything. If you do click cancel and restart the process.
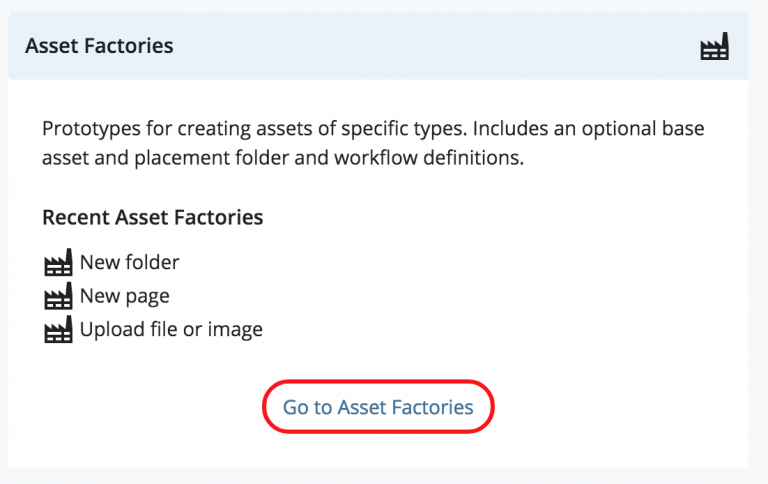
Step 6: Add Asset Factories and Destinations
To allow users within the group to be able to add pages and folders to the website folder you need to add asset categories to the website you just created.
- Go to “Manage Site” to the right of the top-left search bar. Then click on “Go to Asset Factories”.

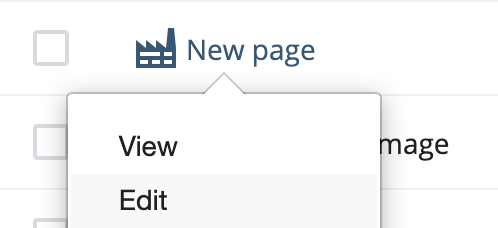
2. Once inside the Asset Factories page right click on “New Folder” and click edit.
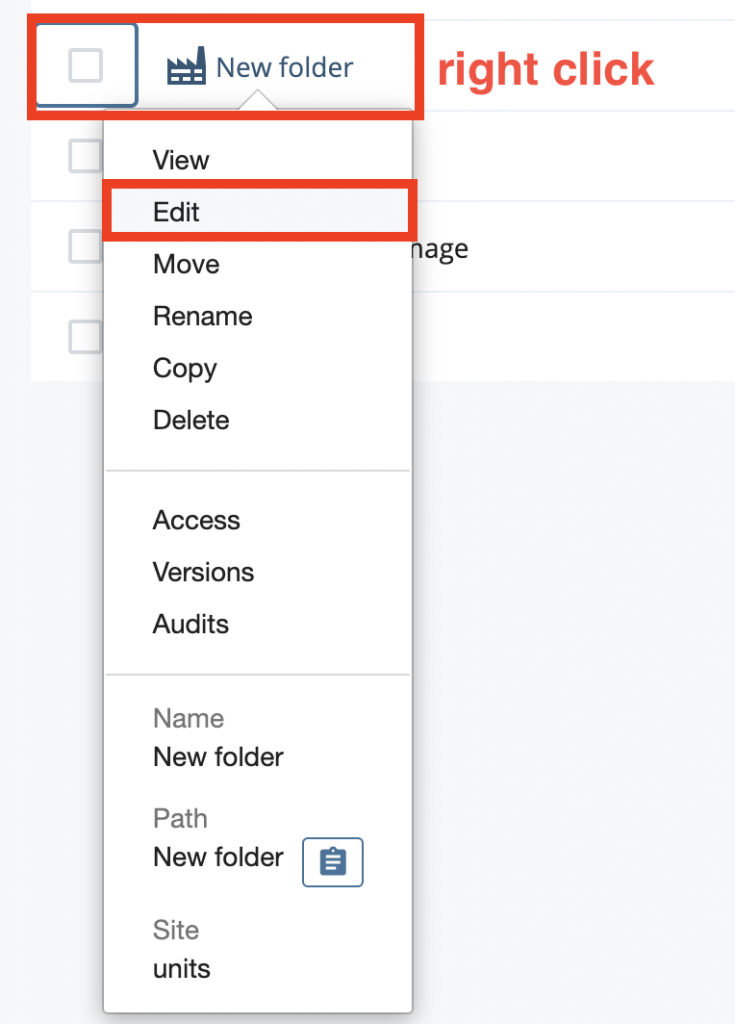
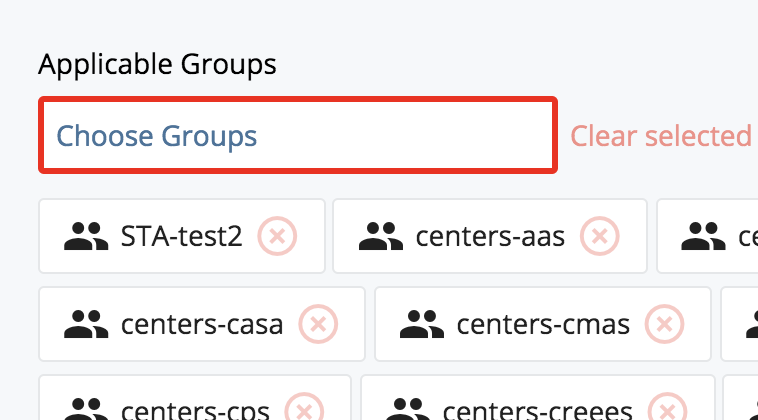
3. Under “Applicable Groups” click “Choose Groups” then add the Group you created. Click “Submit”.
Note: You will see all the websites listed underneath, and when you search for your group you will notice that they are all check marked. This is normal and it should look like this. Do not uncheck or delete anything. If you do click cancel and restart the process.
4. Repeat steps 2 and 3 for “New page” and “Upload file or image” on the same Asset Factories folder you were in.

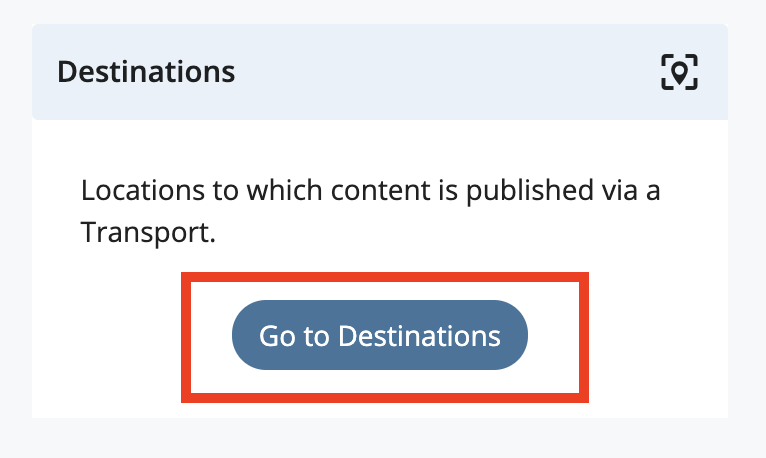
To allow users within the group to publish the new site and its component folders and pages, add the new group to Destinations.
- Navigate to “Manage Site” as in Step 5. Find and click “Go to Destinations.”

2. Right click “live” then click “Edit.”
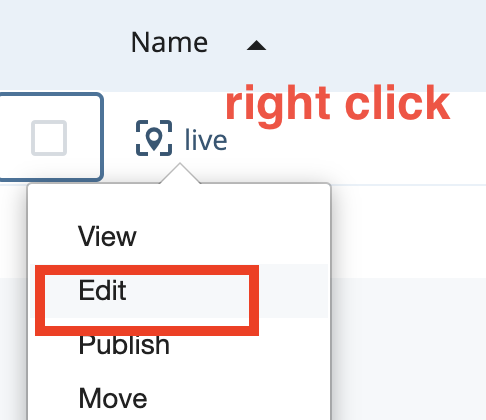
3. Under “Applicable Groups” click “Choose Groups” to add the new group. Click “Submit” to save the update.

Note: You will see all the websites listed underneath, and when you search for your group you will notice that they are all check marked. This is normal and it should look like this. Do not uncheck or delete anything. If you do click cancel and restart the process.
Step Seven: Give WRITE Permissions to the New Web Presence for the New Group.
Part One
- Return to web presence by selecting “SITE: units”. On the new folder, you created right-click on the name in the left panel and click on “View”.


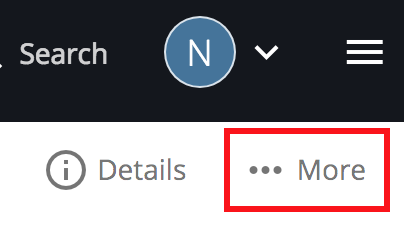
2. In the top right click “More” and then click “Access” in the drop down.

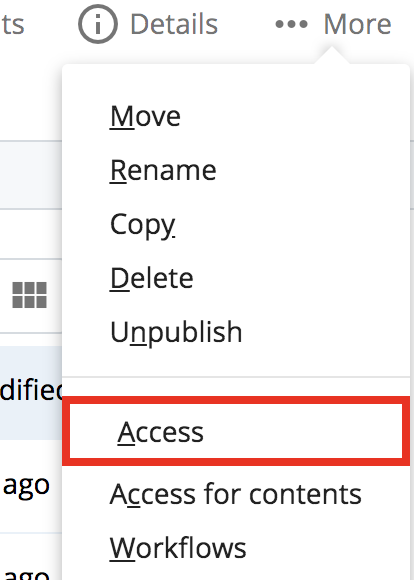
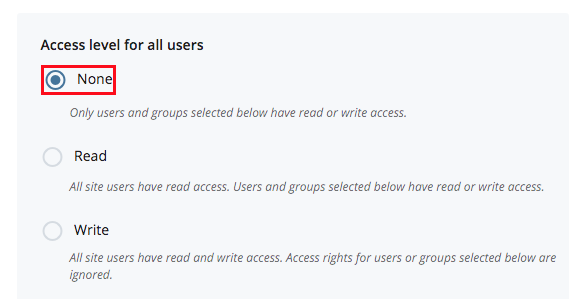
3. Choose “None” for “Access level for all users”
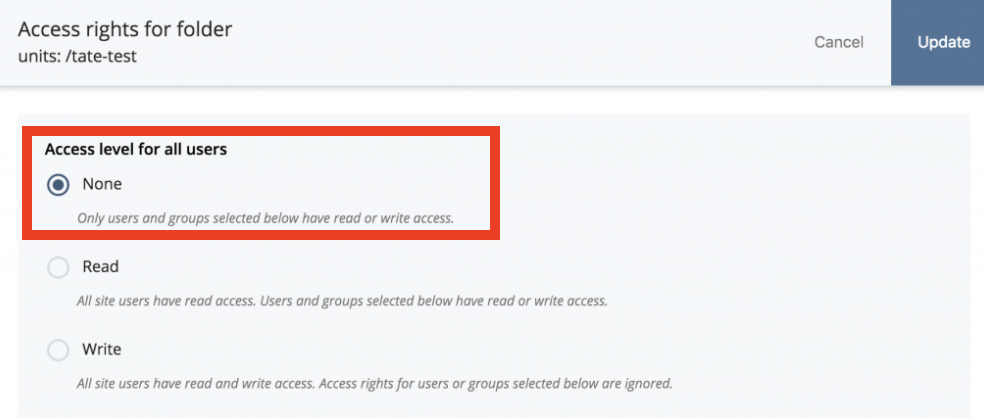
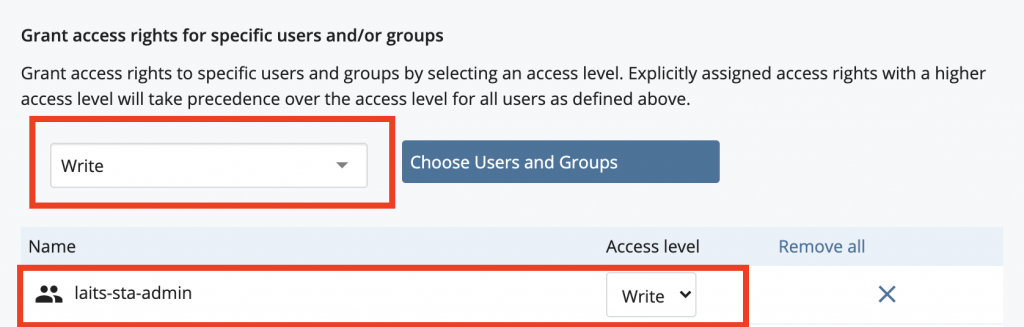
4. At the bottom switch the drop down to “Write” and add the group you created in previous steps if not already present. (Click “Choose Users and Groups” and click “Groups” tab to search for your group). Also make sure to add “laits-sta-admin” group with “Write” access so that other sta’s can edit this site.

5. Click “Update”.
Part Two
- Return to web presence by selecting “SITE: units”. On the new folder, you created right-click on the name in the left panel and click on “View”.
2. In the top right click “More” and then click “Access for Contents” in the drop down.
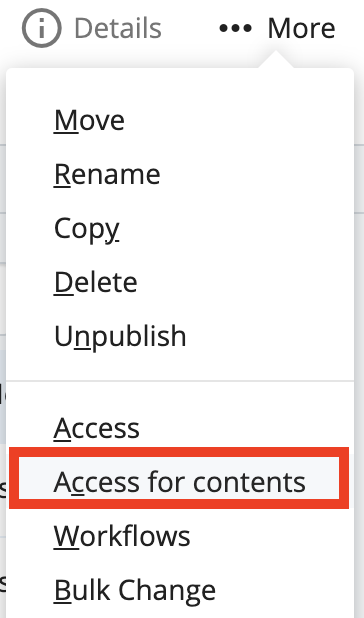
3. At the bottom switch the drop-down to “Write” and add the group you created in previous steps if not already present. (Click “Choose Users and Groups” and click “Groups” tab to search for your group). Also make sure to add “laits-sta-admin” group with “Write” access so that other sta’s can edit this site.

4. Click “Merge Access Rights”.
Step 8: Restricting Access to “Unit_Info_LAITS_Only” and Adding Department Logo to Page.
Restricting Access
- Click on the folder you created under Units. Then right-click “unit_info_laits_only” and select “Access” in the dropdown.
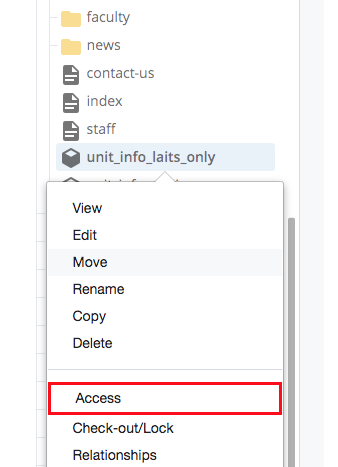
2. Select “None” under Access level for all users.
3. At the bottom switch the drop down to “Write” and add “laits-sta-admin” group with “Write” access so that other sta’s can edit this site. Do not add anyone else. We do this so only LAITS people can access this.
Adding Department Logos
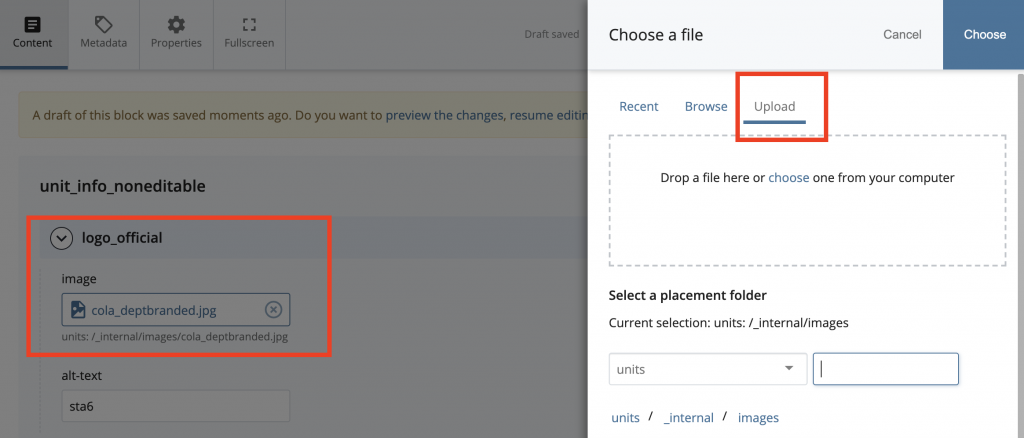
- Click “unit_info_laits_only” in the folder. Click edit in the right-hand corner and under “logo_official” upload the .jpg file of the department. Official department logos need to be in the format shown here: https://brand.utexas.edu/identity/college-school-and-unit-marks/
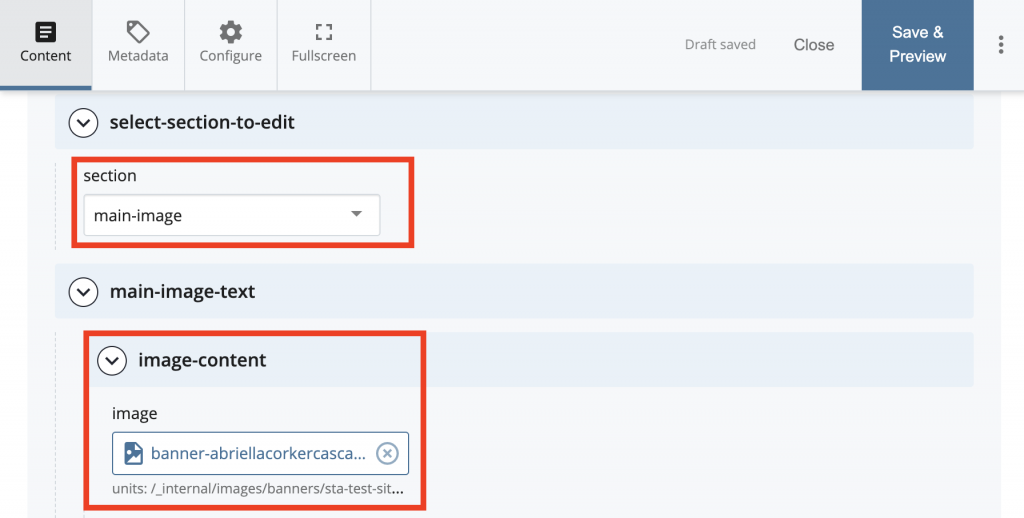
2. If the client provided you with a banner (place in Index) and alternative logo for the top right-side of the index page (place in unit_info_laits_only) add them. If not skip this step.

Yay! That’s the Cascade side…Publish the folder to make it go live.
Now Set up the COLA Database Side (unless told not to)
1. Go to the COLA Web Editor
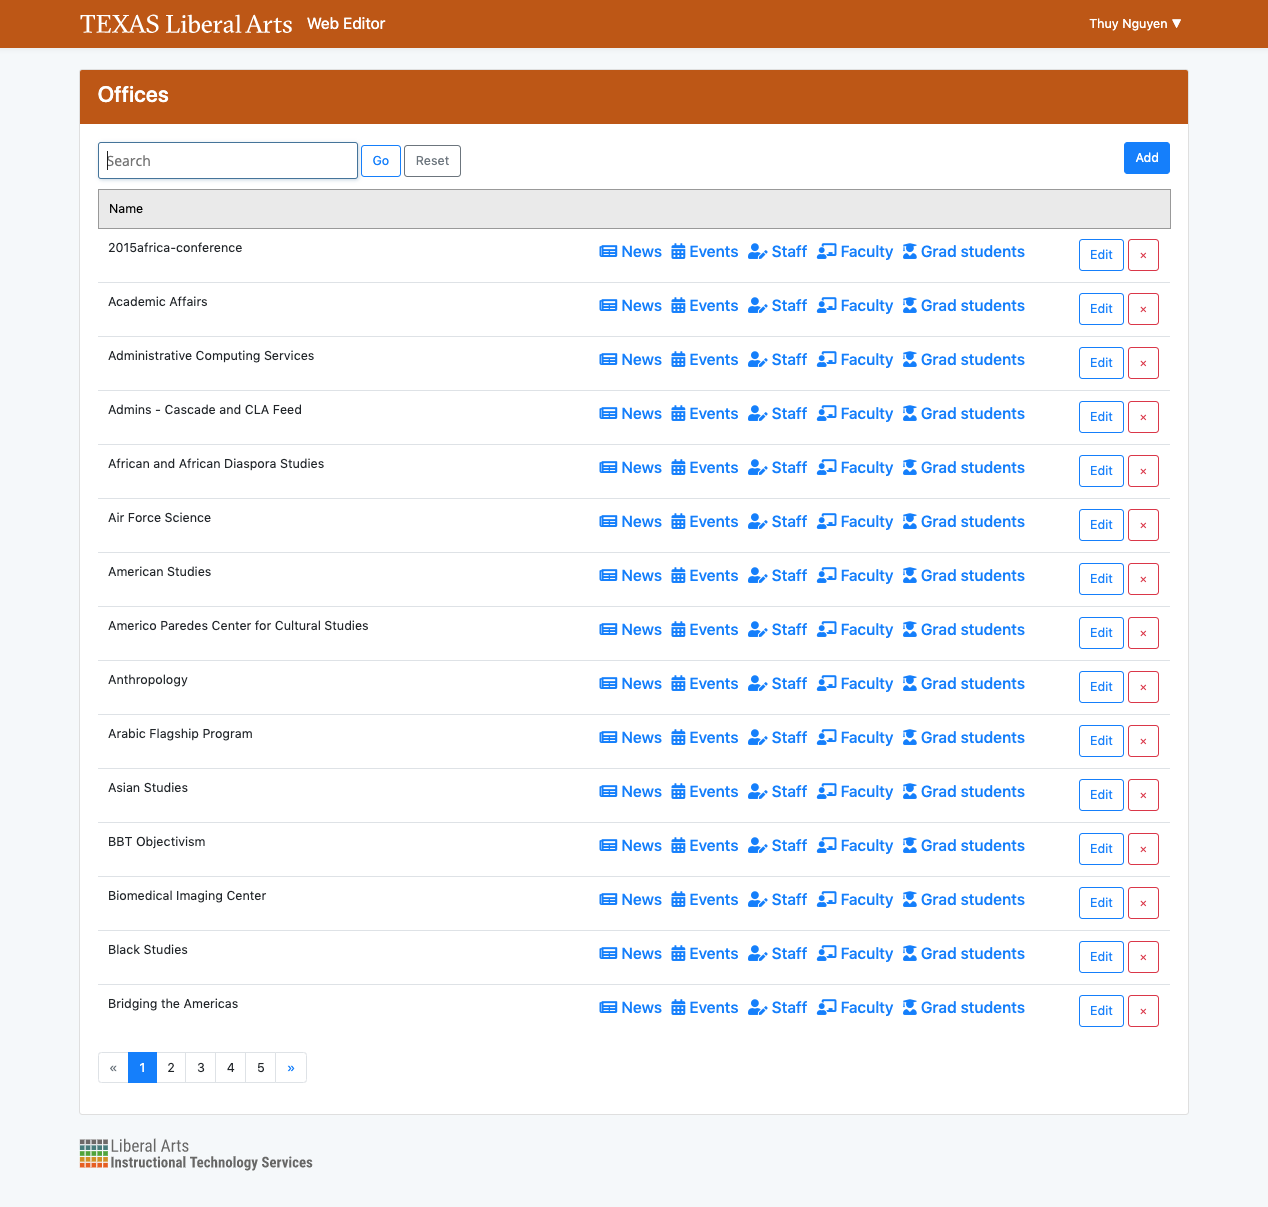
2. Go to Offices (drop down under your name)
3. Click ‘Add’ to create a new Office
4. Fill out the name and the path ending to the Cascade Site
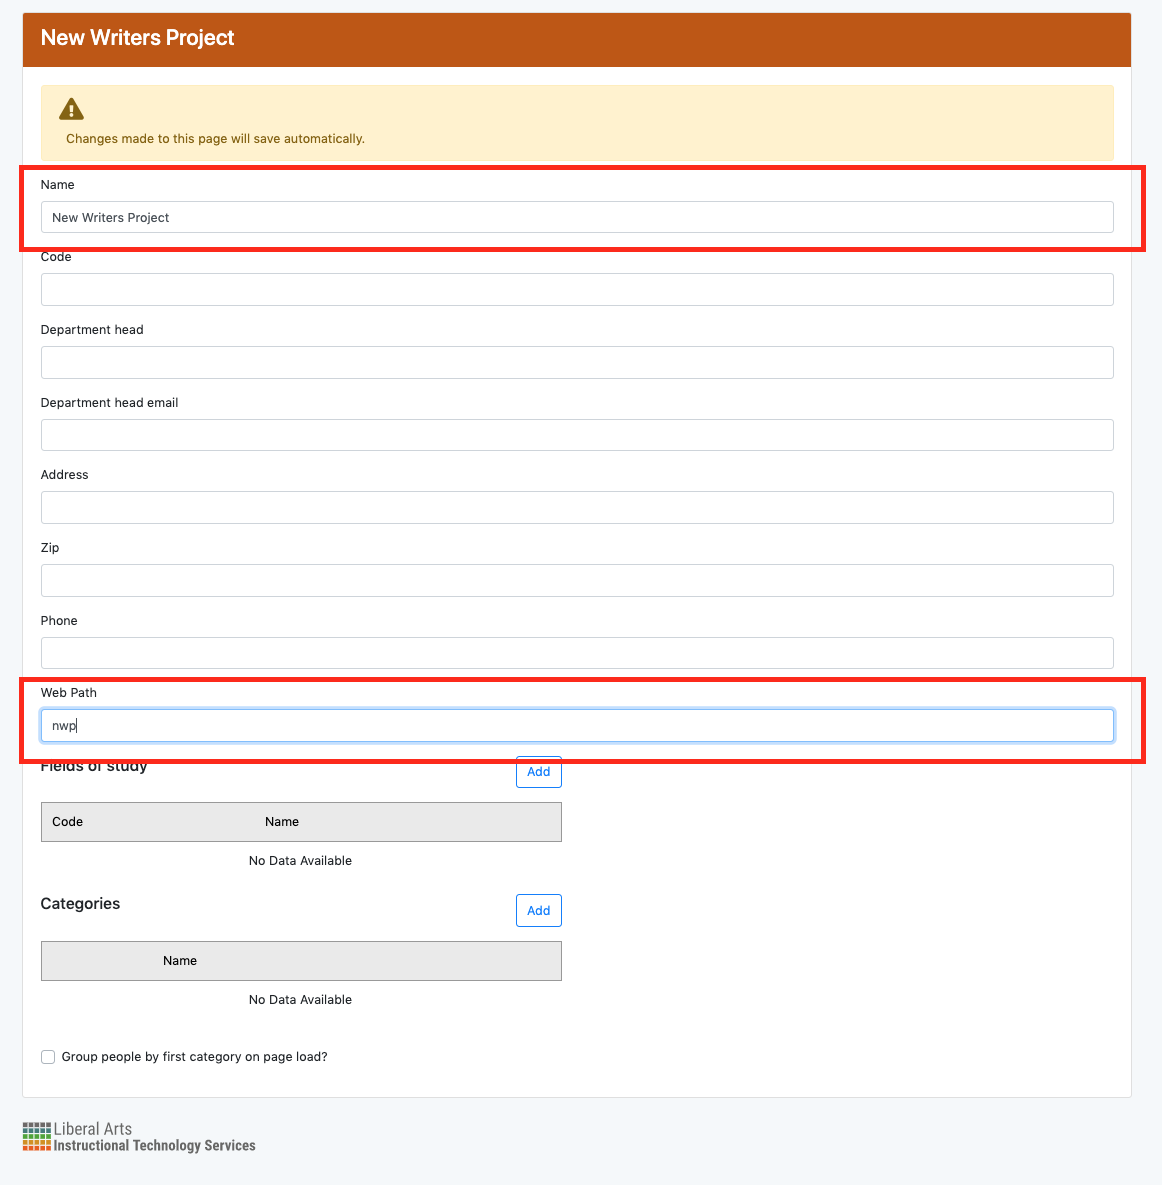
5. Save changes
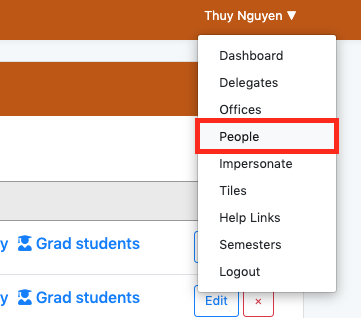
6. Click on People
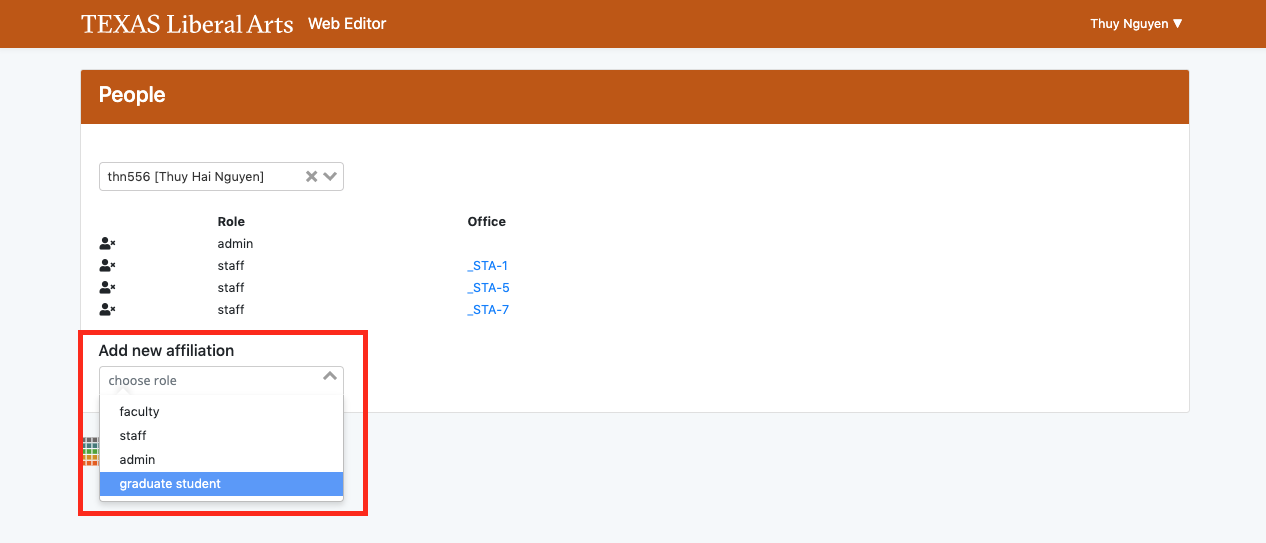
7. Add an affiliation for the client base on their role. Do not choose Admin.
8. Send an email to the new office admin (please feel free to improve this)
Email Subject: xxxxxx_sitename_xxxxxx: Cascade CMS & Cola Database
Hi Professor X,
Your site has been created!
Online Instructions/Documentation (in the process of being updated)
Instructions for the Cascade Content Management System:
https://liberalarts.utexas.edu/web-admin-help/how-to-use-cascade/navigating-to-a-page.phpInstructions for the COLA database:
https://liberalarts.utexas.edu/web-admin-help/how-to-use-the-web-editor/how-to-edit-a-profile.phpAccount Access (2 different sites)
Cascade Server Content Management System
https://cms.la.utexas.edu/login.act#
Username (case sensitive): XXXXXX
Password (please be sure to change the default password as shown here): XXXXXXXXCOLA Database
– this is what feeds the staff, faculty, news, and events
http://www.utexas.edu/cola/_db
Username: Your UT EID
Password: Your UT EID passwordCreate Additional Accounts
Instructions (beta) for creating additional admin accountsPlease let me know if you run into any issues while working with the site!
Thank you,
<Your Name>
9. New departments and centers requiring a web presence will require a new lockup, which looks like this:

These are created by submitting an order to UT’s Communication office. Please direct the client to this form to request one.