
An important part of the work we do here at LAITS involves collaborating with clients; fulfilling their requests, helping guide them through the process of development and the limits of the mediums you are trained in. As you work through these projects, you might realize your client does not have a clear understanding of what to visually expect from the end results of your work. Maybe, you as the designer need more visual clarification yourself. Well, when words are not enough to explain what you need, an efficient way to help someone visualize what a project might look like once it’s done is through mock-ups.
Mock-ups are visual representations of a project that simulate how it might look when finalized and in its corresponding context. Moreover, annotated mock-ups have the best of both worlds; written and visual communication. When you make an annotated mock-up, you are creating a design relevant to your project and adding a few comments, questions, and/or suggestions within that image, in order for the viewer to understand the message you are trying to send. This is a more effective way of communicating with your client because you are able to pack information into a single document and the annotations you make can be located right next to the thing you want to draw attention to.
Goals
The objective of this KB is to help you understand:
- What annotated mock-ups are
- The theoretical & practical applications of this visual method of communication
- How to compliment these mock-ups with clear client emails
Steps in Context
Now that you understand what annotated mock-ups are, let’s break it down with an example.
Let’s say you have a client who asked you to create a new webpage for them. They gave you some direction of what they are looking for on this page, but perhaps they gave you too much information and examples, and left a lot of decisions in your hands. What do you do now?
Well, you could create an annotated mockup and ask for more clarification on what your client likes and dislikes through it.
Step 1: You open Photoshop and create a new file with a width and height appropriate for the mock-up.
- If in doubt, make sure the size is exactly that of the display space, but add some extra space for the width so that you can fit the annotations better. Ex. if the original w: 1000px, go for w:1500px.
- If the website you’re mocking-up requires for the user to scroll down, make sure to double or triple the height of your mockup, so that you could fit all of that content into a single file.
- You could potentially change the size of the artboard afterwards, too. So don’t overthink this step.
Step 2: Take screenshots of the examples your client sent you. If you have room for making decisions, make sure to include the features you most like in those screenshots.
- For this step you also want to ensure that the whole browser window is visible, to give the client complete context of the end results.
Step 3: Now it’s time to franken-build your mock-up. Take the parts you most like and that are most relevant to the project from the examples that were provided to you, and add those elements into your design. Include only what you think will make for a successful page and what was required from you.
- Elements that are not necessary should be cropped off through Photoshop. If you need to build new elements too, this is the time to do it.
Step 4: Check that the format of your design follows the guidelines of the webpage you will build. If it does, move on. If it doesn’t, go back and make adjustments until it looks right.
- Examples of these guidelines can be: having the same background color, the similar padding on content, replicating the font if you need to insert new text, etc.
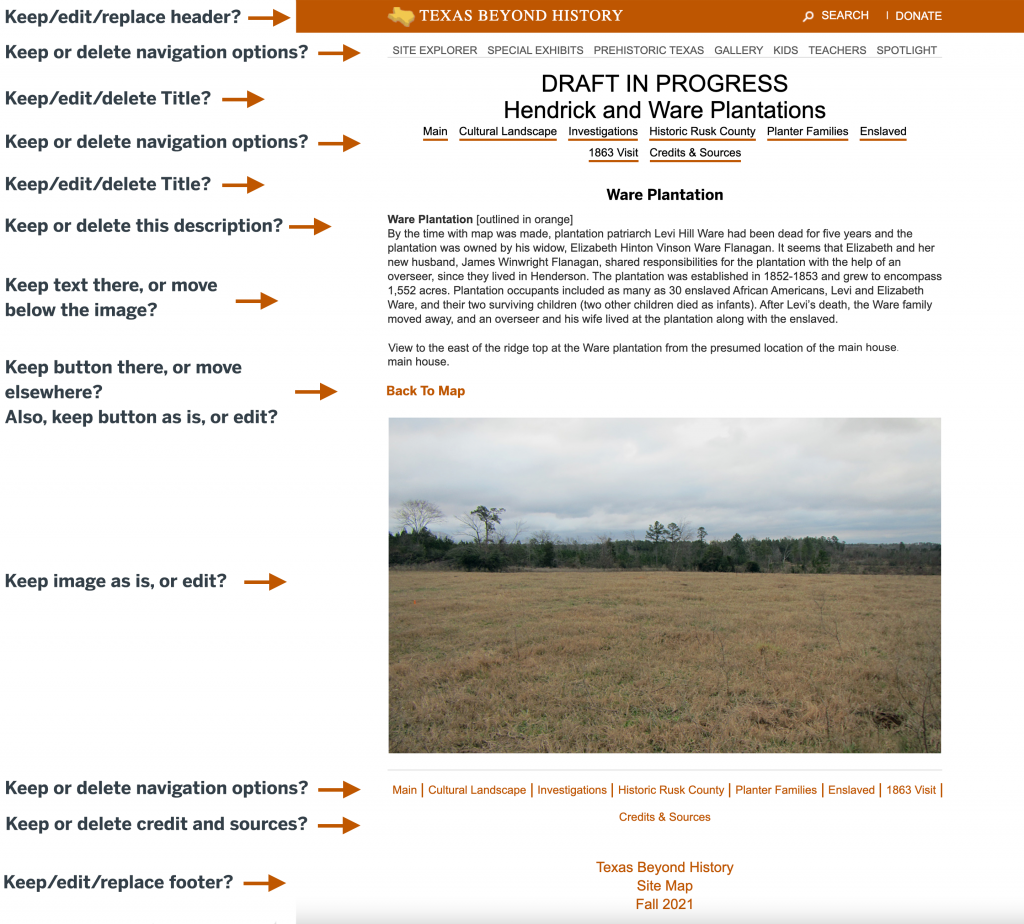
Step 5: Now it’s time to make your annotations. Add your questions/comments as new text that stands out from the rest of mockup. Place those annotations as close as possible to the elements you reference (i.e. if you talk about the header, inert your annotation at the top of the page). Adding arrows and other indications (circling/highlighting/underlining an element) as reference is also good practice.
Check out the following image:
Step 6: Now that you have finished working on the mock-up, you are ready to send it to your client. Write an email – on the same thread you have communicated with them before – explaining why you made this mock-up, and asking for their further input.
- Important: make sure that the client understands the vocabulary you used on the mock-up. Clients are not as versed on the same mediums and platforms you are, and what they can do. If you asked them about making edits, specify which kinds of edits would be possible to implement on the official site.
Check out this example corresponding to the image above:
| Keep: Leaving the element exactly as it is. Delete: Getting rid of the element altogether. Replace: Continuing to use the concept of the element (i.e. a header or title) but replacing the format to a different style of your choosing. Edit: Continuing to use the concept and specific element but making further changes to improve upon it. Make sure to further elaborate on the edits to be made. For example, keeping the image but resizing it, requesting to move the text below the image, removing a specific portion of the text, changing the wording on the titles, etc. |
Check out these trainings for further tips on emails and client communication: