There are two ways to set up automatic delayed release of Lectures Online recordings. You can set up recordings to be delayed a specific number of days after the class meeting, or you can select specific days for all recordings up to that day are released.
You can also hide all recordings all at once if you want to make a few recordings available to students or if you only want to share recordings with specific students.
You can also hide specific recordings.
To access these options, log into your Canvas page for your course, click on the Lectures Online app in the elft navigation column, then click on the ‘Visibility’ link in the upper right corner.

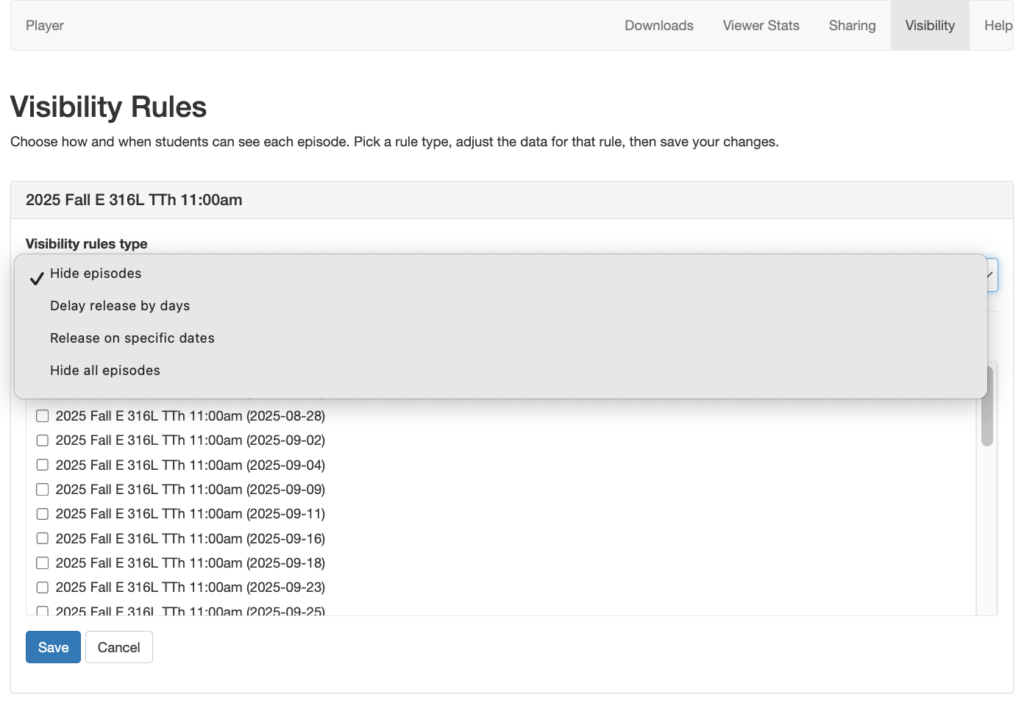
A ‘Visibility Rules’ page will load. Under your course title there is a drop down menu with four options. Information on how to ‘Delay release by days’, ‘Release on specific dates’, and ‘Hide all episodes is noted below. To learn how to hide a specific recording, click here.
How to delay release of recordings for a specific number of days after a class meeting
You can use this setup to allow students to view recordings after a specific delay of time after your course meeting. Recordings will appear grayed out to your students until the specified delay has expired. To set this up:
1. Select the ‘Delay release by days’ option under the Visibility rule types.
2. In the ‘Delay new recordings (days) box’ enter the number of days you want to delay. If you enter 1, this will release the day after your class meeting.
3. The standard release time is midnight. You can select a different time by entering a release time. Please note that this is a 24-hour clock so 09:05 is 9:05am and 21:05 is 9:05pm.
4. Press the ‘Save’ button.
If you want to hide a specific recordings after the delayed release time, you can click the box next to the recording title and then press the ‘Save’ button (noted on the image in the green rectangle).
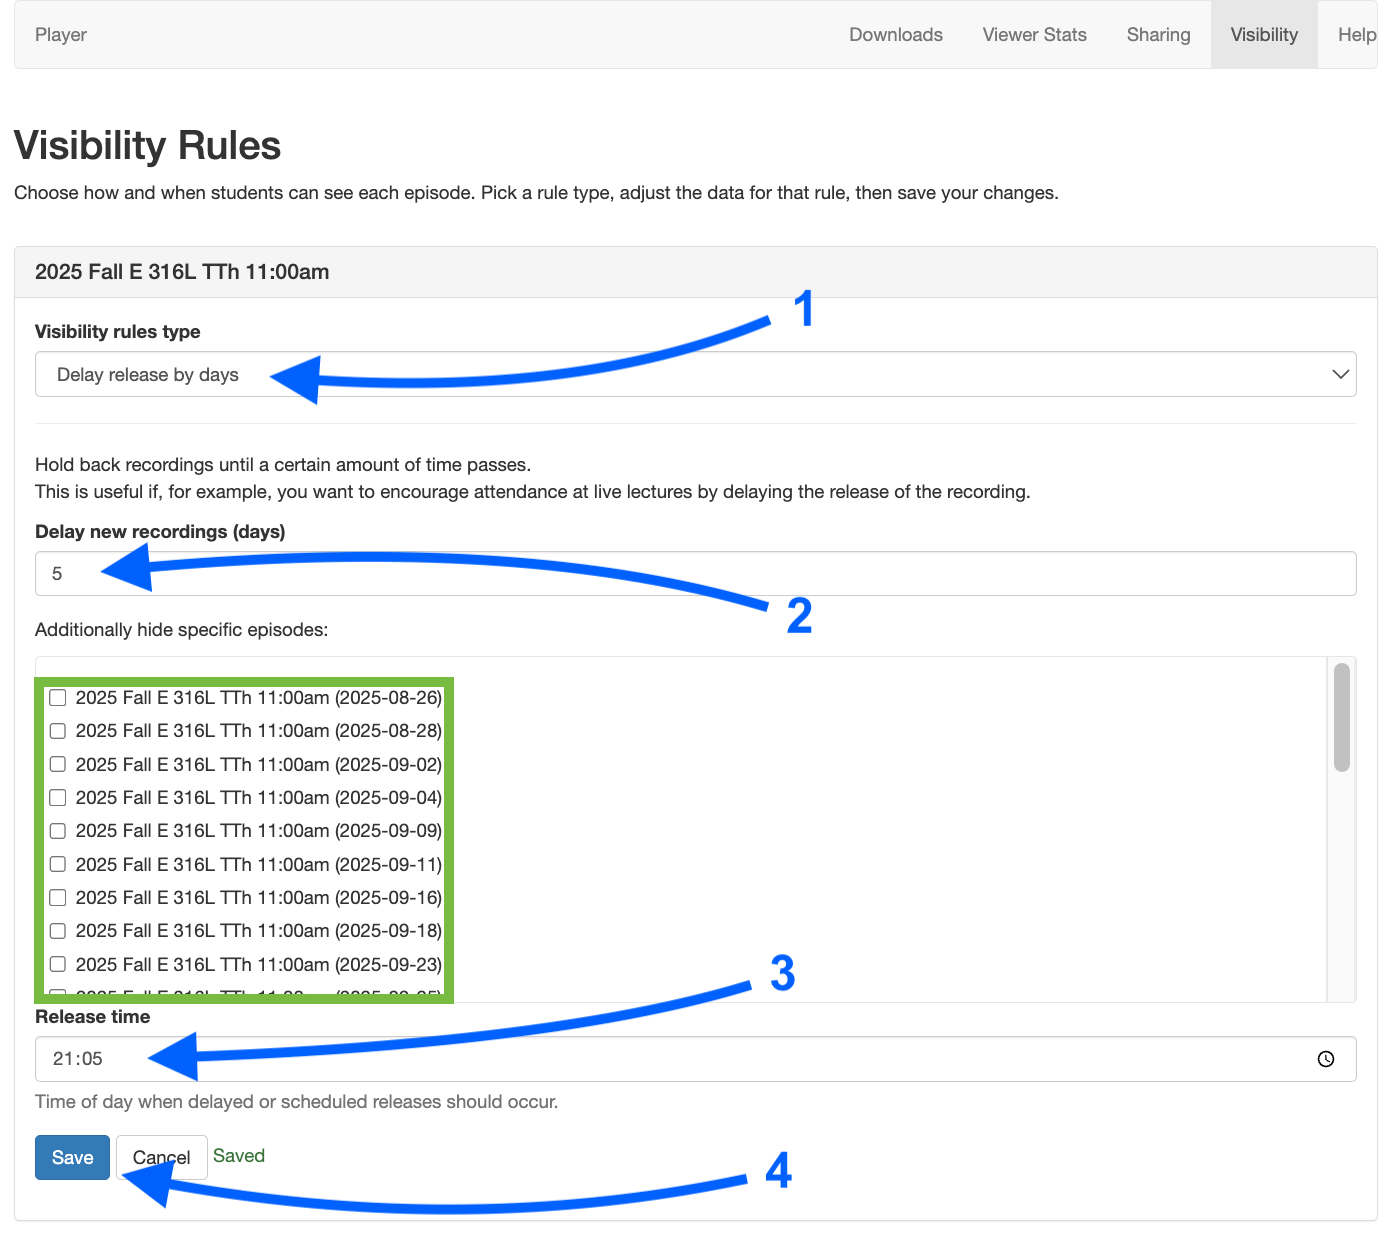
When this is set up, students will be able to see the name of the recording, but it will be grayed out and not able to play. Academic staff, such as instructors and TAs, will still be able to view the recording even when it is hidden from students.
You can change the duration of the delay recording release throughout the term.
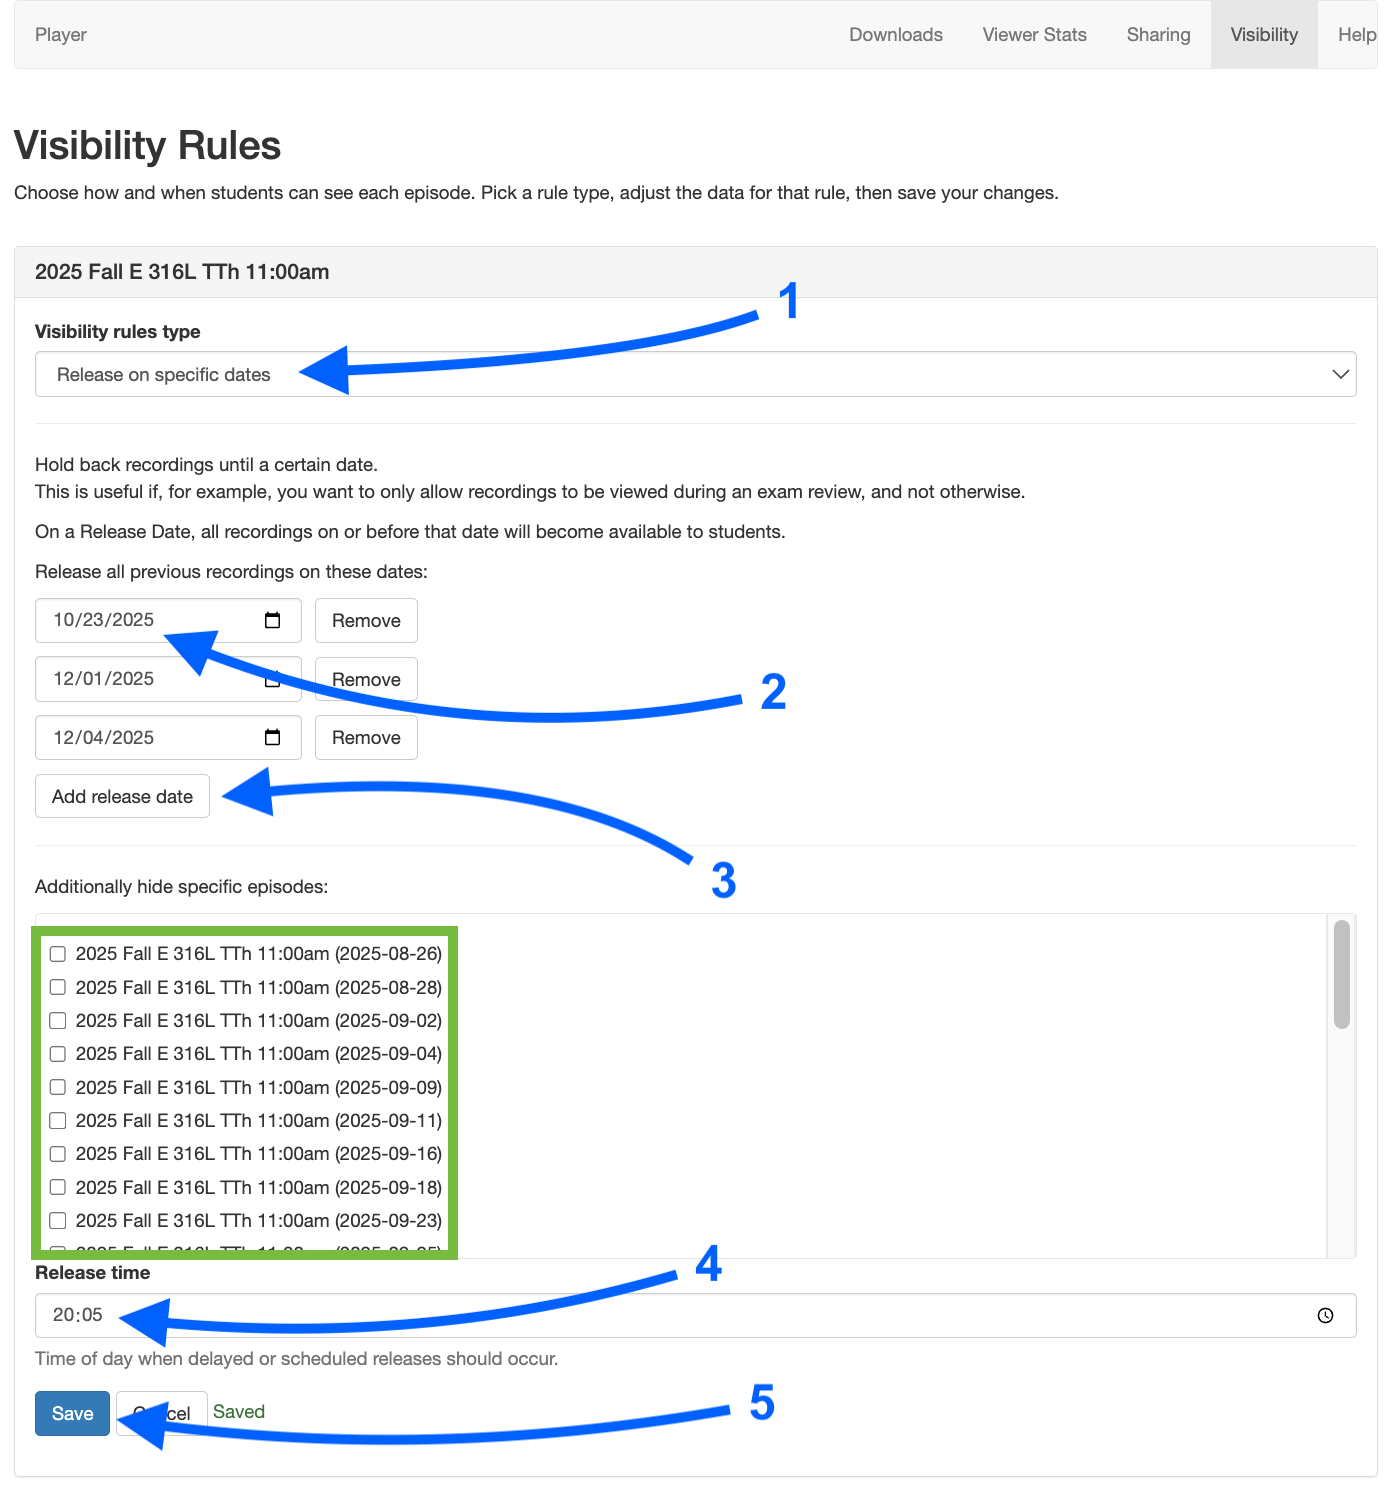
How to delay all recordings to a specific release date
You can use this setup to designate one or more release dates. On those designated dates, all recordings up to that date will be made available to students. This is useful if you want to only make recordings available before a test or other important day.
Please read the note under the image below regarding setup for release prior to a test.
Recordings will appear grayed out and not able to play for your students until the specified date, however academic staff in Canvas will be able to view the recordings. To set this up:
1. Select the ‘Release on specific days’ option under the Visibility rule types.
2. Under the ‘Hold back recordings until a certain date’ section, enter the date on which you want recordings to release. Note that this will make all recordings that have taken place up until that date and time available for viewing.
3. To add more dates, click on the ‘Add release date’ button.
4. The standard release time is midnight. You can select a different time by entering a release time. Please note that this is a 24-hour clock so 08:05 is 8:05am and 20:05 is 8:05pm.
5. Press the ‘Save’ button.
You can remove release dates by clicking the remove button next to the date.
If you want to hide a specific recording after the delayed specific release date, you can click the box next to the recording title and then press the ‘Save’ button (noted on the image in the green rectangle).
Important note about setup for release prior to an exam.
If you want to use this for a test, you should set the date prior to that of your exam. Also, you might need to setup multiple release dates to ensure your students will have time to review all recordings.
For example, if you teach a MWF course and have an exam on Monday the 25th of September, you might want to setup the 18th of Sept (Monday) for all recordings up to, and including, the 18th to release in order to allow your students time to review recordings before office hours and/or review sessions. You would then likely want to set Wednesday the 20th and Friday the 22nd as release dates so the recordings from these days will also be available to your students before the exam.
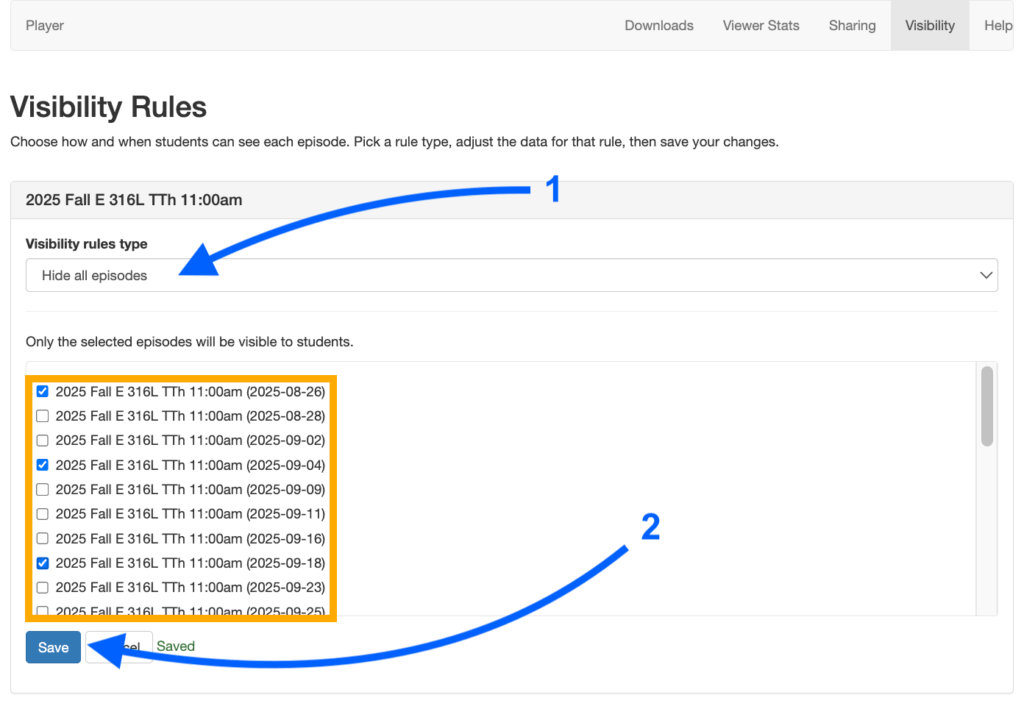
How to hide all recordings
You can use this setup in connection with selective sharing to allow on specific students, such as those with excused absences, to view recordings, or if you want to only make specific recordings available at a non-standard time during the semester.
Recordings will appear grayed out and not able to play for your students, however academic staff in Canvas will be able to view the recordings To set this up:
1. Select the ‘Hide all episodes’ option under the Visibility rule types.
2. Press the ‘Save’ button.
If you want to unhide (make available) a specific recording to all students in your course, you can click the box next to the recording title and then press the ‘Save’ button (noted on the image in the orange rectangle).